In this blog post we will look at the working of the DynamoDB using Python SDK Boto3.
I will be also covering the overview of DynamoDB and accessing the Dynamo DB using AWS Console, AWS CLI and finally through Python SDK. Also, we would be seeing a AWS service called Cloud9.
TOPICS that would be discussed
- What is DynamoDB ?
- DynamoDB in AWS Console
- DynamoDB using AWS CLI
- DynamoDB using Python SDK
1.Overview about DynamoDB
We should start agreeing on some basics that the reason why we have databases is for persistent and durable storage of the data, to manage large amount of data accurately and to ensure security of the data.
Just think for a minute, what if instead of database we are dependent on storing information using a simple storage service like S3 which is pure key value store!
These services have limited functionality, they only have the basic of indexes. What if we must group results in different way and if we want to retrieve them in sorted order?
This is where a database comes into picture. Databases stores information in a form that’s optimized for needs, where some fields are expected with frequent updates and with other requirements.
DynamoDB
Amazon DynamoDB is a fully managed, proprietary NoSQL Database service provided by Amazon under its AWS services. DynamoDB provides APIs allowing clients to query or make changes to the DynamoDB over the network.
Dynamo DB is a serverless Database, there’s no need to provision or installing or managing the software. Everything is serverless in terms of the database usage. The product automatically scales up or down based on the traffic
DynamoDB doesn’t care whether the traffic is public, from an EC2, or through a VPC.

2.DynamoDB in AWS Console
We will be creating a simple table in DynamoDB
The goal here is really to get comfortable with the structure of DynamoDB tables and inserting Items and learn to use console effectively.
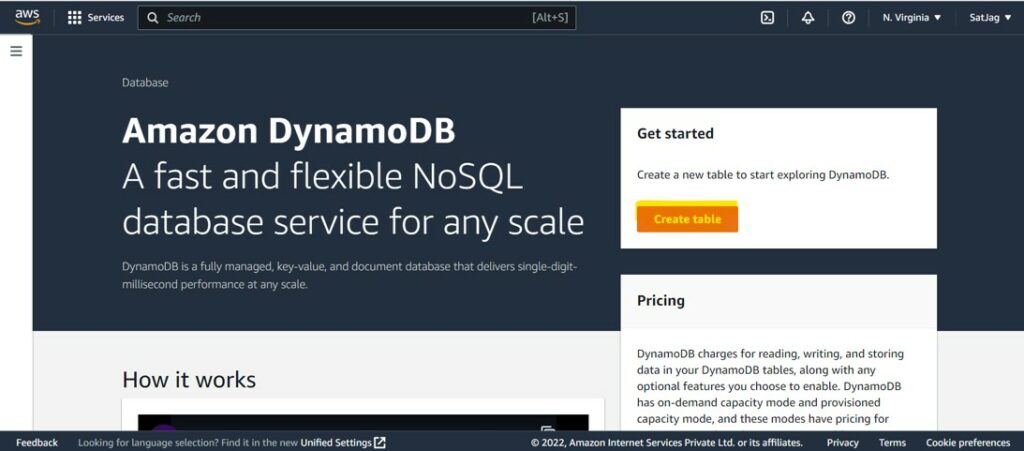
Step-1: Go to the AWS Management Console and then move to the DynamoDB part of the console.
The First thing you would see is an option to create table

Step-2: You could go ahead click on Create table and give the table name and followed by a Partition key (Primary Key) for uniquely identifying the items in the table and rest could be default and click create.

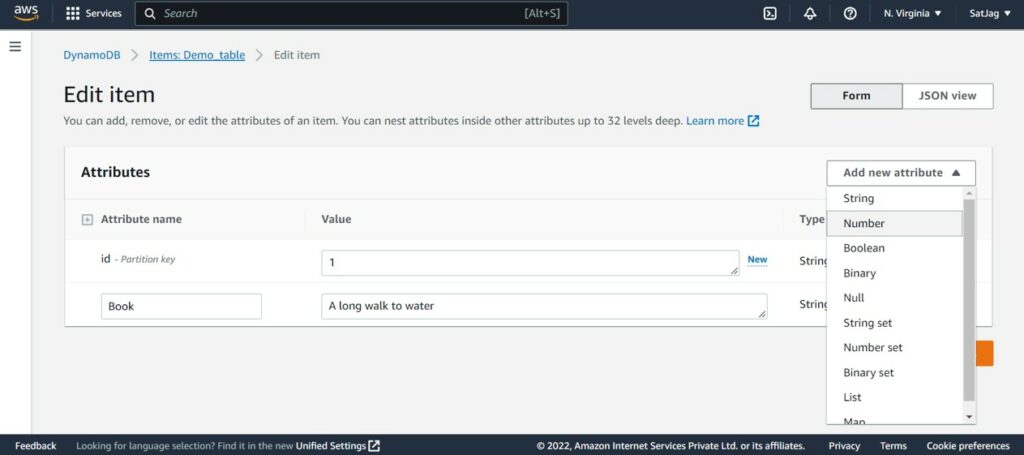
Step-3: Enter in your own items, use different values and attributes, you could see a dropdown option for selecting different attributes, also you could view the items in JSON form as well.
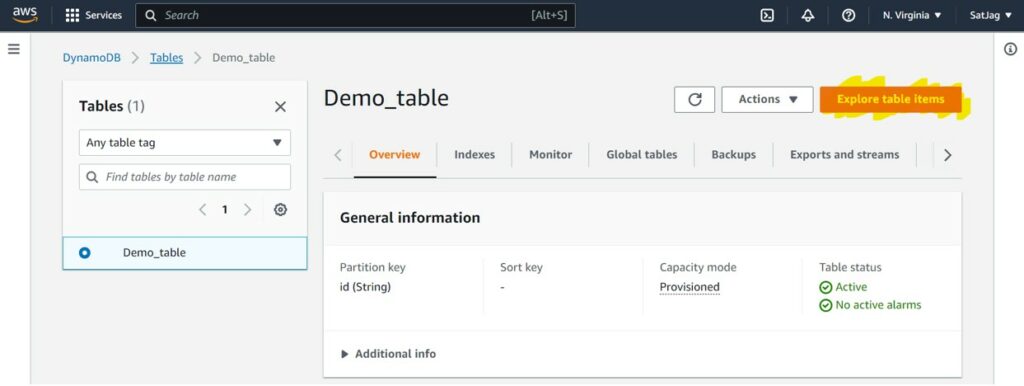
After Creating items, it would direct you to the items created, you can also view the items by
Tables -> < your table> -> Explore Table Items

Similarly, you can update the item in the table, delete the item and delete the whole table.
Try exploring the other options in the DynamoDB section. In Overview section of DynamoDB console you could find Items Summary and Table capacity metrics, which would show a lot of relevant information about the table.
Let’s see how to query the table in console.
Step 1: Click on Explore table items in your respective table created, In the top there would be option called scan or query and in the bottom section you would be able to view all your items created with in the table.
Step 2: Enter the Id of the item to retrieve a specific item in the query section and click on run it will return the item of the respective id entered.
Step 3: In real time the table would contain many rows and columns and if you want to filter out specific items, then we can add filter option to our query and then by entering the conditions we can filter out the required items from out table.

By now we have an idea how to manually create table also Insert, read, delete, update Items, and query the items from console.
We can pretty much build the whole complete DynamoDB application using simple shell script
We want to build some more automation and go beyond that console that we saw in the above section. Now, let’s see how to query and manage DynamoDB Tables using AWS CLI and Python.
3.Creating a table in DynamoDB directly through AWS CLI
AWS offers a command-line interface which can be installed on Windows, MAC, or Linux it allows easily to access and manage your AWS services and resources from your command shell.
To run the DynamoDB commands, you need to:
1.Install AWS CLI
sudo apt update
sudo apt install awscli
For upgrading an existing AWS CLI and or for more information click on this link
2.Configure AWS CLI
The following example shows sample values. Replace them with your own values as described in the following sections.
$ aws configure
AWS Access Key ID [None]: AKIAIOSFODNN7EXAMPLE
AWS Secret Access Key [None]: wJalrXUtnFEMI/K7MDENG/bPxRfiCYEXAMPLEKEY
Default region name [None]: us-west-2
Default output format [None]: json
The command line format consists of an DynamoDB command name, followed by the parameters for that command.
For Example: the below command creates a table named MusicCollection
aws dynamodb create-table \
    --table-name MusicCollection \
    --attribute-definitions AttributeName=Artist,AttributeType=S AttributeName=SongTitle,AttributeType=S \
    --key-schema AttributeName=Artist,KeyType=HASH AttributeName=SongTitle,KeyType=RANGE \
    --provisioned-throughput ReadCapacityUnits=1,WriteCapacityUnits=1
To list the AWS CLI commands for DynamoDB, use the following command
aws dynamodb helpSo behind the CLI and all the DynamoDB commands is a low-level API and this include a control for actions like to create table, update and delete the table and also for all of the data operations you can use with your tables .
Below we can see the list of those few low-level API’s, where we can insert an item, retrieve a item and update an item as well.

Language specific SDK’s provide a richer development experience around these low level API’s
To make use of those API’s for developers , AWS offer with in SDK for many popular languages .

In the below Section we will be using Python SDK .
The AWS SDK for Python is BOTO3
4.Working with DynamoDB using Python SDK through CLOUD9
We are going to use fully online cloud-based IDE called AWS cloud 9 .
We could have pretty much run the python scripts in AWS CLI or in Visual Studio Code but the reason behind choosing CLOUD9 is to explore this IDE service in AWS .
Topics that being covered in this section
- Setting up CLOUD9 Environment
- Executing Python Scripts in CLOUD9
- Low-level APIs in Python Scripts to work on DynamoDB
The example we are going through is an online bookstore application
CLOUD9
AWS Cloud9 is a cloud-based integrated development environment (IDE) that lets you write, run, and debug your code with just a browser.
There is no additional charge for AWS Cloud9. If you use an Amazon EC2 instance for your AWS Cloud9 development environment, you pay only for the compute and storage resources
First thing is we are going to create the environment in Cloud9 Move down to Cloud9 part in console
1.Move down to Cloud9 part in console

2.Click on create Environment and give a unique name for the environment and we can just choose to go with all the defaults. (cloud9 will create a small ec2 instance then you will be able to test some of the functionality, we’ll be running our python scripts there)
3.Review it and click create. This is going to take a little bit of time for that environment to be provisioned and prepared for you.
4. Once create click open under IDE column.


- On left side you would be able to see a window like with list of files and the editor at the main screen, finally down the bottom an actual shell.
- First thing is we will be creating the python scripts that we are going to be working with
Creating Table
1.Click on the file option at the top and create new file save it as .py extension in the under the environment created (In my case the file name is create_table.py and environment is Bookstore)

import boto3

# boto3 is the AWS SDK library for Python.
# We can use the low-level client to make API calls to DynamoDB.
client = boto3.client('dynamodb', region_name='us-east-2')

try:
    resp = client.create_table(
        TableName="Books",
        # Declare your Primary Key in the KeySchema argument
        KeySchema=[
            {
                "AttributeName": "Author",
                "KeyType": "HASH"
            },
            {
                "AttributeName": "Title",
                "KeyType": "RANGE"
            }
        ],
        # Any attributes used in KeySchema or Indexes must be declared in AttributeDefinitions
        AttributeDefinitions=[
            {
                "AttributeName": "Author",
                "AttributeType": "S"
            },
            {
                "AttributeName": "Title",
                "AttributeType": "S"
            }
        ],
        ProvisionedThroughput={
            "ReadCapacityUnits": 1,
            "WriteCapacityUnits": 1
        }
    )
    print("Table created successfully!")
except Exception as e:
    print("Error creating table:")
    print(e)
2.This script will call the create_table API and create the table for us in the specified region we are connected to boto3 client. here region is chosen as us-east-2
3.We are creating a table named Books and we need to define the primary key in key schema argument, partition key is given as Author and sort key is given as Title and both the data type are “S ”-> String and below we could see we have defined the Provisioned Throughput as read capacity 1 and write capacity 1 . (Provisioned Throughput controls the amount of data we can read or write to DynamoDB per second).
4. Install the SDK which is boto3, go ahead and type in the shell as
Sudo pip install boto3We can go ahead and run the script

Python ./<filename>
You could verify the table in DynamoDB console .
Inserting Data
1.let’s load some data into the table (books and their details in this example )
2. Create a separate python file for inserting data similar to the above steps.
dynamodb = boto3.resource('dynamodb', region_name='us-east-2')
table = dynamodb.Table('Books')

with table.batch_writer() as batch:
    batch.put_item(Item={"Author": "John Grisham", "Title": "The Rainmaker",
        "Category": "Suspense", "Formats": { "Hardcover": "J4SUKVGU", "Paperback": "D7YF4FCX" } })
    batch.put_item(Item={"Author": "John Grisham", "Title": "The Firm",
        "Category": "Suspense", "Formats": { "Hardcover": "Q7QWE3U2",
        "Paperback": "ZVZAYY4F", "Audiobook": "DJ9KS9NM" } })
    batch.put_item(Item={"Author": "James Patterson", "Title": "Along Came a Spider",
        "Category": "Suspense", "Formats": { "Hardcover": "C9NR6RJ7",
        "Paperback": "37JVGDZG", "Audiobook": "6348WX3U" } })
    batch.put_item(Item={"Author": "Dr. Seuss", "Title": "Green Eggs and Ham",
        "Category": "Children", "Formats": { "Hardcover": "GVJZQ7JK",
        "Paperback": "A4TFUR98", "Audiobook": "XWMGHW96" } })
    batch.put_item(Item={"Author": "William Shakespeare", "Title": "Hamlet",
        "Category": "Drama", "Formats": { "Hardcover": "GVJZQ7JK",
        "Paperback": "A4TFUR98", "Audiobook": "XWMGHW96" } })
3.In line 2 give the name of the table you have created (In my case it’s ‘Books’)
4.Here batch_writer is the API call to write the data into DynamoDB
5.After running the above file, you would be able to see the data inserted in DynamoDB console table


Retrieving the Data
1. Follow the same steps as above to create a python file and below is the code for getting a item. Here get_item is the low-level API call that DynamoDb supports to get the item from the table
import boto3

dynamodb = boto3.resource('dynamodb', region_name='us-east-1')
table = dynamodb.Table('Books')

resp = table.get_item(Key={"Author": "John Grisham", "Title": "The Rainmaker"})

print(resp['Item'])
2.For getting an item we must specify the exact primary key we are looking to retrieve .So, we have to provide both partition key and sort key (In this example I’m providing author as John Grisham and the title as Rainmaker)

Querying the Items
- Retrieving multiple items with Single request.
- Here query is the API call being used and also we need to mention which partition key we are looking at ( eq stands for equal).
import boto3
from boto3.dynamodb.conditions import Key

dynamodb = boto3.resource('dynamodb', region_name='us-east-1')
table = dynamodb.Table('Books')
resp = table.query(KeyConditionExpression=Key('Author').eq('John Grisham'))

print("The query returned the following items:")
for item in resp['Items']:
    print(item)
Updating an Item
- The update_Item API allows you to update a particular item as identified by its key.
We have to mention the attribute names and value for updating .
import boto3
dynamodb = boto3.resource('dynamodb', region_name='us-east-2')
table = dynamodb.Table('Books')
resp = table.get_item(Key={"Author": "John Grisham", "Title": "The Rainmaker"})
print("Before Update")
print(resp['Item'])
resp = table.update_item(
    Key={"Author": "John Grisham", "Title": "The Rainmaker"},
    ExpressionAttributeNames={
        "#formats": "Formats",
        "#audiobook": "Audiobook",
    },
    ExpressionAttributeValues={
        ":id": "8WE3KPTP",
    },
    UpdateExpression="SET #formats.#audiobook = :id",
)
resp = table.get_item(Key={"Author": "John Grisham", "Title": "The Rainmaker"})
print("After Update")
print(resp['Item'])

Delete table
1.Deleting a table is pretty much easy with an API call delete_table
import boto3

client = boto3.client('dynamodb', region_name='us-east-1')

try:
    resp = client.delete_table(
        TableName="Books",
    )
    print("Table deleted successfully!")
except Exception as e:
    print("Error deleting table:")
    print(e)


The entire table would be deleted.
I hope you found this blog helpful and insightful. Thanks for reading.
We Started Discussing what exactly is DynamoDB and we saw hands-on with DynamoDB manually in the console and then we tried other ways of accessing it by using AWS CLI to access directly our DynamoDB and Finally we used Python Scripts to access the DynamoDB through Cloud9 platform (which is also a service provided by AWS). Hope there was a good learning with this BLOG.
Thank you, Peace out .