Microsoft Azure, formerly known as Windows Azure or Azure, is Microsoft’s public cloud computing platform. It provides a range of cloud services, including compute, analytics, storage and networking. Users can pick and choose from these services to develop and scale new applications, or run existing applications in the public cloud. This article details how to backup and restore the virtual machines generated in Azure.
Azure Backup
Azure Backup is Microsoft’s solution to back up files, folders, physical machines, virtual machines (VMs), and applications stored on-premises or in the cloud. It is a straightforward backup solution that does not call for the installation of intricate tools on your network. Azure Backup does not charge for the data transferred during backup or recovery operations. It secures the data in transit and at rest. Backups can be retained for short or long-term data retention. Azure Backup’s configuration, scalability, and data recovery procedures are simple to follow. By regularly taking backups, you can secure your data. Depending on your use case, virtual machines (VMs) provide a variety of backup alternatives. Azure backups can be created through the Azure portal. This method provides a browser-based user interface to create and configure Azure backups and all related resources. The below steps explain how to back up the existing Azure VM.
For creating a backup, first we need to create a recovery services vault.A Recovery Services vault is a logical container that stores the backup data for each protected resource, such as Azure VMs. When the backup job for a protected resource runs, it creates a recovery point inside the Recovery Services vault. You can then use one of these recovery points to restore data to a given point in time.
To create a Recovery Services vault follow the below steps.
1. Sign in to your account in the Azure portal.
2. Search for Backup center in the Azure portal, and go to the Backup Center dashboard. The screen appears as shown below.

3. Select +Vault from the Overview tab.
4. Choose the Recovery Services vault and select continue.
5. Fill the recovery service dialog vault with appropriate answers. After completing the details, select review & create at bottom left. When you’re ready to create the Recovery Services vault, select Create.
6. The Recovery Services vault creation process might be time-consuming. Keep an eye on the status updates under the Notifications section in the portal’s top right corner. Your vault appears in the list of Recovery Services vaults after it has been created. Select Refresh if you can’t view your vault.
After creating the recovery vault, we need to apply a Backup policy. This policy explains how the backup should run.
1. Go to Backup center and click +Backup from the Overview tab.
2. Select Azure Virtual machines as the Datasource type and select the vault you have created. Then click Continue.
3. Assign a Backup policy. The default policy backs up the VM once a day. The daily backups are retained for 30 days. Instant recovery snapshots are retained for two days. If needed, you can create a backup policy, by selecting create new policy.

4. Under virtual machines, select ADD for adding the virtual machines for backup under the above created policy. The Select virtual machines pane will open. Select the VMs you want to back up using the policy. Then select OK. [ You can only select VMs in the same region as the vault]
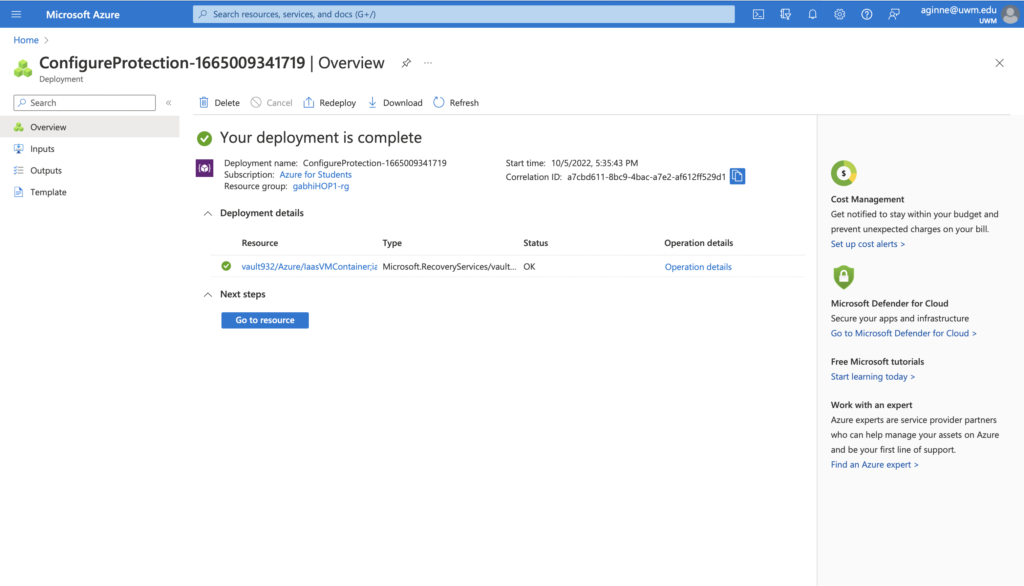
5. After successful deployment, the below picture appears on the screen.

There is an other method for the back up process.
1. Sign in to your account in the Azure portal.
2. Search for virtual machine in the Azure portal, go to the virtual machines service. Here select a VM which you wanted to provide a backup.

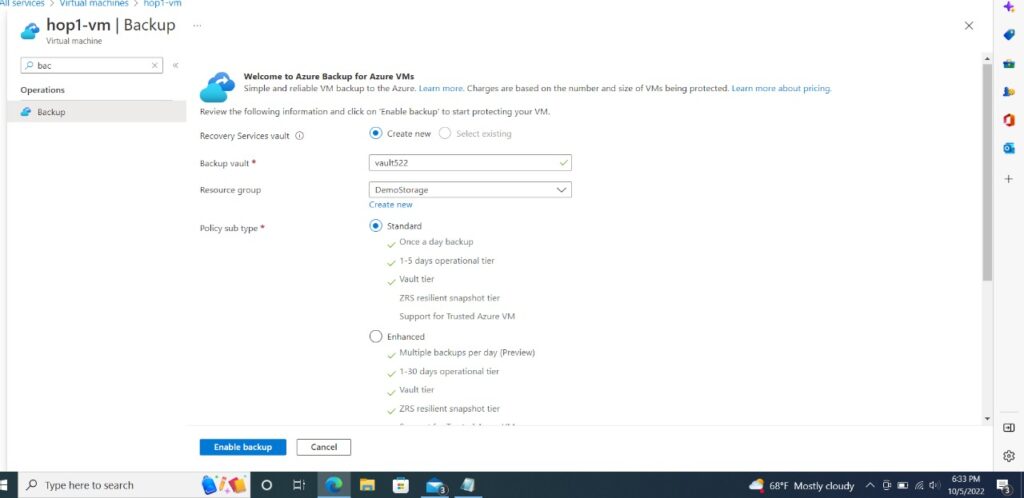
3. Under Operations tab, there is an option called Backup. Click on that.
4. For recovery service vault, select the existing one or you can create a new one.
5. If you are creating a new vault, name the vault under Backup vault. Also choose the resource group.
6. Choose appropriate policy sub type.
7. Under backup policy, like before you can edit it accordingly to the requirements.
8. After complete checkup, select enable backup below. After deployment a window is opened like above image(Deployment confirmation).
Backup Restore
Azure Backup provides several ways to restore a VM.
1. Create a new VM : Quickly creates and gets a basic VM up and running from a restore point. You can specify a name for the VM, select the resource group and virtual network (VNet) in which it will be placed, and specify a storage account for the restored VM. The new VM must be created in the same region as the source VM. If a VM restore fails because an Azure VM SKU wasn’t available in the specified region of Azure, or because of any other issues, Azure Backup still restores the disks in the specified resource group.
2. Restore disk : Restores a VM disk, which can then be used to create a new VM. Azure Backup provides a template to help you customize and create a VM. The restore job generates a template that you can download and use to specify custom VM settings, and create a VM. The disks are copied to the Resource Group you specify. Alternatively, you can attach the disk to an existing VM, or create a new VM using PowerShell. This option is useful if you want to customize the VM, add configuration settings that weren’t there at the time of backup, or add settings that must be configured using the template or PowerShell.
3. Replace existing : You can restore a disk, and use it to replace a disk on the existing VM. The current VM must exist. If it’s been deleted, this option can’t be used. Azure Backup takes a snapshot of the existing VM before replacing the disk, and stores it in the staging location you specify. Existing disks connected to the VM are replaced with the selected restore point. The snapshot is copied to the vault, and retained in accordance with the retention policy. After the replace disk operation, the original disk is retained in the resource group. You can choose to manually delete the original disks if they aren’t needed.Replace existing is supported for unencrypted managed VMs, including VMs created using custom images. It’s unsupported for classic VMs, unmanaged VMs, and generalized VMs. If the restore point has more or less disks than the current VM, then the number of disks in the restore point will only reflect the VM configuration. Replace existing is also supported for VMs with linked resources, like user-assigned managed-identity or Key Vault.
4. Cross Region (secondary region) : Cross Region restore can be used to restore Azure VMs in the secondary region, which is an Azure paired region. You can restore all the Azure VMs for the selected recovery point if the backup is done in the secondary region.During the backup, snapshots aren’t replicated to the secondary region. Only the data stored in the vault is replicated. So secondary region restores are only vault tier restores. The restore time for the secondary region will be almost the same as the vault tier restore time for the primary region. This feature is available for the options below:
– Create a VM
– Restore Disks
Azure don’t currently support the Replace existing disks option.
Permissions – The restore operation on secondary region can be performed by Backup Admins and App admins.
5. Cross Subscription Restore : Allows you to restore Azure Virtual Machines or disks to any subscription (as per the Azure RBAC capabilities) from restore points. You can trigger Cross Subscription Restore for managed virtual machines only. Cross Subscription Restore is supported for Restore with Managed System Identities (MSI). It’s unsupported from snapshots and secondary region restores. It’s unsupported for Encrypted Azure VMs and Trusted Launch VMs.
Process to Restore the VM:
To restore a VM (create a new VM), make sure you have the correct Azure role-based access control (Azure RBAC) permissions for the Restore VM operation. If you don’t have permissions, you can restore a disk, and then after the disk is restored, you can use the template that was generated as part of the restore operation to create a new VM.
1. Navigate to Backup center in the Azure portal and click Restore from the Overview tab.
2. Select Azure Virtual machines as the Datasource type, and then select a Backup instance.
3. Choose the required VM and click continue.
4. Now select the restore point to use for the recovery. In Restore Virtual Machine, select a restore option: (i) Create new (Use this option if you want to create a new VM. You can create a VM with simple settings, or restore a disk and create a customized VM) (ii) Replace existing (Use this option if you want to replace disks on an existing VM)
5. If you wanted to create a new VM, fill the required blank.
-> Restore type – Create new virtual machine.
-> Virtual machine name – Give a unique name, should not match with other existing
-> Resource group- select an existing resource group for the new VM, or create a new one with a globally unique name. If you assign a name that already exists, Azure assigns the group the same name as the VM.
-> Virtual network – select the VNet in which the VM will be placed. All VNets associated with the subscription in the same location as the vault, which is active and not attached with any affinity group, are displayed. Select the subnet. The first subnet is selected by default.
-> Staging Location – specify the storage account for the VM.
-> Choose the required subscription from the Subscription drop-down list to restore an Azure VM to a different subscription. Azure Backup now supports Cross Subscription Restore (CSR), you can now restore an Azure VM using a recovery point from default subscription to another. Default subscription is the subscription where recovery point is available.The following screenshot lists all subscriptions under the tenant where you’ve permissions, which enable you to restore the Azure VM to another subscription.
6. Select Restore to trigger the restore operation.
5 Tips for Azure Backup
Here are five tips to help you using Azure Backup:
1. Optimize disk performance: Backup processes can decrease disk performance. To fix this, you can schedule your backups when the machine experiences a low load. You can also restrict usage to no more than 20 disks simultaneously for the same backup schedule for a single storage account.
2. Keep in mind what cannot be backed up: Azure Backup doesn’t provide backup solutions for memory cards, removable disks, volume shadow copy service (VSS), and offline volumes. You also won’t be able to use Azure Backup if your volumes are protected by BitLocker, and you’re using any file system other than NTFS.
3. Remember data can be backed up and recovered at a file or folder level: Azure provides backup solutions not only for VMs, but also for files and folder. You can take advantage of this service by using Azure backup agents. If you want to restore a single file, don’t waste your time by restoring the entire VM. Instead, use the backup agents.
4. Cache folder restrictions: Keep in mind that you won’t be able to store your cache folder in removable disks, network share, and offline volumes.
5. Backup server renaming: When you rename the backup server, you will need to re-register it to the vault with the new name. Otherwise, all the backups will be stopped.