The Azure Blob Storage client library for Python allows you to manage blobs and containers in Azure Storage. In this article, we will go over the steps to install the library, create a project and try out example code for basic tasks such as creating a container and uploading blobs. We will also demonstrate how to authenticate to Azure and authorize access to your blob data.
Overview
Azure storage containers provide a powerful and secure way to store and manage files. With Python, you can easily create, write to, and delete files in an Azure storage container. Getting started we must achieve the following :
- Create a new directory to store, create and delete new files/folders.
- Install the packages and set up the framework for the application.
- To authenticate to Azure and authorize access to your blob data.
- Creating a container.
- Upload blobs to a container.
- List the blobs in a container.
- Download blobs from the container.
- Delete a container.
*REQUIRED:
1. Azure Storage account (if you don’t have one follow the link it takes less than 5 minutes)
2. Azure CLI installed on your pc (follow the link to install)
Create a new directory to store, create and delete new files/folders.
First, open a console window, such as PowerShell or Bash, and create a new directory for your project say: “azureblob”.
By typing:
mkdir azureblob
Then, switch to the newly created directory (azureblob) using the “cd” command and install the required packages using the “pip” install command.
This will include the Azure Blob Storage and Azure Identity client libraries: pip install azure-storage-blob azure-identity
cd azureblob
pip install azure-storage-blob azure-identity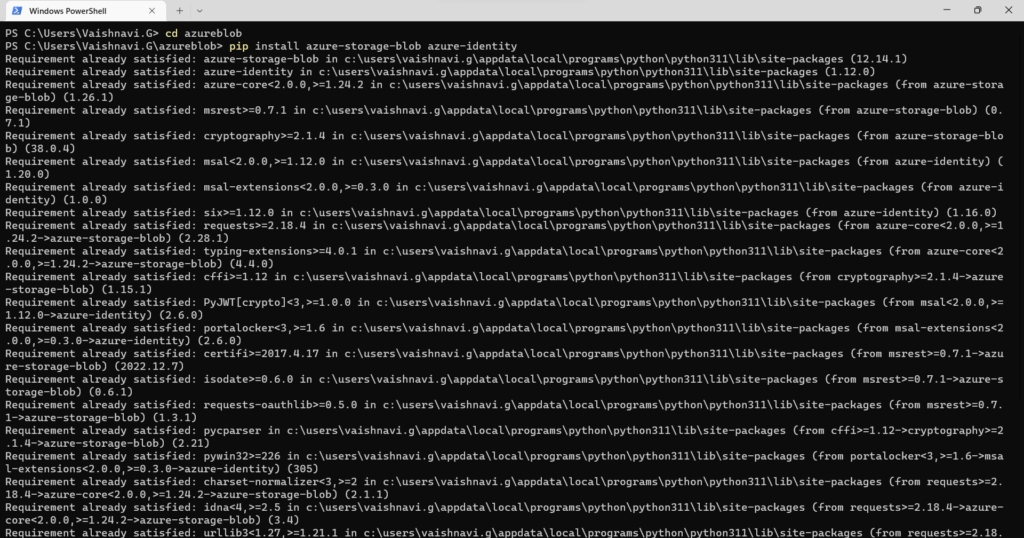
After the packages are installed, you can set up the basic structure of your app by creating a new text file in your code editor. Let’s use Visual Studio Code for this example.
- Launch Visual studio code (we will refer to it as vs code in our post)
- Open a new python text file.
- Save the file as “azureblob.py” in the project directory.

Install the packages and set up the framework for the application
Now that the Python file is in the right directory. Let’s add the necessary import statements and create the program structure, including basic exception handling.
import os,
from azure.identity import DefaultAzureCredential
from azure.storage.blob import BlobServiceClient, BlobClient, ContainerClient
Here,
The “os" module provides functions for interacting with the operating system, such as accessing environment variables and file paths. The uuid module provides functions for generating universally unique identifiers (UUIDs), which are used to identify objects in a unique and predictable way.
The “DefaultAzureCredential” class is part of the Azure Identity library and provides a default implementation of the “AzureCredential" interface. This class can be used to authenticate to Azure services using a variety of authentication methods, including managed identities, service principals, and shared access signatures.
The “BlobServiceClient" class is part of the Azure Storage Blob library and provides a high-level API for managing containers and blobs in Azure Blob Storage. This class can be used to create, list, and delete containers, as well as to create, list, read, update, and delete blobs within those containers.
The "BlobClient" class is also part of the Azure Storage Blob library and provides a lower-level API for working with blobs in Azure Blob Storage. This class can be used to upload, download, and delete blobs, as well as to retrieve information about a blob such as its type, size, and metadata.
The “ContainerClient" class is also part of the Azure Storage Blob library and provides an API for working with containers in Azure Blob Storage. This class can be used to create, list, and delete containers, as well as to retrieve information about a container such as its metadata and access policies.
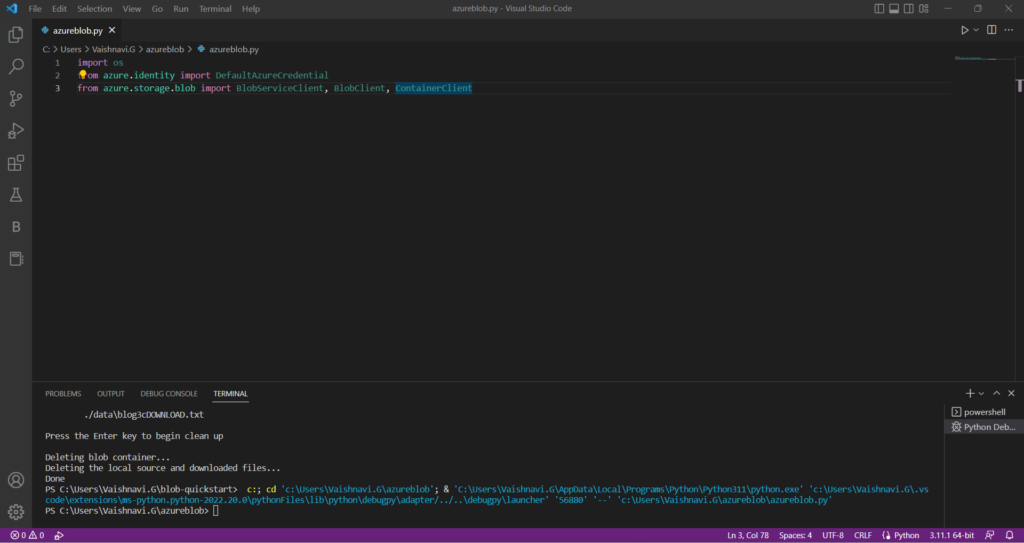
Now, we are ready to start working with the Azure Blob Storage client library for Python and begin managing blobs and containers in Azure Storage.
Our program will consist of two blocks ‘try‘ and ‘except‘. The code inside the ‘try‘ block will be intended to be the main body of the program and The ‘except‘ block that follows the ‘try‘ block is a handler for exceptions.
As ‘try’ block has multiple functionalities let’s leave it empty and define the ‘except’ block.
try:
    print("azureblob Storage Python Test")


except Exception as ex:
    print('Exception:')
    print(ex)
The Exception class is a base class for all exceptions in Python, and this except statement catches all exceptions that are derived from the Exception class.
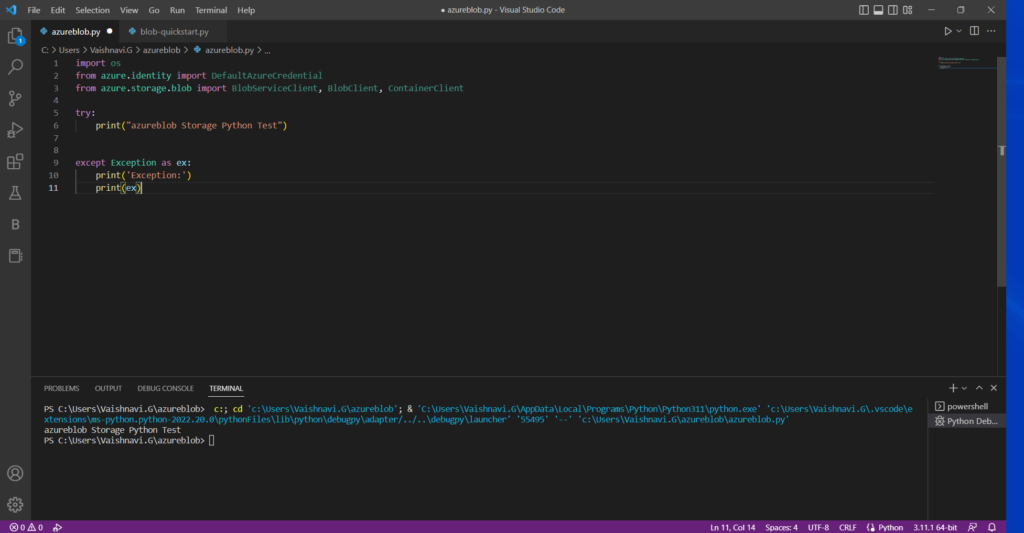
We now have the fundamental framework prepared.
To authorize access to blob data via Azure Portal
- Go to the Azure portal
- On the main search bar type storage accounts and select it.
- On the storage account overview page, select Access control (IAM) from the left-hand menu.
- On the Access control (IAM) page, select the Role assignments tab.
- Select + Add from the top menu and then Add role assignment from the resulting drop-down menu.
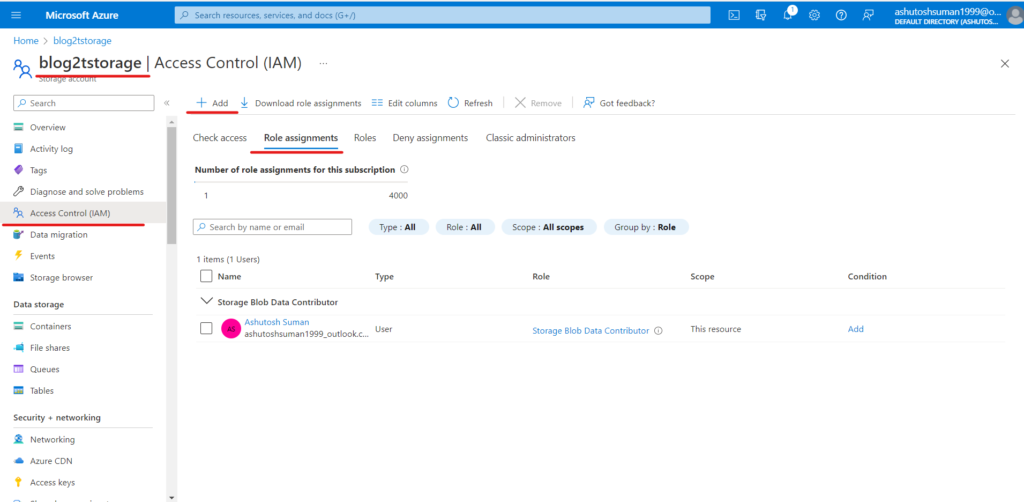
- Use the search box to filter the results to the desired role. For this example, search for Storage Blob Data Contributor and select the matching result and then choose Next.
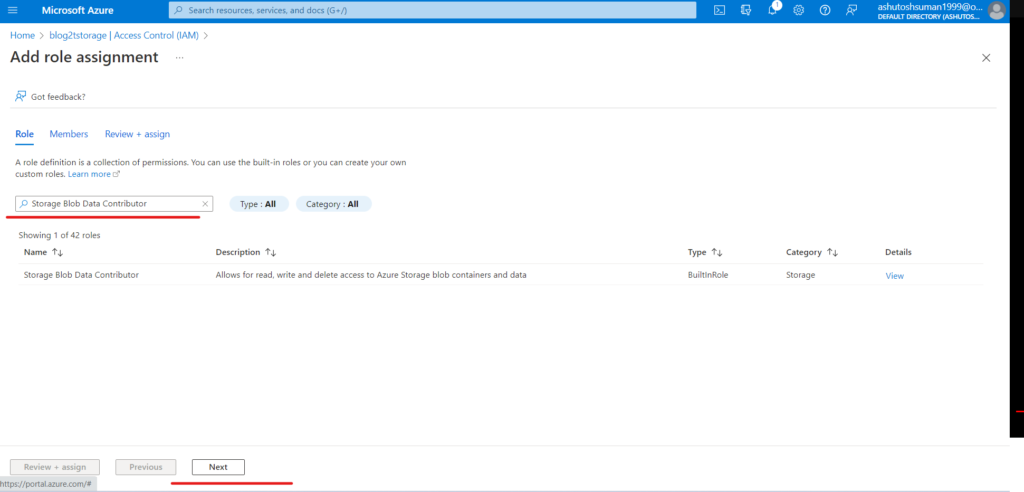
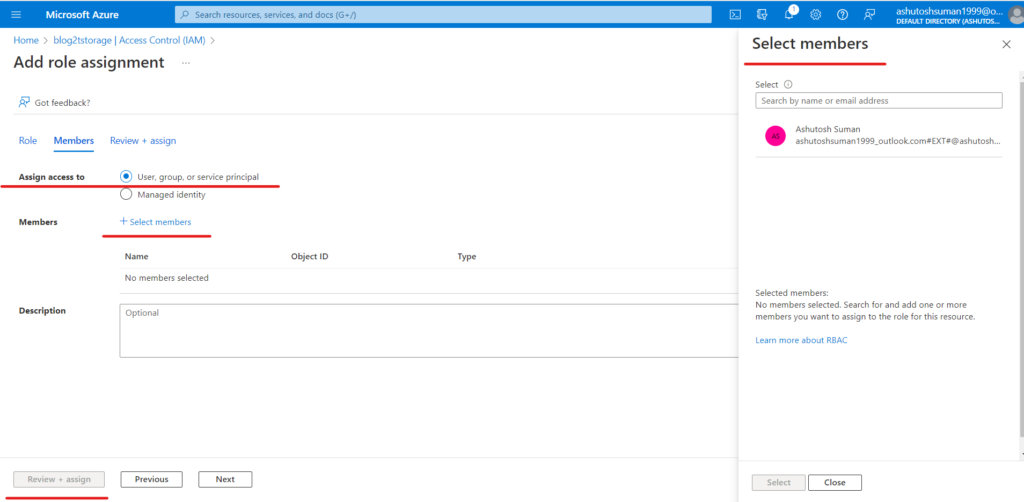
- Under Assign access to, select User, group, or service principal, and then choose + Select members.
- In the dialog, search for your Azure AD username (usually your user@domain email address) and then choose Select at the bottom of the dialog.
- Select Review + assign to go to the final page, and then Review + assign again to complete the process.
Now, let’s us authorize access to data in storage account:
The Azure CLI, Visual Studio Code, or Azure PowerShell are all options for authenticating. But, we will be doing it via VS code.
- Launch VS code
- On the main menu of Visual Studio Code, navigate to Terminal > New Terminal.
- Sign-in to Azure through the Azure CLI using the following command:
az login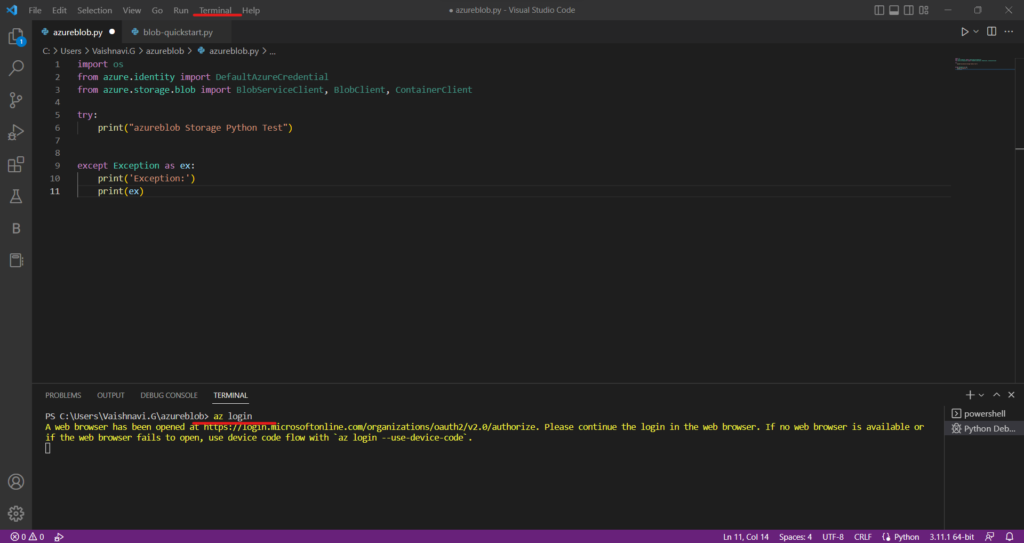
You will be redirected to login on your default web browser.
Ensure that the Azure AD account you used to provide the role to your storage account is the one you’re using for authentication.
Open the previously saved Python file (azureblob.py)
Now under the try block after the print statement paste the following:
account_url = "https://blog2tstorage.blob.core.windows.net"
default_credential = DefaultAzureCredential()

# Create the BlobServiceClient object
blob_service_client = BlobServiceClient(account_url, credential=default_credential)
replace the container name with yours in the code ( in this case “blog2tstorage” ) and save the program.
Creating a container
To create a new container in your storage account, you will need to decide on a name for the container and then use the create_container method to create it. To do this, you can add the following code to the end of the try block (i.e after the previous code):
# Create a name for the container
container_name = "blog2cont"

# Create the container
container_client = blob_service_client.create_container(container_name)
This code will create a container with the specified name using the blob_service_client object. You can replace “blog2cont” with the desired name for your container.
Upload blobs to a container
To upload blobs to a container we will be making a new file and uploading all together
paste the following code at the end of the try block and replace the “blog2file” in the 3rd line of the code with the file name of your choice.
# Create a local directory to hold blob data
local_path = "./data"
os.mkdir(local_path)

# Create a file in the local data directory to upload and download
local_file_name = "blog2file" + ".txt"
upload_file_path = os.path.join(local_path, local_file_name)

# Write text to the file
file = open(file=upload_file_path, mode='w')
file.write("Hello, World!")
file.close()

# Create a blob client using the local file name as the name for the blob
blob_client = blob_service_client.get_blob_client(container=container_name, blob=local_file_name)

print("\nUploading to Azure Storage as blob:\n\t" + local_file_name)

# Upload the created file
with open(file=upload_file_path, mode="rb") as data:
    blob_client.upload_blob(data)
Your program should look something like this
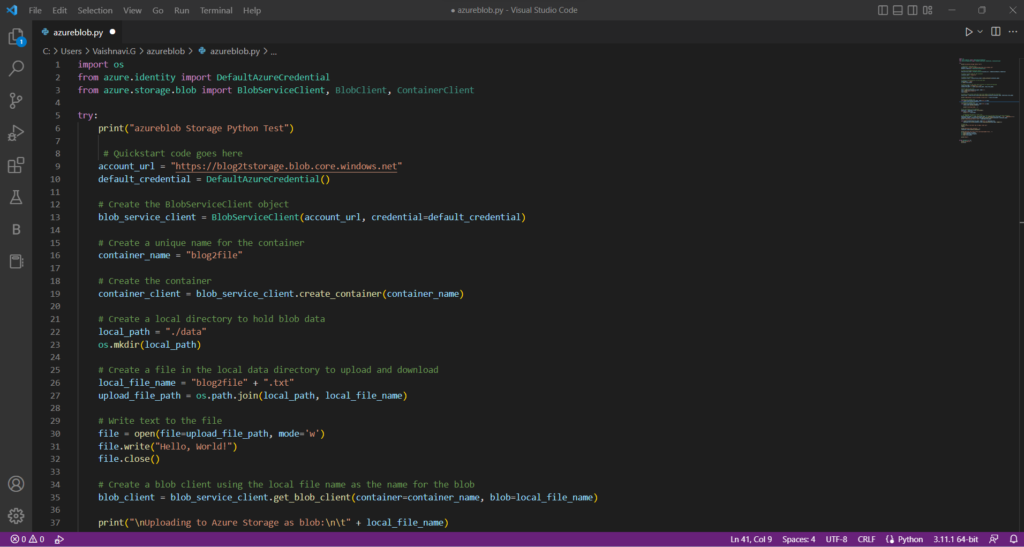
- The code in the snippet creates a local directory to hold data files, creates a text file in the directory, gets a reference to a BlobClient object using the BlobServiceClient, and then uploads the local text file to a blob using the upload_blob method.
- The file is opened in write mode and the string “Hello, World!” is written to it.
- The file is then uploaded to Azure Storage as a blob.
List the blobs in a container
To list the blobs in a container using the list_blobs method, you can add the following code to the end of the try block in your Python code:
print("\nListing blobs...")

# List the blobs in the container
blob_list = container_client.list_blobs()
for blob in blob_list:
    print("\t" + blob.name)
This code will print a list of all the blobs in the container.
Download blobs from the container
Inorder to download the already exsisting blobs in the container. Use the following code.
Paste it at the end of the try block:
# Download the blob to a local file
# Add 'DOWNLOAD' before the .txt extension so you can see both files in the data directory
download_file_path = os.path.join(local_path, str.replace(local_file_name ,'.txt', 'DOWNLOAD.txt'))
container_client = blob_service_client.get_container_client(container= container_name)
print("\nDownloading blob to \n\t" + download_file_path)

with open(file=download_file_path, mode="wb") as download_file:
 download_file.write(container_client.download_blob(blob.name).readall())
This code is for downloading a file (called a “blob” in this context) from a storage container in Azure Blob Storage. The code creates a container_client using the blob_service_client and the name of the container that contains the blob. It then prints a message to the user indicating the file path where the blob will be downloaded. Finally, it opens a new file with the specified name and writes the contents of the blob to this file. The file name has “DOWNLOAD” added before the “.txt” extension so that the original file and the downloaded file can be distinguished in the local file system.
your final program should look like this:
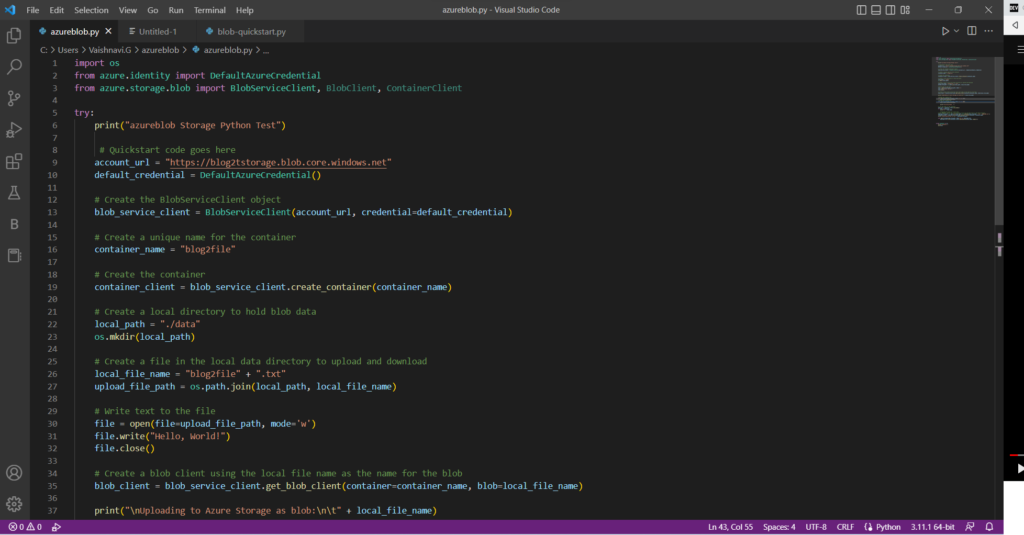
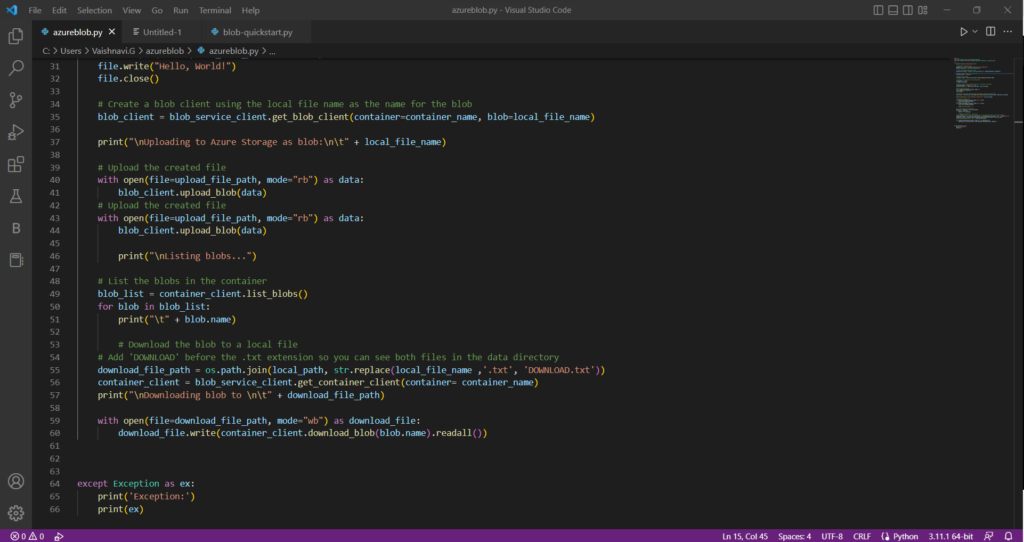
DON’T RUN IT YET!
Delete a container.
To Delete a container paste the following code at the end of a try block, so that any errors that occur during the clean up process can be handled by the corresponding except block.
# Clean up
print("\nPress the Enter key to begin clean up")
input()

print("Deleting blob container...")
container_client.delete_container()

print("Deleting the local source and downloaded files...")
os.remove(upload_file_path)
os.remove(download_file_path)
os.rmdir(local_path)

print("Done")
This code is for cleaning up resources that were created by the app. First, it prompts the user for input by calling the input() method, allowing the user to verify that the resources were created correctly before they are deleted. Then, it uses the container_client to delete the container containing the blob. Finally, it uses the os.remove() method to delete the local files that were created (the source file that was uploaded and the downloaded file). It also uses the os.rmdir() method to delete the local directory that was created. This code is intended to be added to the end of a try block, so that any errors that occur during the clean up process can be handled by the corresponding except block.
Now, let’s execute the program.
It creates a blob in the container and downloads the same file(blog2file.txt) to your local directory
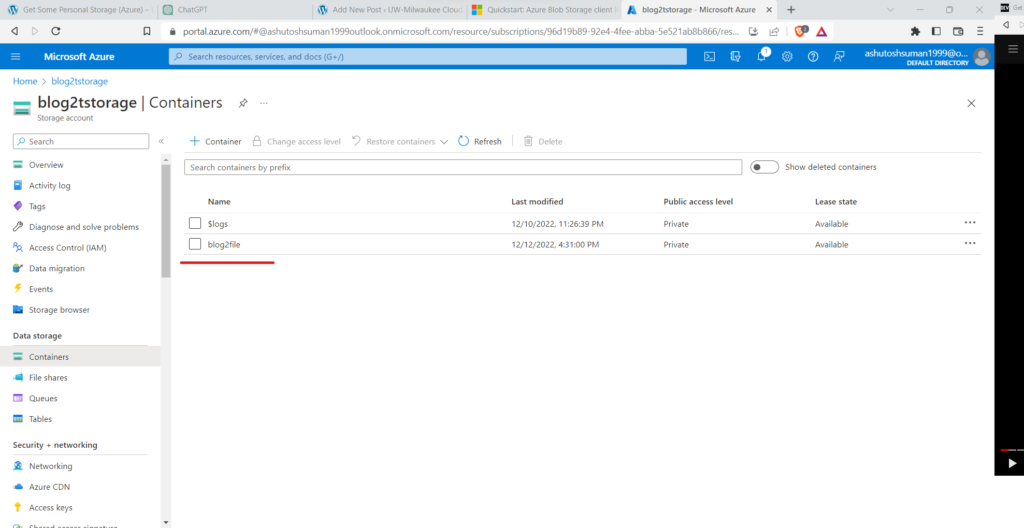

Now you should be able to see “Press the Enter key to begin clean up” message on your output screen.
Press enter to delete resources the app created.