Azure Queue Storage:
What is Azure Queue Storage?
Queue storage is a service that was created for the purpose of storing large number of messages. Azure Queues are simple but very powerful messaging service in Azure.
It is also currently a sub service of storage with another, therefore if you been already using blob storage then you already have access to the queue storage itself.
How does Azure Queue work?
Storage Account:
Multi-purpose storage service (blob, file, queue and table).
Geo-replication and security shared across services.
highly scalable
Max 20,000(1KiB) messages.
Explanation: It is part of the storage account, so it takes all the best features of the storage account like geo-replication and security and high scalability. It can only process 20,000 messages per second, and this assumes 1Kilo byte messages in this estimation)
(Under each storage account you can have one or multiple queues, usually separate queues are used by business logic like you can have incoming, outgoing orders and returns and processes them separately.
Queue:
Container for messages
Up to 500 TiB of data
Max 2,000 (1KiB) messages
Explanation: Each queue is a container for your messages, and it can store up to 500 Terabytes of data so it’s pretty much limitless scalability, but a single queue can process only 2000 messages per second so if you need more take a different approach, you can scale across multiple queues or maybe even multiple storage accounts.
Each queue within the account has a unique name. The name of the queue must be a valid DNS name and unchangeable. Below are the rules to name a queue:
- A queue name must be between 3 to 63 characters long.
- All alphabets must be in lowercase.
- Start the name with an alphabet or a number and can only contain alphabets, numbers, and the hyphen.
- The first and last characters must be only alphanumeric.
- Message
Messages:
A data in any format
Up to 64KB
Default time to live (TTL) is 7 days
Non-expiring messages (TTL of -1)
Explanation: Under each queue there are messages, and the message is pretty many data in any kind of format like JSON, binary, text, CSV etc. But a single message can only be up to 64 kilobytes of data because messages should be small, and it should only send key information and pull everything else from your database and any other data storing solution.
There’s something called time to live, so when you put a message on a queue by default if no one picks it up it will be there for seven days after and after seven days it will expire and get deleted automatically but we do have option for non-expiring messages i.e., we set the TTL time to live to -1.
Why would you want to use the queues?
When your application needs to store over 5 GB worth of messages in a queue where the messages have a lifetime of no more than 7 days.
When your application requires flexible leasing to process its messages. This allows messages to have a very short lease time so that if a worker crashes, the message can be processed again quickly. It also allows a worker to extend the lease on a message if it needs more time to process it, which helps deal with non-deterministic processing times of messages.
When your application wants to track the progress of processing a message inside of a message. This is useful if the worker processing a message crashes. A subsequent worker can then use that information to continue where the prior worker left off.
When you require server-side logs of all of the transactions executed against your queues.
If you have a storage in your SQL where you store your data and you have your applications, let’s say for each hundred users, you are going to have one instance of your web application just to scale up, and when new users start coming, you will auto scale with another application. But during heavy periods of traffic, you might encounter some issues, like maybe your database is too small or maybe your backend API is not good enough. Then you will hit those blocks and your application will start failing. How can you handle that scenario without simply increasing the database? Because you could always, as they call it, throw hardware at the problem, but that’s not the best design.
You can actually solve this design without paying more by adding a simple queue and outputting all the messages to the queue and then having some function handler or any other API that will grab these messages from this queue at a very steady rate that your database can handle This will pretty much flatten out, so of course, you’d notice a slowdown in the users’ requests, so that’s something you should think about.
What is the Azure Message Queue?
A collection of messages that are transmitted and received in a queue from application to application is referred to as an Azure Message Queue. Messages are held in queues until they can be received and processed by the receiving application.
On arrival, each communication is assigned a queue and given a time stamp. Without caring about customer availability, it makes sure that messages are securely transmitted to other applications. The Azure Message Queue, which can hold millions of messages, also helps to balance different workloads.
How to use Azure Queue Storage from PowerShell?
Common Queue Storage operations:
- Create a queue
- Retrieve a queue
- Add a message
- Read a message
- Delete a message
- Delete a queue
This requires the Azure PowerShell (Az) module v0.7 or later. Run Get-Module -ListAvailable Az to find the currently installed version.
There are no PowerShell cmdlets for the data plane for queues. To perform data plane operations such as add a message, read a message, and delete a message, you have to use the .NET storage client library as it is exposed in PowerShell. You create a message object and then you can use commands such as AddMessage to perform operations on that message. This article shows you how to do that.
Sign into Azure
Sign into your Azure subscription with the Connect-AzAccount command and follow the on-screen directions.
Retrieve list of locations
If you don’t know which location you want to use, you can list the available locations. After the list is displayed, find the one you want to use. This exercise will use eastus. Store this in the variable location for future use.
Power shell:
Get-AzLocation | Select-Object Location
$location = “eastus”
Create storage account
Create a standard general-purpose storage account with locally redundant storage (LRS) using New-AzStorageAccount. Get the storage account context that defines the storage account to be used. When acting on a storage account, you reference the context instead of repeatedly providing the credentials.
Power shell:
$storageAccountName = “howtoqueuestorage”
$storageAccount = New-AzStorageAccount -ResourceGroupName $resourceGroup -Name $storageAccountName
-Location $location `
-SkuName Standard_LRS
$ctx = $storageAccount.Context
Create a queue
The following example first establishes a connection to Azure Storage using the storage account context, which includes the storage account name and its access key. Next, it calls New-AzStorageQueue cmdlet to create a queue named howtoqueue.
Power shell:
$queueName = “howtoqueue”
$queue = New-AzStorageQueue –Name $queueName -Context $ctx
Retrieve a queue
You can query and retrieve a specific queue or a list of all the queues in a storage account. The following examples demonstrate how to retrieve all queues in the storage account, and a specific queue; both commands use the Get-AzStorageQueue cmdlet.
Power shell:
#Retrieve a specific queue
$queue = Get-AzStorageQueue –Name $queueName –Context $ctx
#Show the properties of the queue
$queue
#Retrieve all queues and show their names
Get-AzStorageQueue -Context $ctx | Select-Object Name
Add a message to a queue
Operations that impact the actual messages in the queue use the .NET storage client library as exposed in PowerShell. To add a message to a queue, create a new instance of the message object, Microsoft.Azure.Storage.Queue.CloudQueueMessage class. Next, call the AddMessage method. A CloudQueueMessage can be created from either a string (in UTF-8 format) or a byte array.
The following example demonstrates how to add a message to your queue.
Power shell:
#Create a new message using a constructor of the CloudQueueMessage class
$queueMessage = [Microsoft.Azure.Storage.Queue.CloudQueueMessage]::new(“This is message 1”)
#Add a new message to the queue
$queue.CloudQueue.AddMessageAsync($queueMessage)
#Add two more messages to the queue
$queueMessage = [Microsoft.Azure.Storage.Queue.CloudQueueMessage]::new(“This is message 2”)
$queue.CloudQueue.AddMessageAsync($queueMessage)
$queueMessage = [Microsoft.Azure.Storage.Queue.CloudQueueMessage]::new(“This is message 3”)
$queue.CloudQueue.AddMessageAsync($queueMessage)
Read a message from the queue, then delete it
The best-try-first-in-first-out method is used to read messages. This isn’t a given. All other processes viewing the queue are no longer able to see the message after you read it. This makes sure that another instance of your code can get the same message and try again if the first instance’s failure to handle the message was caused by a hardware or software issue.
The duration of the message’s invisibility before it becomes available for processing again is specified by this invisibility timeout. 30 seconds is the standard.
Your code reads a message from the queue in two steps. When you call the Microsoft.Azure.Storage.Queue.CloudQueue.GetMessage method, you get the next message in the queue. A message returned from GetMessage becomes invisible to any other code reading messages from this queue. To finish removing the message from the queue, you call the Microsoft.Azure.Storage.Queue.CloudQueue.DeleteMessage method.
In the following example, you read through the three queue messages, then wait 10 seconds (the invisibility timeout). Then you read the three messages again, deleting the messages after reading them by calling DeleteMessage. If you try to read the queue after the messages are deleted, $queueMessage will be returned as $null.
Power shell:
#Set the amount of time you want to entry to be invisible after read from the queue
#If it is not deleted by the end of this time, it will show up in the queue again
$invisibleTimeout = [System.TimeSpan]::FromSeconds(10)
#Read the message from the queue, then show the contents of the message. Read the other two messages, too.
$queueMessage = $queue.CloudQueue.GetMessageAsync($invisibleTimeout,$null,$null)
$queueMessage.Result
$queueMessage = $queue.CloudQueue.GetMessageAsync($invisibleTimeout,$null,$null)
$queueMessage.Result
$queueMessage = $queue.CloudQueue.GetMessageAsync($invisibleTimeout,$null,$null)
$queueMessage.Result
#After 10 seconds, these messages reappear on the queue.
#Read them again,but delete each one after reading it.
#Delete the message.
$queueMessage = $queue.CloudQueue.GetMessageAsync($invisibleTimeout,$null,$null)
$queueMessage.Result
$queue.CloudQueue.DeleteMessageAsync($queueMessage.Result.Id,$queueMessage.Result.popReceipt)
$queueMessage = $queue.CloudQueue.GetMessageAsync($invisibleTimeout,$null,$null)
$queueMessage.Result
$queue.CloudQueue.DeleteMessageAsync($queueMessage.Result.Id,$queueMessage.Result.popReceipt)
$queueMessage = $queue.CloudQueue.GetMessageAsync($invisibleTimeout,$null,$null)
$queueMessage.Result
$queue.CloudQueue.DeleteMessageAsync($queueMessage.Result.Id,$queueMessage.Result.popReceipt)
Delete a queue
To delete a queue and all the messages contained in it, call the Remove-AzStorageQueue cmdlet. The following example shows how to delete the specific queue used in this exercise using the Remove-AzStorageQueue cmdlet.
Power shell:
#Delete the queue
Remove-AzStorageQueue –Name $queueName –Context $ctx
Clean up resources
Remove the resource group to get rid of all the assets you made for this exercise. Additionally, this eliminates all resources that are part of the group. Both the newly formed storage account and the resource group itself are deleted in this instance.
Power shell:
Remove-AzResourceGroup -Name $resourceGroup
Queue Names:
Every queue within an account must have a unique name. The queue name must be a valid DNS name and cannot be changed once created. Queue names must confirm to the following rules:
- A queue name must start with a letter or number, and can only contain letters, numbers, and the dash (-) character.
- The first and last letters in the queue name must be alphanumeric. The dash (-) character cannot be the first or last character. Consecutive dash characters are not permitted in the queue name.
- All letters in a queue name must be lowercase.
- A queue name must be from 3 through 63 characters long.
Create a queue and add a message with the Azure portal:
Create a queue
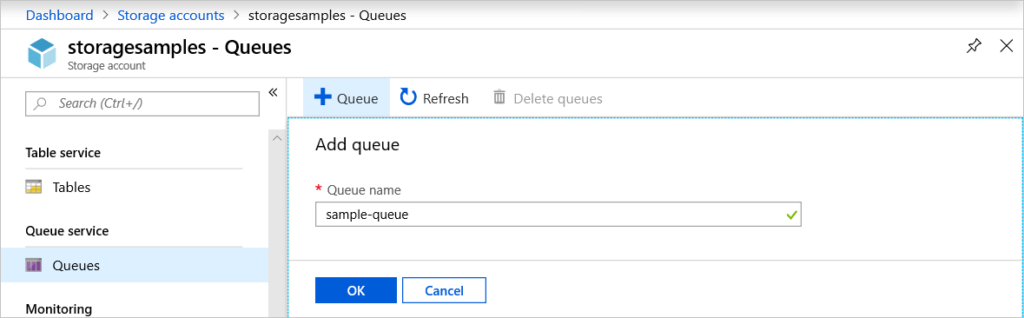
To create a queue in the Azure portal, follow these steps:
- Navigate to your new storage account in the Azure portal.
- In the left menu for the storage account, scroll to the Queue Storage section, then select Queues.
- Select the + Queue button.
- Type a name for your new queue. The queue name must be lowercase, must start with a letter or number, and can include only letters, numbers, and the dash (-) character.
- Select OK to create the queue.
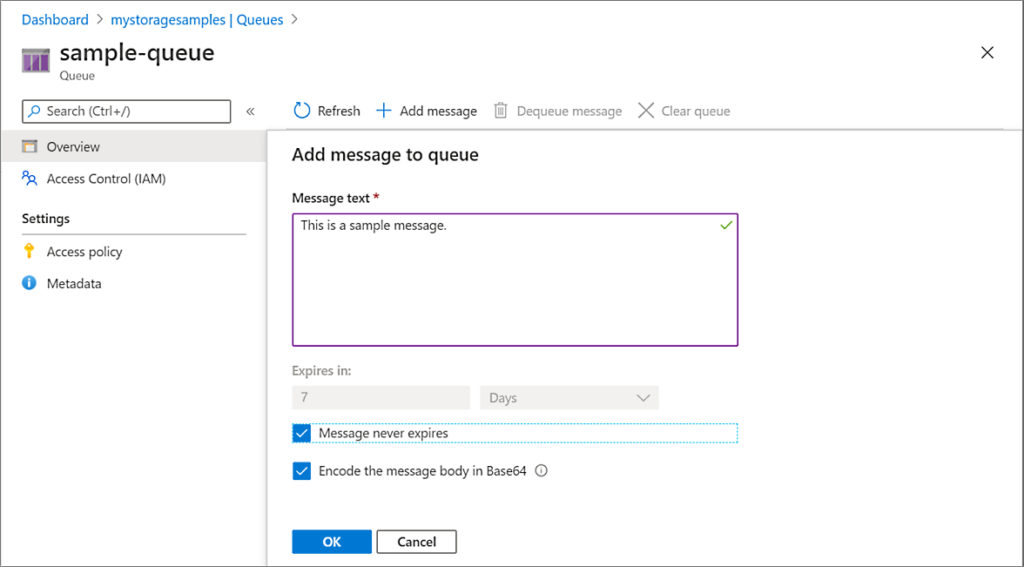
Add a message
Next, add a message to the new queue. A message can be up to 64 KB in size.
- Select the new queue from the list of queues in the storage account.
- Select the + Add message button to add a message to the queue. Enter a message in the Message text field.
- Specify when the message expires. Valid values that can be entered in the Expires in field are between 1 second and 7 days. Select Message never expires to indicate a message that will remain in the queue until it is explicitly removed.
- Indicate whether to encode the message as Base64. Encoding binary data is recommended.
- Select the OK button to add the message.
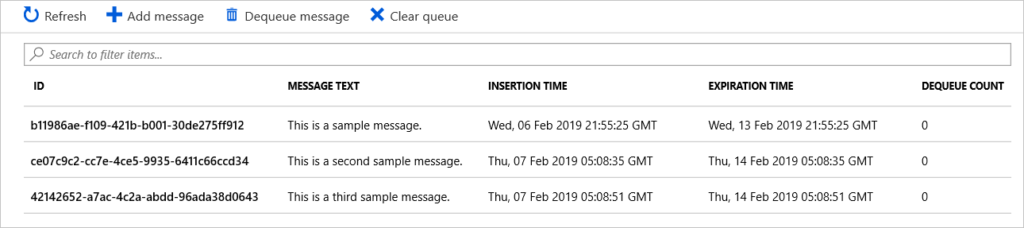
View message properties
The Azure portal shows a list of all the messages in the queue when you add a message. You may see the message ID, the message’s content, its insertion time, and its expiration time. Additionally, you can observe how frequently this message has been dequeued.
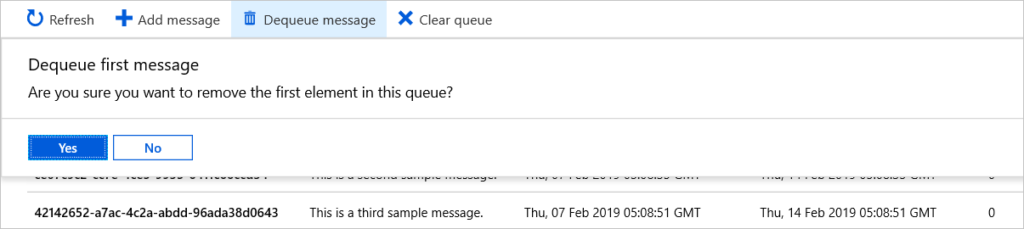
Dequeue a message
From the Azure portal, you can dequeue a message from the front of the queue. A message is erased when it is dequeued.
The oldest message in the queue is always removed when dequeuing.
Limitations of Azure Queue:
By leveraging HTTP and HTTPS to make authenticated calls, it enables users to access messages from anywhere in the world.
Additionally, a single message can only be 64kb in size at most. However, the number of messages that can fit in a queue at any given time depends on the storage account.