This is step 2 of 6 of Hands-On Project 2 for both Azure and AWS. In this step, you install the Ubuntu Desktop GUI over Ubuntu Server in the cloud, and gain access to the GUI using Remote Desktop Protocol (RDP). This setup provides you with the conveniences of a windowed environment for doing software development.
Install Ubuntu Desktop
The first step in the process is to install the Ubuntu Desktop itself. Connect to your virtual machine with SSH and open a terminal window. Then start by updating your cached package information:
sudo apt updateIf it has been a long time since you updated software on your VM, or there are a large number of package upgrades available, consider upgrading your installed packages to the latest versions. If you are confident in your installed software versions, skip this step to save time:
sudo apt upgradeNext, install Ubuntu Desktop and some of the packages needed to support it. When prompted, answer yes. Note that this install runs for a while, so be patient. (By running this on a cloud server, it probably runs faster than if you were doing this on a home computer).
sudo apt install ubuntu-desktopsudo apt install tightvncserversudo apt install gnome-panel gnome-settings-daemon metacity nautilus gnome-terminalConfigure and Start Your Xvnc Server
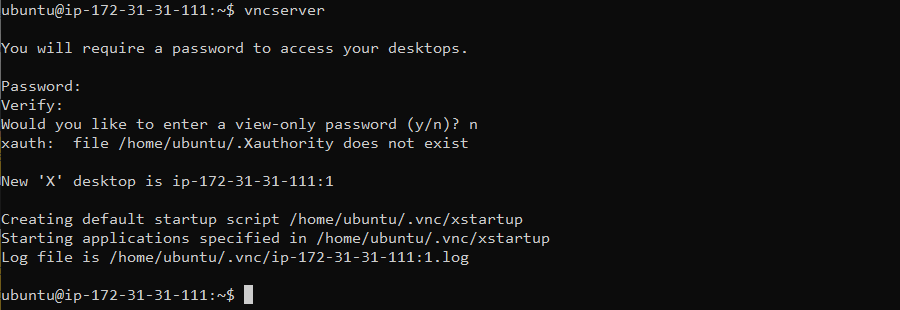
Ubuntu Desktop relies on a desktop server to be able to render a windowed environment on Linux. The vncserver command is a Perl script that starts a VNC (Virtual Network Computing) desktop. The startup process requires that you enter a few configuration parameters. Run the following command:
vncserverYou will be prompted for a password, followed by the option to enter a view-only password. For the first password, use only up to 8 characters for the password. The full software stack we are using will not support passwords longer than 8 characters. The view-only password will not be needed, and you can skip it. Here is what the process looks like:
Install the Remaining Software Packages
We need the Lightweight X Desktop Environment (lxde) package:
sudo apt install lxde -yAnd the xrdp package to support Remote Desktop Protocol clients:
sudo apt install xrdp -ySet a Password for Your Main Account On Ubuntu
When logging in with RDP, you will be accessing your main account on Ubuntu. On your AWS EC2 instance, we have been using the default account of ‘ubuntu’ that was assigned when you created the instance. On your Azure virtual machine, you may have used ‘ubuntu’ as your user name, or you may have accepted Azure default (‘azureuser’), or you may have assigned your own user name. For the following, use whatever account name you have been using for this virtual machine and set a password. Important: For this password, use the same password that you supplied for the vncserver command above. This will assure that your login will go smoothly:
sudo passwd ubuntuTurn Off Animations to Improve Performance
By default, Ubuntu Desktop does some nice animations as you are navigating the desktop. However, if you will be running your remote desktop on a slower internet connection, you will notice a distinct performance degradation if you leave the animations turned on. You can turn off the animations with the following command:
gsettings set org.gnome.desktop.interface enable-animations false First Login With Remote Desktop Protocol
Since we are using the BitVise SSH client for this series of exercises, we can use our existing SSH connection to login using RDP. On the first login, there are several things to click through before you are fully up and running on Ubuntu Desktop. Please perform the following steps to complete the first login:
- At the left of the BitVise SSH Client window, click on New Remote Desktop. If prompted, click Connect to connect anyway.
- At the login dialog, enter your main account name and the (shortened) password and click to login.
- You will likely see a dialog labeled Authentication Required. This is a one-time setup. Re-enter your shortened password and click Authenticate.
- You will likely see a dialog indicating that there is a new version of Ubuntu Linux available – 22.04. We specifically want to stay with Ubuntu 20.04, so click on Don’t Upgrade and then OK.
- Once you get to the Welcome screen, you can click through with Next, taking all the defaults until you get a Start Using Ubuntu button. Click on Start Using Ubuntu.
- You will likely see a prompt to Save History. Please click No on this dialog.
- You will likely receive a prompt indicating that there is updated software for Ubuntu 20.04. Click on Remind Me Later, unless you want to go through a potentially lengthy software update at this point.
- For convenience, you will want to add several applications to your Favorites. The Favorites show up when you click on “Activities” in the upper-left corner of your screen. To add to favorites:
- Click on Activities –> Show Applications. At top of screen, type the word ‘terminal’. When Terminal appears, right-click on it and then Add to Favorites.
- Click on Activities –> Show Applications. At top of screen, type the word ‘text’. When Text Editor appears, right-click on it and then Add to Favorites.
- Click on Activities –> Show Applications. At top of screen, type the word ‘settings’. When Settings appears, right-click on it and then Add to Favorites.
- By default, Ubuntu Desktop will blank your RDP screen after 5 minutes. When this happens, you will not be able to reactivate Ubuntu Desktop without logging out and back in again. To fix this issue, Click on Activities –> Settings –> Power. Change the Blank Screen setting to Never.
At this point, you can logout or continue working. To logout, click on the Power button at upper right of screen, then click Power Off / Log out –> Log out.