If you’re in need of a way to send email notifications from your Azure Function App, look no further! In this tutorial, we will show you how to utilize the SendGrid service inside of your Function App to easily send notification emails to relevant stakeholders.
Overview
To achieve this we create a new Azure Function with a Timer trigger, and use the built-in SendGrid binding service in Azure to send the emails. This allows us to easily schedule the function to run at specific times or on a regular interval, using the CRON expression syntax.
To set up the function app, we will need to perform the following steps:
- Create Azure resources
- create a SendGrid account.
- generate an API key.
- create a PowerShell function to interact with the SendGrid API,
- And further integrate the PowerShell function into the Function App.
What is Azure Functions?
Azure Functions is a serverless compute service that enables you to run code on-demand without having to explicitly provision or manage infrastructure. It provides a way to write and deploy code in a variety of programming languages, including C#, F#, Node.js, Python, and PHP. Functions can be triggered by a variety of events, such as HTTP requests, timers, or changes in data, and they can be integrated with other Azure services to build powerful and scalable applications. Azure Functions is a cost-effective solution that allows us to focus on writing and deploying code, without worrying about the underlying infrastructure.
What is Time trigger?
A time trigger in Azure is a type of trigger that allows you to schedule a function to run at a specific time or on a recurring schedule. For example, you could use a time trigger to automatically run a function every day at a specific time, or to run a function every hour on the hour. Time triggers are often used to perform wide range of tasks such as running regular backups, sending out email notification, newsletters, updates, or reminders to your users or customers or performing maintenance tasks.
You can also use the SendGrid API to customize the content and format of the emails, and track their delivery and performance.
Overall, using a Timer trigger in Azure Functions to send regular email notifications can be a convenient and efficient way to keep your users informed and engaged, without having to manually manage the sending process.
1. Create Azure resources
To set up the function app, we will need to create the necessary Azure resources ( resource group, PowerShell Function App…). This can be done manually or by using a PowerShell script.
Creating each resources from azure portal can be tedious task so we will be using a script to create everything required.
Let’s get started:
- Open Visual studio code and a new terminal window
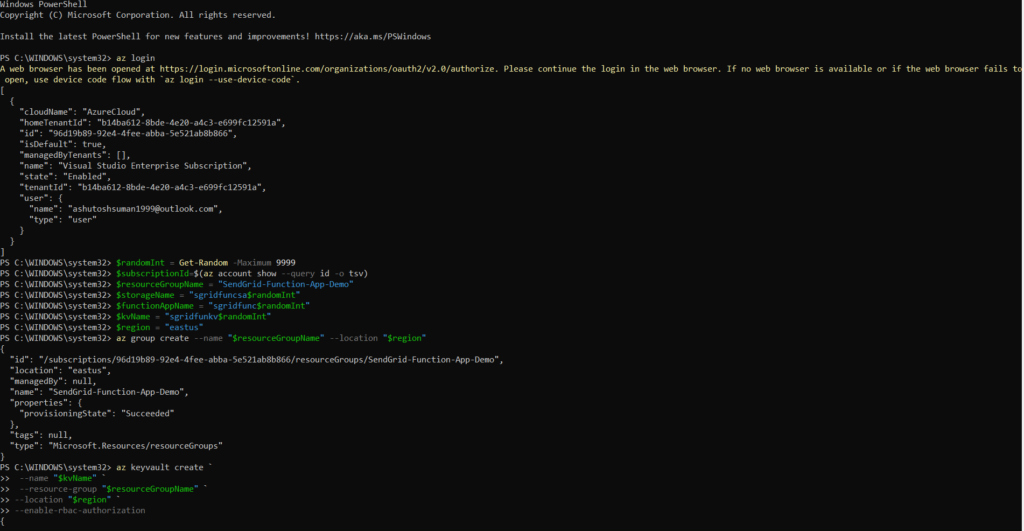
- Type the following command in the terminal to Log into Azure account [ Make sure you have AZURE CLI installed on your system]:
az loginOnce logged in you will see this in the browser:

and this on the terminal screen in the visual studio code:

Now let’s run the script to create the function app resources and configure the environment.
copy and paste the script below into your terminal:
# Setup Variables.
$randomInt = Get-Random -Maximum 9999
$subscriptionId=$(az account show --query id -o tsv)
$resourceGroupName = "SendGrid-Function-App-Demo"
$storageName = "sgridfuncsa$randomInt"
$functionAppName = "sgridfunc$randomInt"
$kvName = "sgridfunkv$randomInt"
$region = "eastus"

# Create a resource resourceGroupName
az group create --name "$resourceGroupName" --location "$region"

# Create a Key Vault
az keyvault create `
    --name "$kvName" `
    --resource-group "$resourceGroupName" `
    --location "$region" `
    --enable-rbac-authorization

# Authorize the operation to create a few secrets - Signed in User (Key Vault Secrets Officer)
az ad signed-in-user show --query id -o tsv | foreach-object {
    az role assignment create `
        --role "Key Vault Secrets Officer" `
        --assignee "$_" `
        --scope "/subscriptions/$subscriptionId/resourceGroups/$resourceGroupName/providers/Microsoft.KeyVault/vaults/$kvName"
    }

# Create an azure storage account for function app
az storage account create `
    --name "$storageName" `
    --location "$region" `
    --resource-group "$resourceGroupName" `
    --sku "Standard_LRS" `
    --kind "StorageV2" `
    --https-only true `
    --min-tls-version "TLS1_2"

# Create a Function App
az functionapp create `
    --name "$functionAppName" `
    --storage-account "$storageName" `
    --consumption-plan-location "$region" `
    --resource-group "$resourceGroupName" `
    --os-type "Windows" `
    --runtime "powershell" `
    --runtime-version "7.2" `
    --functions-version "4" `
    --assign-identity

# Set Key Vault Secrets (secret values are set to 'xxxx', we will update these later after creating SendGrid account)
Start-Sleep -s 15
az keyvault secret set --vault-name "$kvName" --name "sendGridApiKey" --value "xxxx"
az keyvault secret set --vault-name "$kvName" --name "fromAddress" --value "xxxx"

#Configure Function App environment variables:
$settings = @(
  # @Microsoft.KeyVault(SecretUri=https://<key-vault-name>.vault.azure.net/secrets/<secret-name>/<secret-version>)
  # or @Microsoft.KeyVault(SecretUri=https://<key-vault-name>.vault.azure.net/secrets/<secret-name>/) '/' at end means to take latest secret
  "sendGridApiKey=@Microsoft.KeyVault(SecretUri=https://$kvName.vault.azure.net/secrets/sendGridApiKey/)" #from KV
  "fromAddress=@Microsoft.KeyVault(SecretUri=https://$kvName.vault.azure.net/secrets/fromAddress/)" #from KV
)

$settings | foreach-object {
    az functionapp config appsettings set --name "$functionAppName" --resource-group "$resourceGroupName" --settings """$_"""
}

#Assign Function System MI permissions to KV to access secrets
$functionMI = $(az resource list --name $functionAppName --query [*].identity.principalId --out tsv)| foreach-object {
    az role assignment create `
        --role "Key Vault Secrets User" `
        --assignee "$_" `
        --scope "/subscriptions/$subscriptionId/resourceGroups/$resourceGroupName/providers/Microsoft.KeyVault/vaults/$kvName"
    }
Code execution:
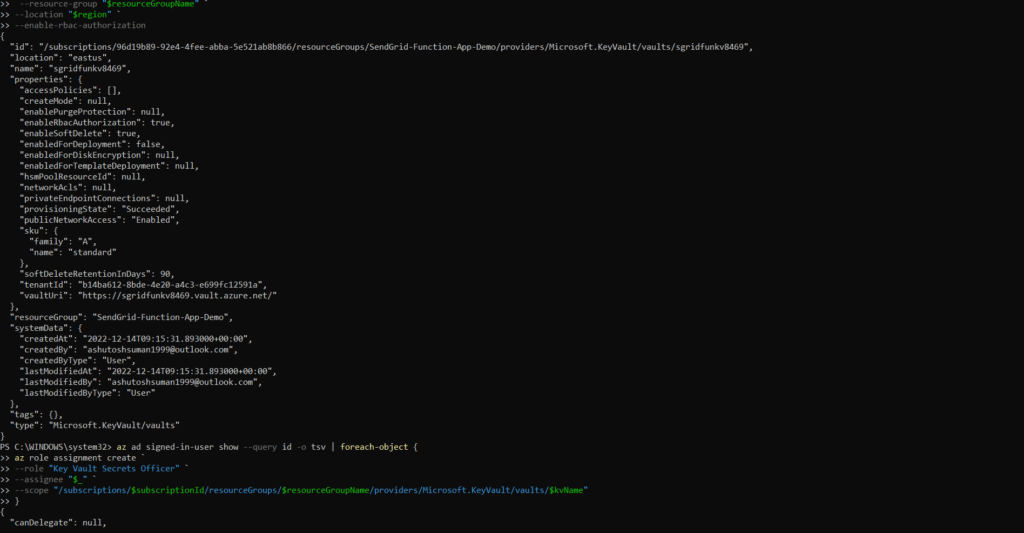
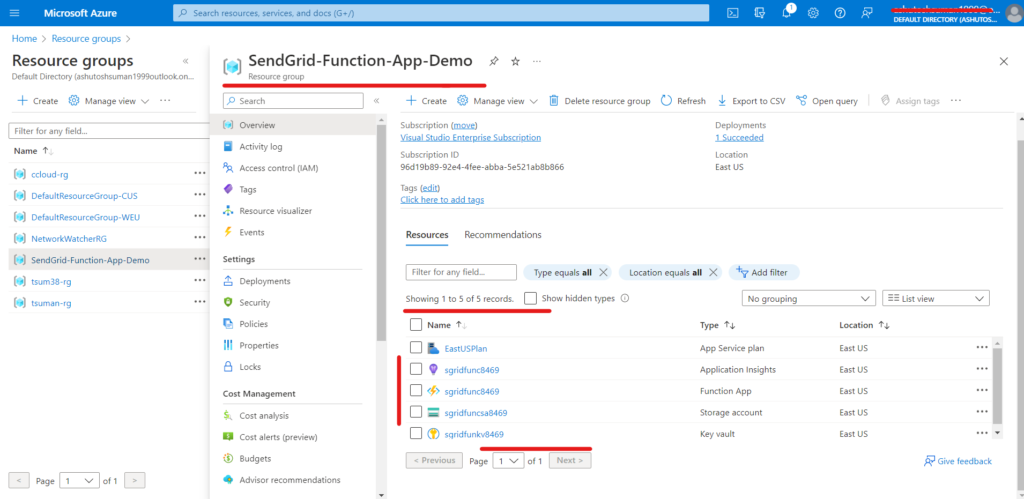
once you run the script it creates:
- resource group called
SendGrid-Function-App-Demo - Create a PowerShell Function App with
SystemAssignedmanaged identity,consumptionapp service plan,insights, akey vaultand function appstorage account.
Now, let us configure few resources we just created for our needs
To configure environment variables for a Function App, you will need to access the settings for the app and add the desired variables. These variables can then be accessed within the code of the function app.
Go to Function app->configuration->Application settings and check if “fromAddress” and “sendGridApiKey” is linked to the source ” key vault Reference”.
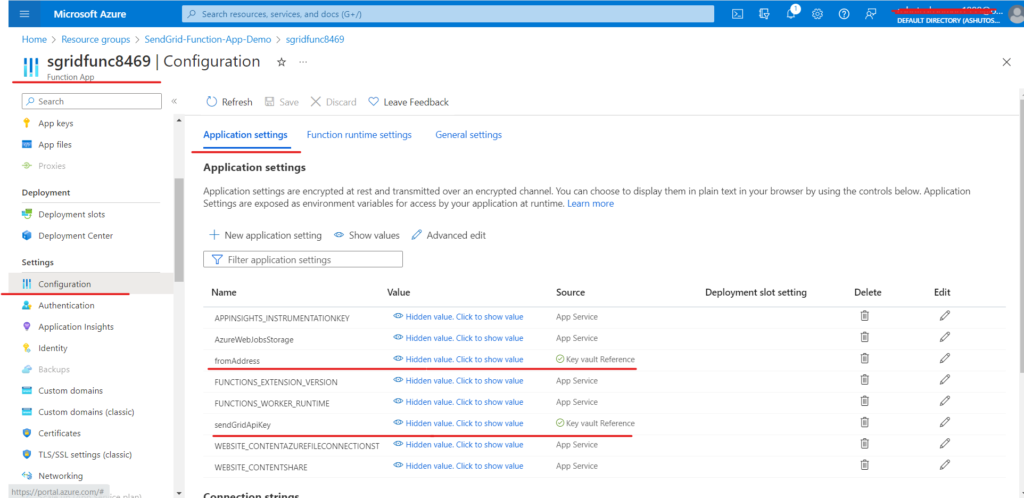
we will be referencing the fromAddress and sendGridApiKey from the key vault we created later on.
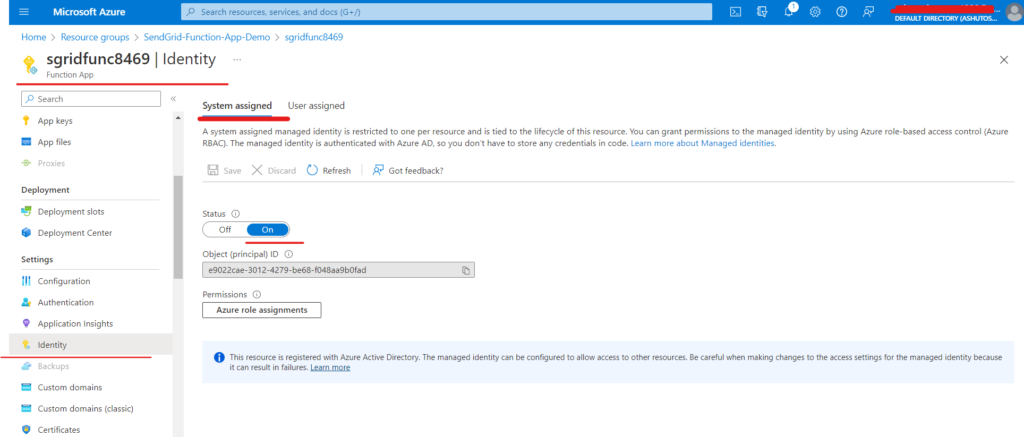
Now navigate to “Identity” in “Function app” and under “System assigned” , turn the status “on”
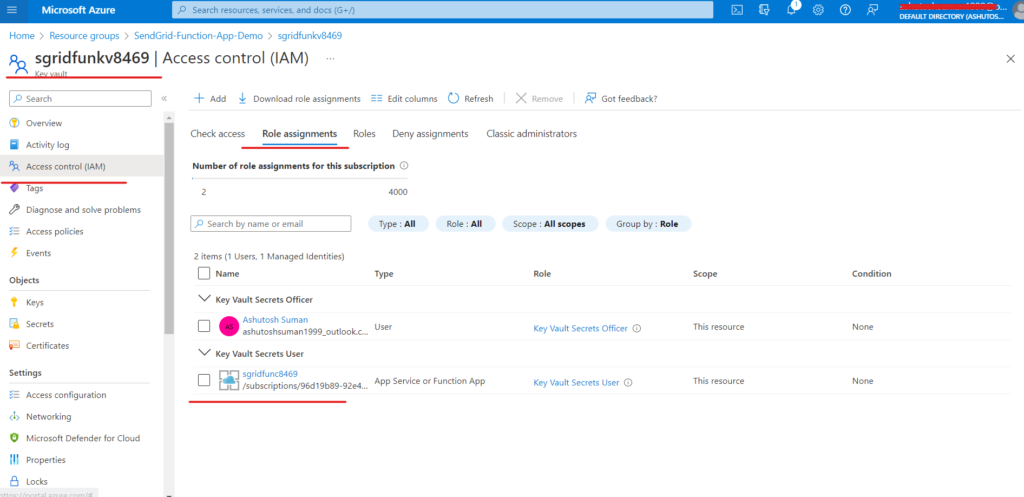
Now let’s Assign “Function App” SystemAssigned managed identity permissions to access/read “secrets” on the “key vault”.
for this navigate to key vault-> Access control(IAM).
Then click on the Role assignments and assign the functions app as ” key Vault Secret User ”
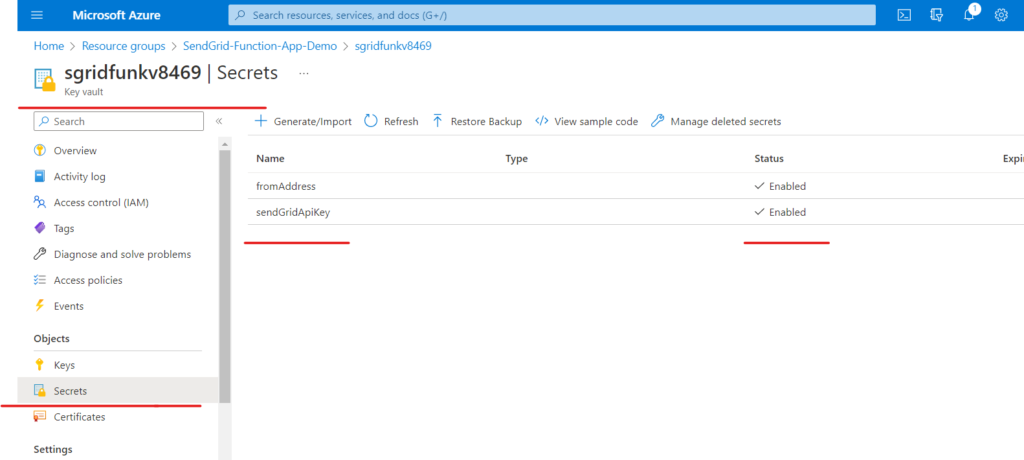
Once this is done we can see everything coming into effect which can be verified by going to
key vault->secrets
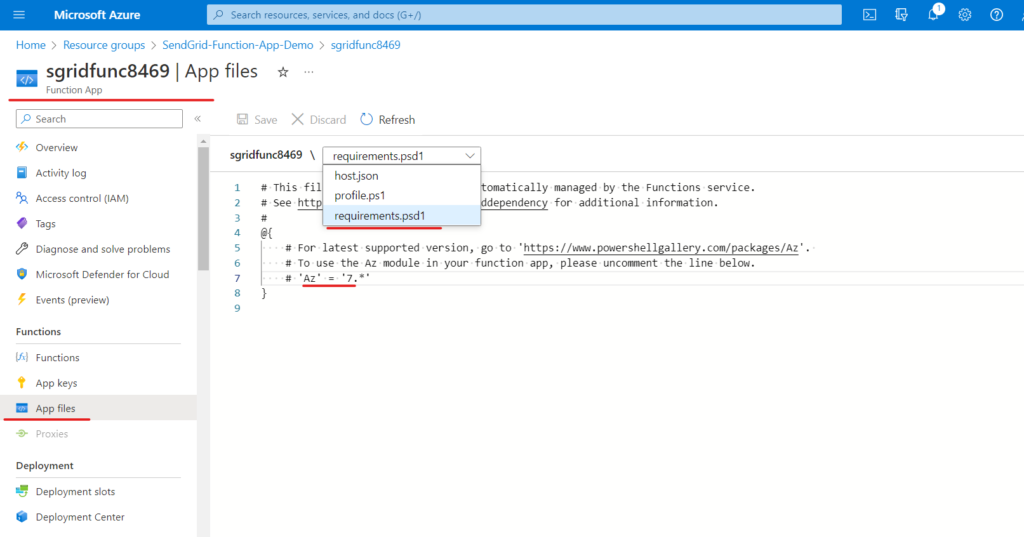
Next, navigate to Functions app-> App files and then from the dropdown menu choose “requirements.psd1”
Finally change the ‘AZ’ = ‘9.*’ to ‘AZ’ = ‘7.*’ and save it.
2. Create a SendGrid account
First, let’s discuss what SendGrid is. SendGrid is a third-party provider in Azure that provides a cloud-based email service. This service manages various types of email, including shipping notifications, friend requests, sign-up confirmations, and email newsletters. It also handles internet service provider (ISP) monitoring, domain keys, sender policy framework (SPF), and feedback loops. Additionally, SendGrid provides link tracking, open rate reporting, and allows companies to track email opens, unsubscribes, bounces, and spam reports.
Azure offers a variety of SendGrid pricing plans, but for the purposes of this tutorial, we will be using the FREE plan, which gives us access to the API and 100 emails per day forever.
To create a SendGrid Account:
1. Go to the Azure Portal
2. search services for Twilio SendGrid and create an account.
3. Provide Your :Email address ,Primary phone number
4. Press Review+ create
We will use the Free account as mentioned earlier.
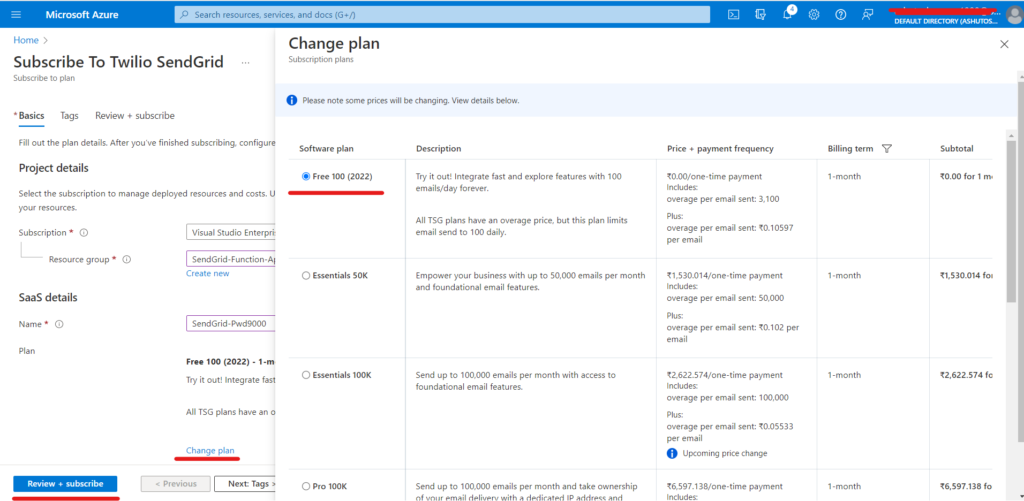
Once done you will soon receive an activation email at the email address you provided when creating the SendGrid Azure resource.
We can now navigate to the SendGrid publisher’s site directly from Azure.
Go to your overview page of Twillo SendGrid, You should find ” Opwn Saas Account on publisher’s site” click on it.
Once you are on the website navigate to dashboard
click on create sender identity -> Create a single sender
Provide the same email used for subscription of Twillo Send Grid on Azure portal.

Now head back to Key vault -> Secrets and update the “fromAddress” with the sender identity From Email Address that you have verified in the previous step.
3. Generate a SendGrid API Key
For this navigate to Settings -> API Keys and click on Create API key.

Give the API Key a Name, then select Full Access and then click on Create & View.

NOTE:
The API key will only be displayed once, so make sure that you copy the key and navigate back to the key vault that we created in the previous step and save the key under the key vault -> secret called “sendGridApiKey”.
4. Create a SendGrid API PowerShell Function
We will now write/run a simple PowerShell function to interact with and send an email via the SendGrid service API.
Run the following:
## code/SendGrid-Notification.ps1

Function SendGrid-Notification {
    [CmdletBinding(SupportsShouldProcess)]
    Param(
        [Parameter(Mandatory, ValueFromPipeline)]
        [String]$ToAddress,
        [Parameter(Mandatory, ValueFromPipeline)]
        [String]$FromAddress,
        [Parameter(Mandatory, ValueFromPipeline)]
        [String]$Subject,
        [Parameter(Mandatory, ValueFromPipeline)]
        [String]$Body,
        [Parameter(Mandatory, ValueFromPipeline)]
        [String]$APIKey
    )

    # Body
    $SendGridBody = @{
        "personalizations" = @(
            @{
                "to"      = @(
                    @{
                        "email" = $ToAddress
                    }
                )
                "subject" = $Subject
            }
        )

        "content"          = @(
            @{
                "type"  = "text/html"
                "value" = $Body
            }
        )

        "from"             = @{
            "email" = $FromAddress
        }
    }

    $BodyJson = $SendGridBody | ConvertTo-Json -Depth 4

    #Header for SendGrid API
    $Header = @{
        "authorization" = "Bearer $APIKey"
    }

    #Send the email through SendGrid API
    $Parameters = @{
        Method      = "POST"
        Uri         = "https://api.sendgrid.com/v3/mail/send"
        Headers     = $Header
        ContentType = "application/json"
        Body        = $BodyJson
    }
    Invoke-RestMethod @Parameters
}
what are we doing here?
This is a PowerShell script that defines a function called SendGrid-Notification. This function can be used to send an email using the SendGrid API.
The function takes several parameters: ToAddress, FromAddress, Subject, Body, and APIKey. It then constructs a JSON object with the provided parameters, adds an authorization header using the provided API key, and sends an HTTP POST request to the SendGrid API.
Further this request causes SendGrid to send an email with the specified parameters.
5. Integrate PowerShell Function into Function App
To do this :
1. Navigate to the “Function app” we created previously.
2. Click on Functions and + Create under Functions.
3. choose “Develop in portal”
4. Time trigger
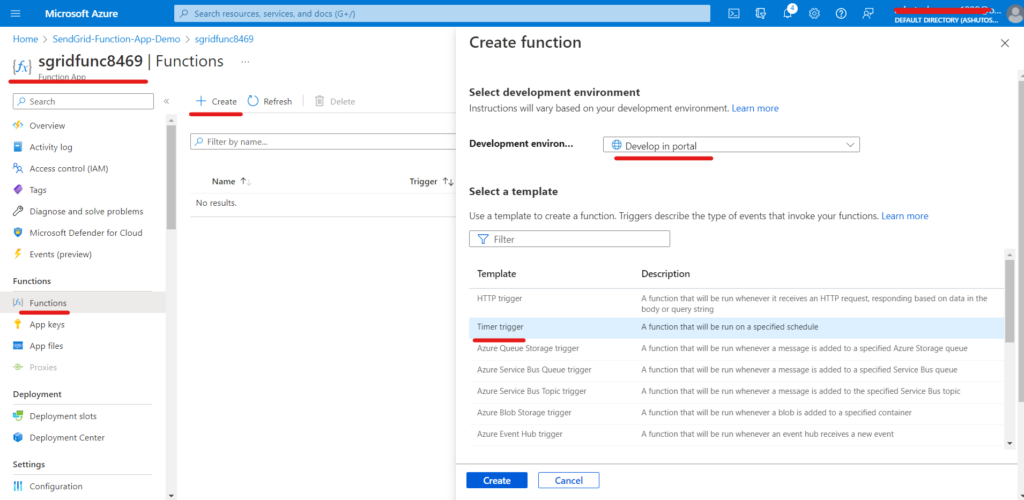
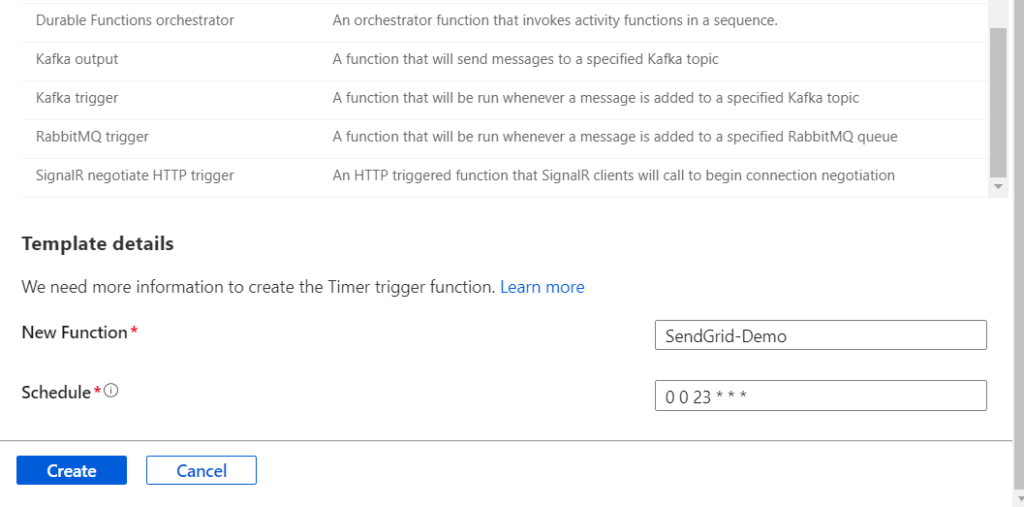
Under Template details : set the cron schedule to run on the frequency you need (in my case I have set this to once a day at 23:00pm) 0 0 23 * * *.
Hit the Create button.
Once created head to the Code + Test option and replace entire code under run.ps1 with the following powershell code and save It:
## code/run.ps1

# Input bindings are passed in via param block.
param($Timer)

# Get the current universal time in the default string format.
$currentUTCtime = (Get-Date).ToUniversalTime()

# The 'IsPastDue' property is 'true' when the current function invocation is later than scheduled.
if ($Timer.IsPastDue) {
    Write-Host "PowerShell timer is running late!"
}

# SendGrid-Notification Function #
Function SendGrid-Notification {
    [CmdletBinding(SupportsShouldProcess)]
    Param(
        [Parameter(Mandatory, ValueFromPipeline)]
        [String]$ToAddress,
        [Parameter(Mandatory, ValueFromPipeline)]
        [String]$FromAddress,
        [Parameter(Mandatory, ValueFromPipeline)]
        [String]$Subject,
        [Parameter(Mandatory, ValueFromPipeline)]
        [String]$Body,
        [Parameter(Mandatory, ValueFromPipeline)]
        [String]$APIKey
    )

    # Body
    $SendGridBody = @{
        "personalizations" = @(
            @{
                "to"      = @(
                    @{
                        "email" = $ToAddress
                    }
                )
                "subject" = $Subject
            }
        )

        "content"          = @(
            @{
                "type"  = "text/html"
                "value" = $Body
            }
        )

        "from"             = @{
            "email" = $FromAddress
        }
    }

    $BodyJson = $SendGridBody | ConvertTo-Json -Depth 4

    #Header for SendGrid API
    $Header = @{
        "authorization" = "Bearer $APIKey"
    }

    #Send the email through SendGrid API
    $Parameters = @{
        Method      = "POST"
        Uri         = "https://api.sendgrid.com/v3/mail/send"
        Headers     = $Header
        ContentType = "application/json"
        Body        = $BodyJson
    }
    Invoke-RestMethod @Parameters
}

# Set these environment variables up in Function App settings:
# These variables are from the Function App and is referenced from Key Vault
$apiKey = $env:sendGridApiKey #SendGrid API Key
$from = $env:fromAddress #SendGrid Sender Address

#Set additional Function variables
$to = "recipient@domain.com"
$subscriptionName = (get-azcontext).Subscription.name
$subscriptionId = (get-azcontext).Subscription.Id

Write-Error "This is a forced error, something has failed, Please investigate xxxx"
$failureMessage = $error[0].Exception.message.ToString()

$body = "$failureMessage - Subscription Details: [Name: $subscriptionName; Id: $subscriptionId]"

$Parameters = @{
    ToAddress   = $to
    FromAddress = $from
    Subject     = "Error notification from Azure Function App via SendGrid API"
    Body        = $body
    APIKey      = $apiKey
}
SendGrid-Notification @Parameters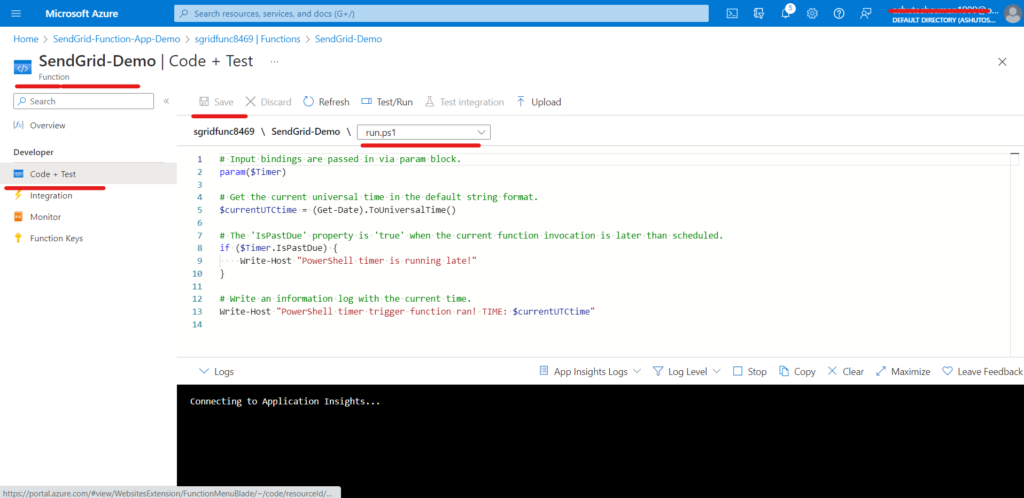
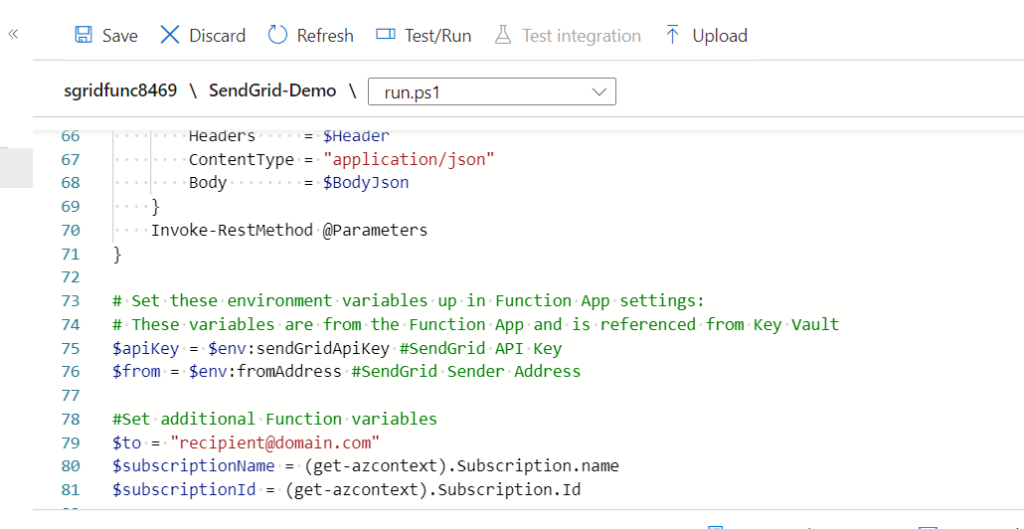
we can see that the apiKey and fromaddress on line75 and 76 in the code are actually referenced from environment variables.
which are in the “Application settings” of the Function App which are referencing the key vault secrets we set up earlier.
Doing this prevents from exposing any API secrets in our Function App code nor the settings.
Click on the “Test/Run” button
And Done.
A few seconds later you should be able to see the email notification that was triggered by the function app and sent via the SendGrid service API.