
Hello!
In my last blog I talked about Robot Motion Planning. I also gave you a brief introduction to UiPath and its service. Automation Cloud. This blog will take your knowledge of UiPath and its service Automation Cloud a step further. If you did not read it yet, you should do so before you continue with this blog. You can find it here.
In this blog I intend to give you a practical overview of UiPath Automation Cloud as I walk you through creating a cloud robot.
Here is a short video by UiPath that gives an overview of the Automation Cloud console.
Before we dive into UiPath Automation Cloud. Let’s quickly recap what cloud automation is. Cloud automation is the process of using orchestration to automatically map and match workloads to cloud computing resources. This enables businesses to deploy new projects fast while bypassing lengthy procurement processes.
Prerequisites
Before moving, there are a few prerequisites you must have.
- You will have to install UiPath community version. If you do not have it installed, you can install and register it from here.
- Once you have it installed, you will need to have UiPath Studio and UiPath Orchestrator installed. These are UiPath services that are included in the free trial.
- Once that is installed, you can move forward with the steps below.
Creating VM Automation Cloud Robots using UiPath Automation Cloud
Step 1. Creating the cloud robot pool
You must create a new machine template of the type Cloud Robots – VM.
Machine templates allow you to configure properties that will apply to all Cloud Robots – VM machines created from it. Then, whenever you need machines, we create as many machines as needed that are exactly like the template.
- Go to Tenant > Machines.
- In the top-right, click Add Machines and select Cloud Robots – VM.
- The Add Cloud Robots – VM page opens:
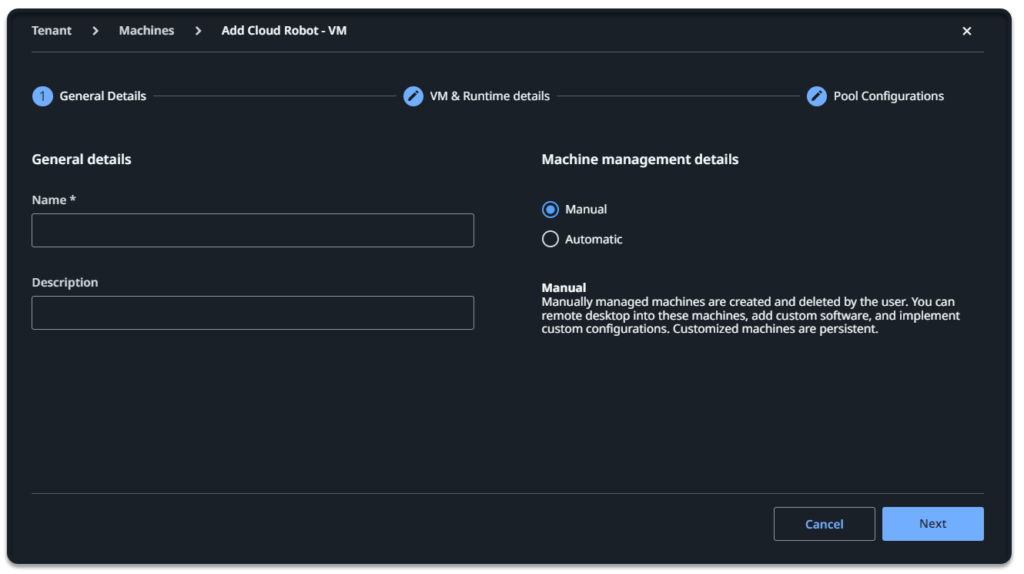
Add general details
- Fill in the Name field and, optionally, fill in the Description field for the machine template.
Set up the Machine management details
- Select the management type for your machine pool:
- Manual – allows you to create and delete machines, use remote desktop, add custom software, or implement custom configurations on your machines. The changes you make persist into future logins.
- Automatic – we create and delete machines for you. Allows you to log in remotely on these machines for debuging purposes, but changes you make are discontinued at logout.
- Click Next to move to the next step. The VM & Runtime details page is displayed.
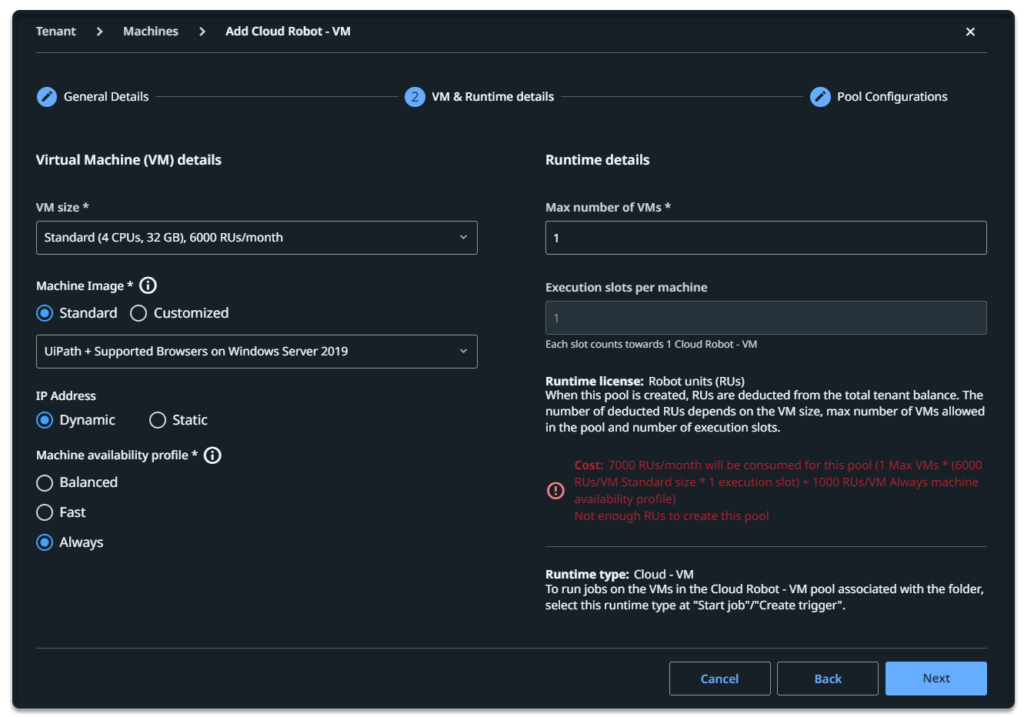
Set the Virtual machine details
- From the VM size list, choose the type of machine that has the technical specifications you need. For more information, see What machine size should I choose?
- Under Machine Image, select a machine image from the following lists:
- Standard if you want to use a standard VM (specifications).
- Customized if you want to use one of your existing customized machines
- Under IP Address, select if you want the machine to use a dynamic IP address, or use a static one.
By default, VMs use a dynamic IP address, meaning it acquires a different IP address every time it starts. To use the same IP address, change this setting to Static. - Select a Machine availability profile for your machines. This allows you to recover robot units by shutting down machines that have been idle for more than the selected duration:
- Balanced – the default profile. Your machines shut down after being idle for more than 30 minutes.
- Fast – your machines shut down after being idle for more than 60 minutes. Adds 500 RUs to the balanced cost profile.
- Always – your machines are not being shut down, regardless of their idle duration. Adds 1,000 RUs to the balanced cost profile.
Note: Your selection immediately updates the robot units consumption, so make sure you have enough robot units to run the selected profile.
Set up the Runtime details
- The Execution slots per machine field is automatically set to
1and you cannot change it. This means any machine created from this template can run only one job at a time. - Runtime license: Robot units (RUs) – each machine created from this template requires a number of robot units (RUs). Make sure you have enough robot units assigned to your tenant, otherwise you cannot create machines.
- If you selected the Automatic option in step 4, input the Max number of VMs you want us to create on your behalf. This impacts the number of robot units required to create the automatic pool.
- Click Next to configure the pool.
- Click Finish to create the template.
On the Machines page, a success message is displayed along the top and you can see your new template in the list.
Step 2. Creating machines
Now that you have configured the cloud robot pool, you can add machines to the pool.
- Go to Tenant > Machines.
- At the right of the pool row, click and select Manage Cloud Robots – VM:
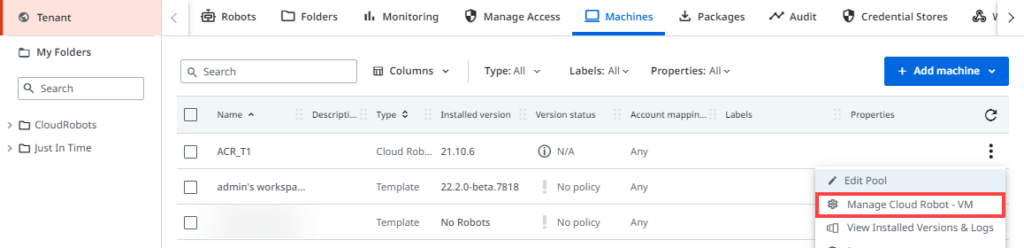
- The Manage Cloud Robot – VM page opens.
- In the top right, click Add Virtual Machine.
- The Add Virtual Machine page opens.
- Fill in the username and password fields with administrator credentials you want to set for the VM.
- Click Provision.
Back on the Manage Virtual Machines page, a success message is displayed along the top and the machine appears in the list with a machine status of Provisioning.
It may take a few minutes to complete provisioning. All machine options are unavailable until the machine is provisioned.
After provisioning is complete, the machine status changes to Running.
Step 3. Preparing cloud robots for use
Accept jobs on the machine
A newly deployed machine is not by default configured to accept jobs. You must manually configure the machine to accept jobs after any configuration you choose to carry out is finished and it is prepared for use.
To allow a machine to be used for running jobs:
- Go to Tenant > Machines.
- At the right of the pool row, click and select Manage Virtual Machines.
- On the Manage Virtual Machines page, at the right of the machine row, click and select Enable Accept Jobs.
Along the top, a success message appears, and Enabling is displayed in the Accept Jobs column. The machine can be used to execute jobs in the folders where the pool is assigned after a short while, when the state changes to Enabled.
Use cloud robots to run jobs
Now you and your users can start to run unattended automations using cloud robots.
To run a job using cloud robots: Start a job as you normally would, but for the Runtime license select Cloud Robot – VM.
- Some fields which do not apply when the runtime is Cloud Robot – VM are not available or cannot be edited. Configure job execution using the available options.
- In the case of cloud robots, selecting the Keep Account/Machine allocation on job resumption checkbox means the job resumes on a machine that was created from the same template, not necessarily the exact same machine.
The job will run on one of the available machines in the machine template that is allocated to the folder.
Monitoring
You can monitor your cloud robots to check for errors on the following pages:
- You can see pending jobs that are waiting for an available machine on the Jobs page.
- You can see the created virtual machines in Orchestrator, on the Monitoring page of the modern folder. When a machine becomes available, it is already connected to Orchestrator, so it runs the next pending job.
If virtual machines are not being created, check the configuration of your cloud robot pool in Orchestrator. - On the Alerts page in Orchestrator, you can set the State filter to All to see details about the Cloud Robots component and see as new robots are created or any errors. To see alerts, you need to have the Alerts – View and Machines – View permissions from a role that is directly assigned to your account (not inherited from groups), and to be added to the folders where cloud robots are used.
- You can view logs for a particular VM, as described below.
Viewing logs for a machine
Logs are valuable reports used by administrators for diagnosing and troubleshooting machines. They provide detailed reports on important events happening on a machine such as machine events, job events, or Azure issues.
Logs are kept for 30 days. The oldest log entry is the first one deleted at the end of the retention period.
To view logs for your machine:
- Go to Tenant > Machines.
- At the right of the pool row, click More Actions and select Manage Cloud Robot – VM.
- On the Manage Cloud Robot – VM page, at the right of the machine row, click More Actions and select View Logs.
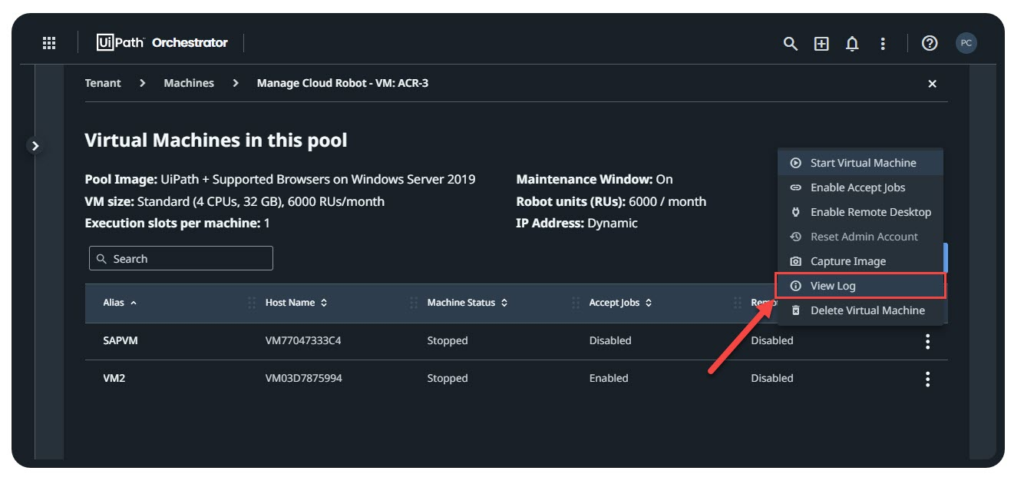
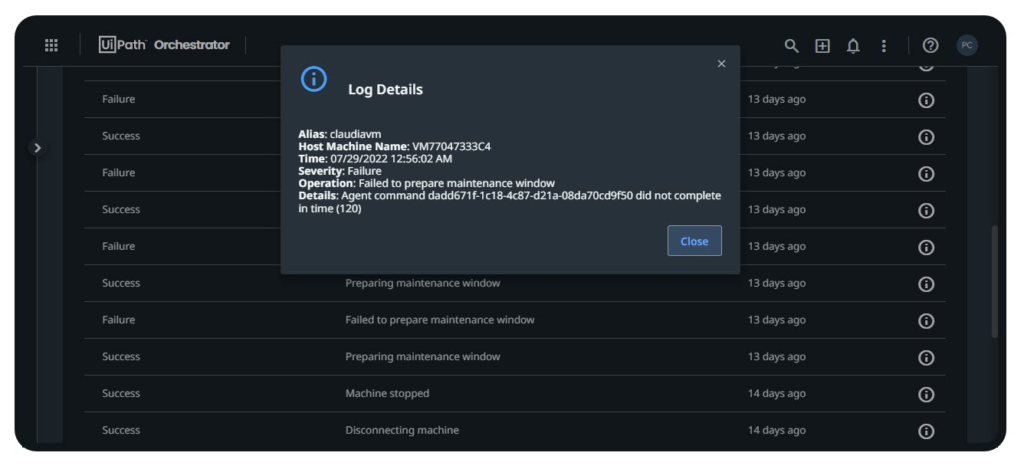
- On the Machine Event Logs page, you can see logs generated for that machine, most recent logs displayed first.
- For details about one of the logs, click Show details at the right of the log row. The Log details window shows a detailed report about that specific event.
Conclusion:
I know there was a lot to take in, while going through this blog. However, if you followed the steps provided above, you should have successfully created a robot, started the robot, made the robot perform a function and stop it and successfully view the logs.