This is step 5 of 6 of Hands-On Project 2 for Azure. In this step, you first install client software on your cloud PC that is needed to access Azure services from a Python program. Then, you create two simple Python programs which access your storage account using the Python SDK. The two programs show two different ways of authenticating against Azure for storage account access.
Note that once you have completed this basic exercise, the use of the Python SDK is completely open to you. That is, you can access pretty much any Azure resource, and even go as far as programmatically provisioning and deleting resources. This offers you the full power of the Azure portal from within a Python program that runs either on a cloud server or from a remote location.
To access Azure resources from a Python program, you need 4 things:
- A Python development environment. You completed this in step 4 of this project.
- The Azure Command Line Interface (CLI).
- The Python Software Development Kit (SDK) for Azure.
- A Python program to do the work.
Since we already have Python and VS Code installed, let’s start with the Azure Command Line Interface.
Install the Azure Command Line Interface (CLI)
There are several ways of accomplishing this, but perhaps the easiest is to use one of the scripts provided by Microsoft. The scripts contain the series of commands that are needed for specific platforms, and you only need one command to run the script. Here, we are using the script designed for Debian Linux, of which Ubuntu Linux is one of the variants:
curl -sL https://aka.ms/InstallAzureCLIDeb | sudo bashThis command downloads the script with curl and then pipes the script to bash to run it. After running the script, you can check for a successful install with the following:
az --versionIf you get version information back, you are good to go.
The az command is the entry point to the Azure CLI, and there are many subcommands, each dealing with a different type of resource. You will learn more of these subcommands as you work more with the CLI.
With the CLI installed and working, we can turn our attention to the Python SDK.
Create a Project and Install Python SDK Packages
For the Azure Python SDK, Microsoft has taken a highly modularized approach. Per their documentation there are 180+ individual Python packages that make up the SDK. In order to use it, you need to identify which packages you need for the services you want to use, then install and use them. Here are a couple of good links that describe the modular structure of the SDK, and give you some clues which packages you might need:
https://learn.microsoft.com/en-us/azure/developer/python/sdk/azure-sdk-overview
https://learn.microsoft.com/en-us/azure/developer/python/sdk/azure-sdk-library-package-index
As an example of the SDK’s modularity, the following Python packages are used to access the various kinds of storage resources in a storage account:
- azure-storage-blob. Used to access Blob Containers.
- azure-storage-file. Used to access File Shares.
- azure-storage-queue. Used to access Queues.
- azure-data-tables. Used to access Tables.
Depending on which of these you need, you would install only those into your project.
To set up for the programs below, create a new Python virtual environment and VS Code project, and install the packages we will be using:
cd ~
mkdir azurepy
cd azurepy
code .
Then, open a terminal window and install these packages:
pipenv install azure-storage-file
pipenv install azure-storage-blob
pipenv install azure-identity
The azure-identity package is used to authenticate your Python program using your Azure account information. We will see how it is used below.
Example Storage Account
For the following examples, we will use a storage account as follows:
- Storage account name is cs790.
- The storage account has one file share in it, named ‘hands-on-projects’. The file share contains 2 files.
- The storage account has one blob container in it, named ‘cs790-blob’. The container has 2 blob objects in it.
To set up your storage account for the exercise, please set up a file share with a few files and a blob container with a few files. You will need to substitute your own names into the code shown below.
Access Your File Share Using the Storage Account Key
We will be showing two ways to authenticate your Python program against your Azure storage account. The first way is to use your storage account key. Doing it this way, you don’t need to login using your account credentials, but you do need to provide the storage account key. The storage account key provides full access to your storage account, so you must make sure it only gets to people who you want to have full access.
Create and save a Python program as follows, using the names that are correct for your storage account:
from azure.storage.file import FileService
import os

storageAccount='cs790'
accountKey = os.environ["STORAGE_ACCOUNT_KEY"]

#Step 1: Authenticate with Azure using the storage account key
file_service = FileService(account_name=storageAccount, account_key=accountKey)

#Step 2: Get and print a directory list for the hands-on-projects file share
generator = file_service.list_directories_and_files('hands-on-projects')
for file_or_dir in generator:
    print(file_or_dir.name)


#Step 3: Read the contents of AWSInitialSetup.txt into memory, then print it
share_name = "hands-on-projects"
directory_name = ""
file_name = "AWSInitialSetup.txt"
file = file_service.get_file_to_text(share_name, directory_name, file_name)
print(file.content)

#Step 4: Get the number of bytes used in the file share, and print it
size = file_service.get_share_stats_in_bytes(share_name)
print("Bytes : %d" % (size))
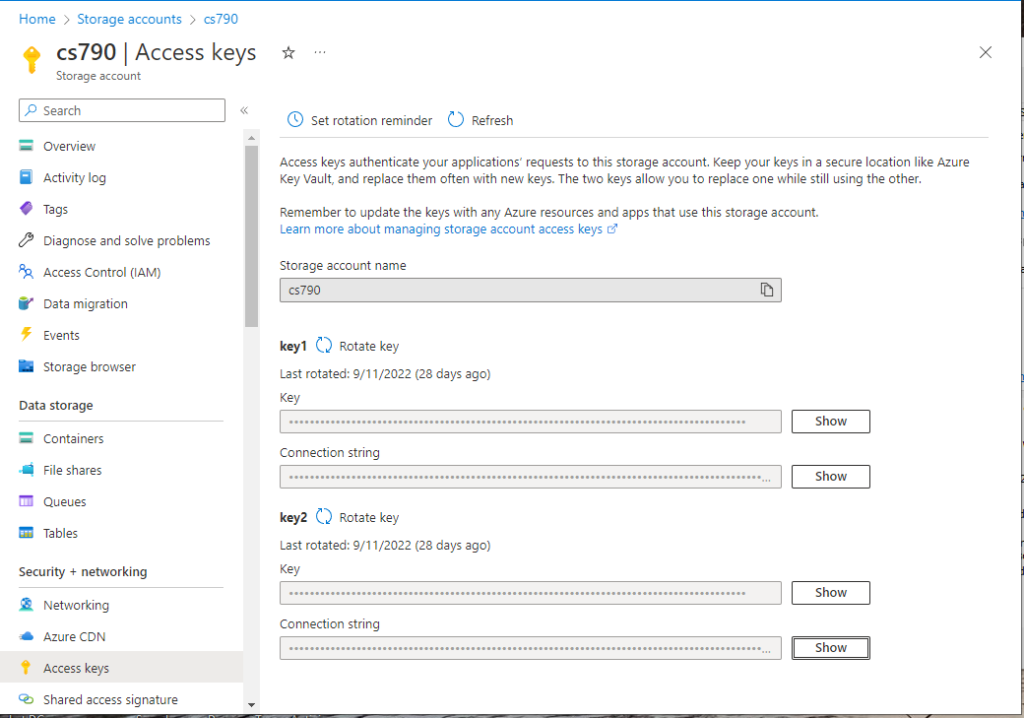
Step 1 is where we authenticate the Python program with the storage account key. The program assumes that you have initialized an environment variable called STORAGE_ACCOUNT_KEY with the key value. As a reminder, you can get the storage account key from this page in the Portal:
With only the storage account name and its account key, this will grant access to the storage account and we can run some API operations against the storage account.
It’s a good idea to keep credentials outside your program, hence the use of the environment variable. To set the environment variable, I used a simple shell script in a file called setenv.sh:
#!/bin/bash

export STORAGE_ACCOUNT_KEY=<the storage account key I copied from the Azure portal.>
To run this, you need to save it, make it executable, and then run it in the VS Code terminal window before you run your Python program:
chmod +x setenv.sh
. ./setenv.sh
The ‘.’ before running setenv is a little odd. What it does is to make sure that the environment variables set by the script are retained in the same shell that your Python program will run in. Without it, the environment variables won’t stay around after the script terminates.
Steps 2, 3 and 4 use the FileService instance to list the directory of the hands-on-projects file share, get a file into memory and print it, and get the number of bytes used by the file share and print it. There are more things you can do with the FileService class. Check here if you’d like to find out more.
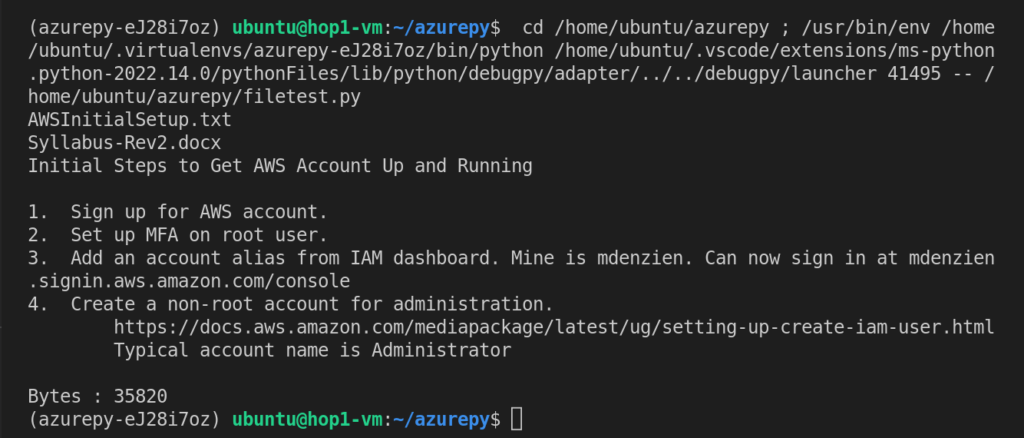
The rather messy output of my example program looks like this:
Access Your Blob Storage Using Your Account Credentials
A second way to authenticate your Python program to Azure is with your account credentials. In fact, your account credentials can be used to authenticate to practically any service that Azure offers and to control the service programmatically.
Create and save a Python program to do this kind of authentication is as follows:
from azure.identity import DefaultAzureCredential
from azure.storage.blob import BlobServiceClient

#Step 1: Create a credential and use it to get a BlobServiceClient object
credential = DefaultAzureCredential(additionally_allowed_tenants="*")
blob_service_client = BlobServiceClient(
        account_url="https://cs790.blob.core.windows.net",
        credential=credential
    )

#Step 2: List all of the containers in this storage account
all_containers = blob_service_client.list_containers(include_metadata=True)
for container in all_containers:
    print(container['name'], container['metadata'])
In Step 1, we use the DefaultAzureCredential class from azure-identity to create a credential. The BlobServiceClient class accepts this as a credential in its constructor, granting access to the storage account. A few things need to be spelled out here:
- You don’t necessarily have access to your storage account from the location where you are running the program. In this case, we needed to include additionally_allowed_tenants=”*” in order for the example to work without doing further setup work.
- DefaultAzureCredential will work with many different authentication methods, including account credentials, getting login information from environment variables, and other methods. The Azure SDK will try a series of authentication methods in order until it finds a method that successfully authenticates, and only disallows access if all the available methods fail. This actually provides flexibility being able to authenticate a program in the test environment and also within a deployed production service without having to change the code in the program.
In Step 2, we simply get a list of all the blob containers in my storage account and print them along with any metadata we created for each container.
To successfully run the program, you will need to login to Azure before running your Python program. From your VS Code terminal window, login with this command;
az loginAs long as you have a default web browser, you will be able to login this way. On Ubuntu, Firefox will be started and you can complete the login the same way that you do when you login to the Portal. After that point, your session will be authenticated, and you should be able to run the program.
After logging in, press F5 or select Run | Start Debugging to run the program. As you can see from this output, I only have one blob container in the storage account, with no metadata:
