This is step 2 of 6 of Hands-On Project 4 for Azure. In this step, you provision a MySQL PaaS database server and connect your cloud PC to it using virtual network peering.
Overview
This is a critical step in the project, because not only do we provision the production database, we also create the networking environment that will allow us to deploy our application code to resources on the production VNet. We are grouping these two steps together because the Azure portal pages for database server setup make it easy to create the private DNS zone we need, and also to link the database service to the production VNet. After setting up the database, we peer our two VNets to gain access to production from our cloud PC. At the end of this step, we are able to connect to the production database server from our cloud PC using the database’s public domain name.
Provision the Production Database Server
Let’s move ahead with creating the production database server:
- In the portal, search for MySQL, then navigate to the Azure Database for MySQL flexible servers service. This is the newer version of the MySQL database service, so we want to use it instead of Azure Database for MySQL servers. Click on Create.
- Put your server in the resource group for this project.
- Name the server, select a Region (US East if you are using your student account), and select MySQL version 8.0 since that’s what we have been using in development.
- Choose a small server size, such as Burstable, B1 ms.
- Enter credentials for your database administrator account. Write these down, because you will need to provide them to the production application when you deploy it.
- Navigate to the Networking tab. For Connectivity method, choose Private access (VNet integration).
- Under Virtual Network, select your production VNet, and for subnet choose the subnet which you delegated to the MySQL database service.
- Under Private DNS Integration, create a new private DNS zone.
- Click on Review and Create, then Create to create your database server.
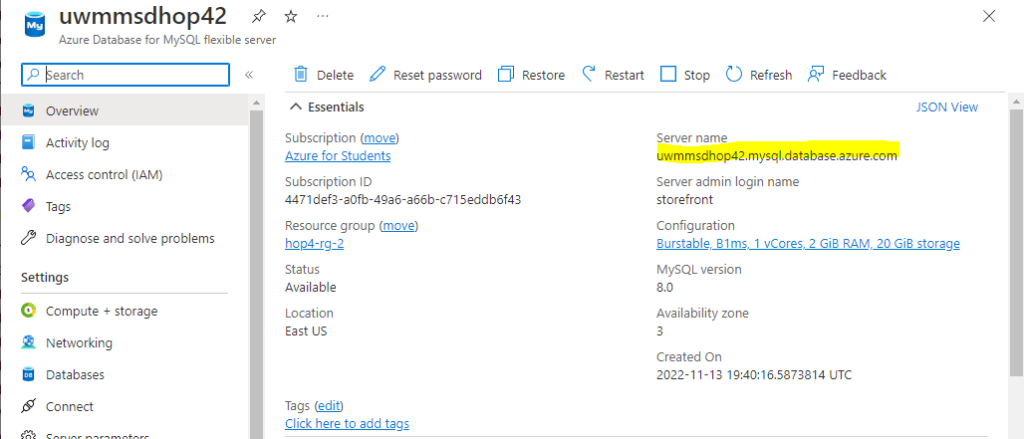
Navigating to the resource after deployment shows us the fully-qualified domain name of the database server. Note that this is not a publicly accessible address.
Configure Database to Accept Unencrypted Connections
By default, the Azure Database for MySQL service requires all clients to connect with encrypted connections. For this exercise, and as a simplification, we will not be downloading SSL/TLS certificates to the Azure App Service to support encrypted connections from the App Service to the database. As a result, we need to configure the database server to accept unencrypted connections. If we do not do this, then connections to the database server will fail when we deploy the application.
To configure the database for unencrypted connections, navigate to the Server parameters page for the database service, search for the require_secure_transport parameter, and set it to OFF. Save the configuration to update and restart the database server. Here is a screenshot of this step when completed:

Peer Your Virtual Networks
After the above steps are complete, your database server exists and you could connect to it from your production VNet using the database’s fully-qualified domain name. However, we currently have no way to access your production VNet, and therefore we have no access to the database. As a first step toward fixing this situation, we will peer the production VNet with the VNet that contains our cloud development PC.
- In the portal, navigate to the Virtual Networks service, select the VNet that contains your cloud PC, select Peerings, and click on Add.
- On the Add Peering page there are two sections: This virtual network, and Remote virtual network. We will complete both sections to create two peering links – one that allows the cloud PC’s VNet to reach the production VNet, and another that allows the production VNet to reach the cloud PC’s VNet.
- Under This virtual network, enter a peering name such as “cloud-pc-to-prod-vnet-link”. This indicates a link to the production network.
- Under Remote virtual network, enter a peering name such as “prod-vnet-to-cloud-pc-link”. This indicates a link from the production network to this one.
- For Virtual network, select your production VNet.
- The defaults for all other selections will allow access in both directions without any additional resources. Leave these defaults intact.
- Click the Add button to initiate deployment of the VNet peerings.
Link the Cloud PC Network to the Private DNS Zone
After the above steps are completed, we can reach the production VNet from our cloud PC and in theory we could connect to our database server from there. However, we would have to use the database server’s private IP address instead of its fully-qualified domain name at this point. So the next step is to link the cloud PC’s VNet to the private DNS zone for the database.
- In the portal, navigate to the Private DNS Zones service, then select the Private DNS zone for your database server.
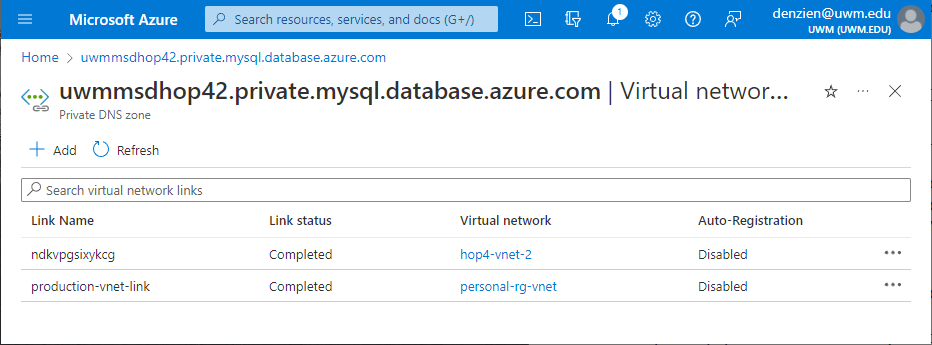
- On this page under Settings, select Virtual network links. You will see that there is already a link to the production VNet from this DNS zone. Click Add.
- Enter a link name (pretty much anything will do), then for Virtual network select the VNet that your cloud PC is on.
- Click OK to deploy the private DNS zone link.
Once the link is created and you refresh the page, the Virtual network links page will show VNet links for both development and production VNets:
Connect to the Production Database Server from Your Cloud PC
If all has gone well, we should now be able to connect to the production database from our Cloud PC. More specifically, we should be able to create a connection in MySQL Workbench, then login to the database with the administrative account credentials. Let’s try it:
- Connect to your cloud PC using Remote Desktop, then run MySQL Workbench.
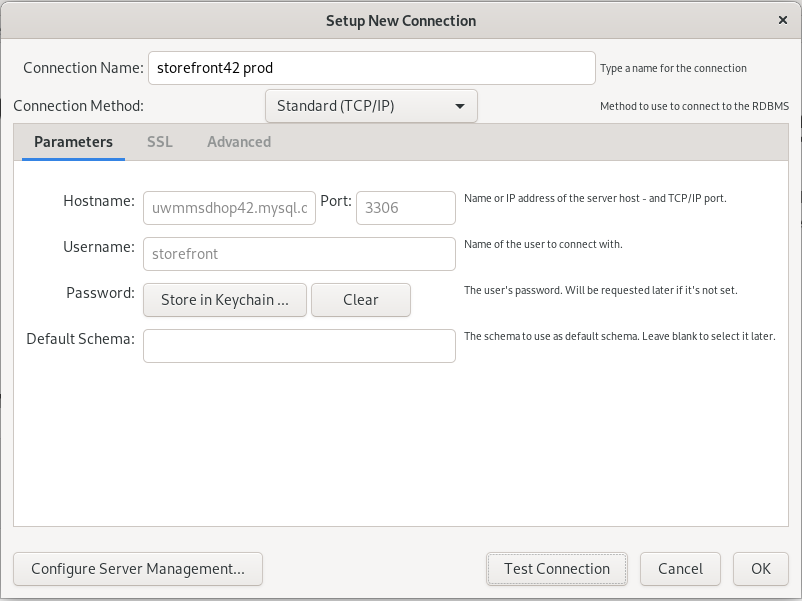
- Configure a new connection, referencing the fully-qualified domain name for the production database. An example of this is uwmmsdhop42.mysql.database.azure.com.
- Test the connection using the administrative username and password for the production database.
- save the connection, then login to the production database.
The connection setup will look something like this:
Success! We are connected to the production database.

Ready to Continue
Now that we have connectivity from our cloud PC to the production database, we can proceed to set up our AppService web server.