This is post – 3 of the Machine Learning services – AWS vs Azure. This post contains hands-on on creating a workspace, importing data, testing and training the model in Azure.
Run your notebook:
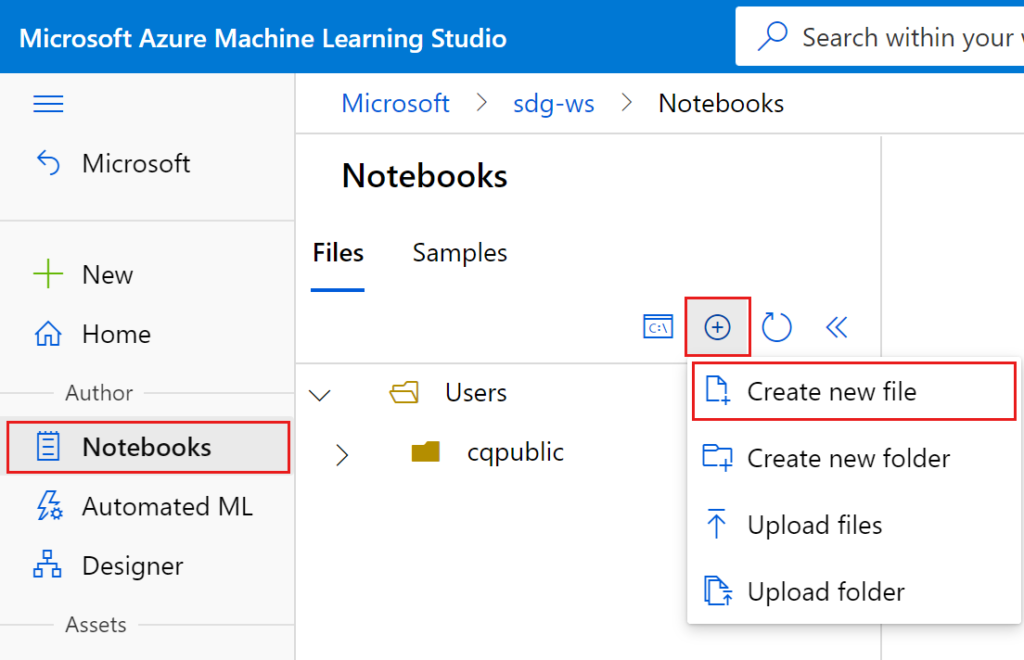
- Sign into Machine Learning Studio.
- Select your workspace, if it isn’t already open.
- On the left, select Notebooks.
- Select Create new file
Connect to the workspace:
You must first establish a connection to your Azure ML workspace before doing any coding. The top-level resource for Azure Machine Learning is the workspace, which offers a centralized location to work with all the artifacts you produce when using Azure Machine Learning.
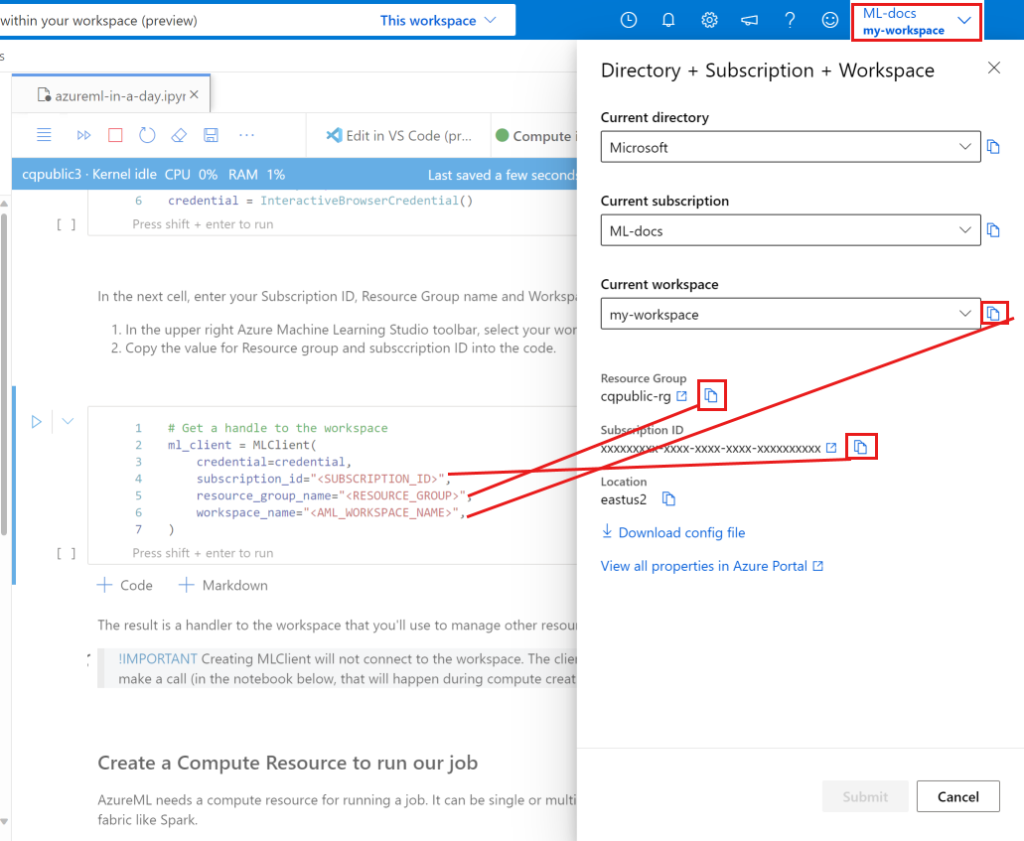
In the next cell, enter your Subscription ID, Resource Group name and Workspace name. To find these values:
- In the upper right Azure Machine Learning studio toolbar, select your workspace name.
- Copy the value for workspace, resource group and subscription ID into the code.
- You’ll need to copy one value, close the area and paste, then come back for the next one.
Create a compute resource to run your job:
You’ll need a compute resource for running a job. It can be single or multi-node machines with Linux or Windows OS, or a specific compute fabric like Spark.
For this example, you only need a basic cluster, so you’ll use a Standard_DS3_v2 model with 2 vCPU cores, 7-GB RAM and create an Azure ML Compute.
from azure.ai.ml.entities import AmlCompute

# Name assigned to the compute cluster
cpu_compute_target = "cpu-cluster"

try:
    # let's see if the compute target already exists
    cpu_cluster = ml_client.compute.get(cpu_compute_target)
    print(
        f"You already have a cluster named {cpu_compute_target}, we'll reuse it as is."
    )

except Exception:
    print("Creating a new cpu compute target...")

    # Let's create the Azure ML compute object with the intended parameters
    cpu_cluster = AmlCompute(
        name=cpu_compute_target,
        # Azure ML Compute is the on-demand VM service
        type="amlcompute",
        # VM Family
        size="STANDARD_DS3_V2",
        # Minimum running nodes when there is no job running
        min_instances=0,
        # Nodes in cluster
        max_instances=4,
        # How many seconds will the node running after the job termination
        idle_time_before_scale_down=180,
        # Dedicated or LowPriority. The latter is cheaper but there is a chance of job termination
        tier="Dedicated",
    )

    # Now, we pass the object to MLClient's create_or_update method
    cpu_cluster = ml_client.compute.begin_create_or_update(cpu_cluster)

print(
    f"AMLCompute with name {cpu_cluster.name} is created, the compute size is {cpu_cluster.size}"
)
Create a job environment:
An environment lists the software runtime and libraries that you want installed on the compute where you’ll be training. Many curated or pre-made settings are available with AzureML, which are helpful for typical training and inference applications. Additionally, you can build your own unique environments by utilizing a conda setup or a docker image.
import os

dependencies_dir = "./dependencies"
os.makedirs(dependencies_dir, exist_ok=True)
from azure.ai.ml.entities import Environment
custom_env_name = "aml-scikit-learn"
pipeline_job_env = Environment(
name=custom_env_name,
description="Custom environment for Credit Card Defaults pipeline",
tags={"scikit-learn": "0.24.2"},
conda_file=os.path.join(dependencies_dir, "conda.yml"),
image="mcr.microsoft.com/azureml/openmpi3.1.2-ubuntu18.04:latest",
)
pipeline_job_env = ml_client.environments.create_or_update(pipeline_job_env)
print(
f"Environment with name {pipeline_job_env.name} is registered to workspace, the environment version is {pipeline_job_env.version}"
)Creating Training Script :
Let’s start by creating the training script – the main.py Python file.
First create a source folder for the script:
import os

train_src_dir = "./src"
os.makedirs(train_src_dir, exist_ok=True)
%%writefile {train_src_dir}/main.py
import os
import argparse
import pandas as pd
import mlflow
import mlflow.sklearn
from sklearn.ensemble import GradientBoostingClassifier
from sklearn.metrics import classification_report
from sklearn.model_selection import train_test_split
def main():
"""Main function of the script."""
# input and output arguments
parser = argparse.ArgumentParser()
parser.add_argument("--data", type=str, help="path to input data")
parser.add_argument("--test_train_ratio", type=float, required=False, default=0.25)
parser.add_argument("--n_estimators", required=False, default=100, type=int)
parser.add_argument("--learning_rate", required=False, default=0.1, type=float)
parser.add_argument("--registered_model_name", type=str, help="model name")
args = parser.parse_args()
# Start Logging
mlflow.start_run()
# enable autologging
mlflow.sklearn.autolog()
###################
#<prepare the data>
###################
print(" ".join(f"{k}={v}" for k, v in vars(args).items()))
print("input data:", args.data)
credit_df = pd.read_excel(args.data, header=1, index_col=0)
mlflow.log_metric("num_samples", credit_df.shape[0])
mlflow.log_metric("num_features", credit_df.shape[1] - 1)
train_df, test_df = train_test_split(
credit_df,
test_size=args.test_train_ratio,
)
####################
#</prepare the data>
####################
##################
#<train the model>
##################
# Extracting the label column
y_train = train_df.pop("default payment next month")
# convert the dataframe values to array
X_train = train_df.values
# Extracting the label column
y_test = test_df.pop("default payment next month")
# convert the dataframe values to array
X_test = test_df.values
print(f"Training with data of shape {X_train.shape}")
clf = GradientBoostingClassifier(
n_estimators=args.n_estimators, learning_rate=args.learning_rate
)
clf.fit(X_train, y_train)
y_pred = clf.predict(X_test)
print(classification_report(y_test, y_pred))
###################
#</train the model>
###################
##########################
#<save and register model>
##########################
# Registering the model to the workspace
print("Registering the model via MLFlow")
mlflow.sklearn.log_model(
sk_model=clf,
registered_model_name=args.registered_model_name,
artifact_path=args.registered_model_name,
)
# Saving the model to a file
mlflow.sklearn.save_model(
sk_model=clf,
path=os.path.join(args.registered_model_name, "trained_model"),
)
###########################
#</save and register model>
###########################
# Stop Logging
mlflow.end_run()
if __name__ == "__main__":
main()Submit the Job:
It’s now time to submit the job to run in AzureML. This time you’ll use create_or_update on ml_client.jobs.
ml_client.create_or_update(job)View the job output and wait for the job completion.
Depoy the Model:
To deploy a machine learning service, you usually need:
- The model assets (file, metadata) that you want to deploy.
- Some code to run as a service. The code executes the model on a given input request.
Create a new online endpoint
import uuid

# Creating a unique name for the endpoint
online_endpoint_name = "credit-endpoint-" + str(uuid.uuid4())[:8]

from azure.ai.ml.entities import (
    ManagedOnlineEndpoint,
    ManagedOnlineDeployment,
    Model,
    Environment,
)

# create an online endpoint
endpoint = ManagedOnlineEndpoint(
    name=online_endpoint_name,
    description="this is an online endpoint",
    auth_mode="key",
    tags={
        "training_dataset": "credit_defaults",
        "model_type": "sklearn.GradientBoostingClassifier",
    },
)

endpoint = ml_client.online_endpoints.begin_create_or_update(endpoint).result()

print(f"Endpoint {endpoint.name} provisioning state: {endpoint.provisioning_state}")
Deploy the model to that endpoint
# picking the model to deploy. Here we use the latest version of our registered model
model = ml_client.models.get(name=registered_model_name, version=latest_model_version)


# create an online deployment.
blue_deployment = ManagedOnlineDeployment(
    name="blue",
    endpoint_name=online_endpoint_name,
    model=model,
    instance_type="Standard_DS3_v2",
    instance_count=1,
)

blue_deployment = ml_client.begin_create_or_update(blue_deployment).result()
Test with sample query:
Create a sample request file following the design expected in the run method in the score script.
deploy_dir = "./deploy"
os.makedirs(deploy_dir, exist_ok=True)

%%writefile {deploy_dir}/sample-request.json
{
  "input_data": {
    "columns": [0,1,2,3,4,5,6,7,8,9,10,11,12,13,14,15,16,17,18,19,20,21,22],
    "index": [0, 1],
    "data": [
            [20000,2,2,1,24,2,2,-1,-1,-2,-2,3913,3102,689,0,0,0,0,689,0,0,0,0],
            [10, 9, 8, 7, 6, 5, 4, 3, 2, 1, 10, 9, 8, 7, 6, 5, 4, 3, 2, 1, 10, 9, 8]
        ]
  }
}
# test the blue deployment with some sample data
ml_client.online_endpoints.invoke(
endpoint_name=online_endpoint_name,
request_file="./deploy/sample-request.json",
deployment_name="blue",
)If you’re not going to use the endpoint, delete it to stop using the resource. Make sure no other deployments are using an endpoint before you delete it.
If you don’t plan to use any of the resources that you created, delete them so you don’t incur any charges:
- In the Azure portal, select Resource groups on the far left.
- From the list, select the resource group that you created.
- Select Delete resource group.
- Enter the resource group name. Then select Delete.