What is Alexa Skills Kit SDK?
In our previous blog, we have discussed the introduction to Amazon’s Alexa Service, Alexa Voice Service (AVS), Alexa Skills Kit (ASK), What is a skill and the requirements on how to build a custom skill. In this blog, we will further discuss the use of Alexa Skills Kit SDK using Python to help build our own skill that can be tested on an Alexa supported device. Using Alexa Skills Kit SDK, makes it easier to build highly engaging skills, by allowing you to spend more time on implementing features and less on writing boiler-plate code.
Installing and Setting up Alexa Skills Kit SDK-
Make sure you have Python 3(3.6 and above) installed, if not install the latest version of Python. To show the version, from a command prompt run the following command:
python --versionIn this blog, we will be setting up the SDK in a virtual environment, which requires a few packages to be installed. To get started, from a command prompt, use the following command to install the package:
pip install virtualenvNext, lets create a new folder for your Alexa skill and navigate to the folder:
mkdir skill
cd skill
Now, lets create a virtual environment called skill_env by issuing the following command:
virtualenv skill_envNext, activate your virtual environment and install the SDK. Run the following command to activate your virtual environment:
source skill_env/bin/activateThe command prompt should now be prefixed with (skill_env), indicating that you are working inside the virtual environment. Use the following command to install the ASK Python SDK:
pip install ask-sdkDepending on the version of Python you are using, the SDK will be installed into the skill_env/lib/Python(version)/site-packages folder. The site-packages folder is populated with directories including:
ask_sdk
ask_sdk_core
ask_sdk_dynamodb
ask_sdk_model
boto3
...
By the end of the above step, you should have added the SDK into a virtual environment using virtualenv for your project. Let’s now work on developing the skill.
Developing Skills-
What’s a Handler? And what types exist?
Request handlers and Exception handlers. Request handlers are responsible for handling one or more types of incoming requests. For example, when you ask an Alexa device to “open hello world”, your skill needs to respond to the LaunchRequest that is sent to your Hello World skill. With the ASK SDK for Python, you simply need to write a request handler, which is code to handle incoming requests and return a response. Your code is responsible for making sure that the right request handler is used to process incoming requests and for providing a response. Exception handlers are responsible to handle a problem that can occur when the request is run. The ASK SDK for Python supports exception handling in a similar way to handling requests.
The ASK SDK for Python provides two ways to create request handlers and exception handlers, but in this blog, we will be using the implementation using handler classes for both of them.
Next Step-
Before we go further into developing our skill for the project, let’s make sure we have met all the requirements we need to go further with the steps. We have set-up the SDK in the virtual environment, understood how handlers work and now we will need to use a text editor/IDE to work on our python file.
For this example, let’s consider the program name to be “Hello World”. Now, you’ll write your Hello World in a single python file named hello_world.py. In the skill folder that you have created earlier.
Implementing Request Handlers-
Start by creating a skill builder object. The skill builder object helps in adding components responsible for handling input requests and generating custom responses for your skill.
Type or paste the following code into your hello_world.py file.
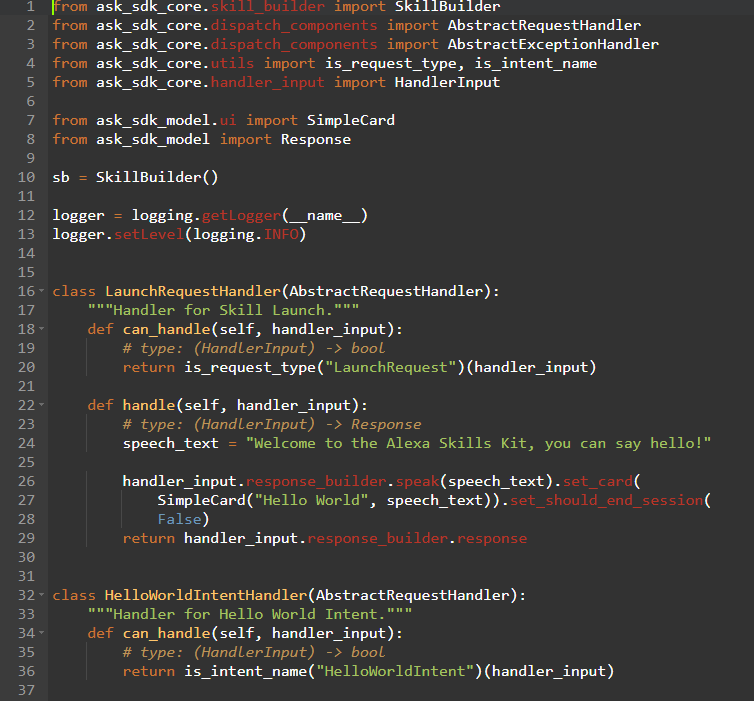
from ask_sdk_core.skill_builder import SkillBuilder

sb = SkillBuilder()
To use handler classes, each request handler is written as a class that implements two methods of the AbstractRequestHandler class; can_handle and handle.
The can_handle method returns a Boolean value indicating if the request handler can create an appropriate response for the request. The Hello World skill only needs to reference the request information to decide if each handler can respond to an incoming request.
LaunchRequest handler
The following code example shows how to configure a handler to be invoked when the skill receives a LaunchRequest. The LaunchRequest event occurs when the skill is invoked without a specific intent.
Type or paste the following code into your hello_world.py file, after the previous code.
from ask_sdk_core.dispatch_components import AbstractRequestHandler
from ask_sdk_core.utils import is_request_type, is_intent_name
from ask_sdk_core.handler_input import HandlerInput
from ask_sdk_model import Response
from ask_sdk_model.ui import SimpleCard

class LaunchRequestHandler(AbstractRequestHandler):
    def can_handle(self, handler_input):
        # type: (HandlerInput) -> bool
        return is_request_type("LaunchRequest")(handler_input)

    def handle(self, handler_input):
        # type: (HandlerInput) -> Response
        speech_text = "Welcome to the Alexa Skills Kit, you can say hello!"

        handler_input.response_builder.speak(speech_text).set_card(
            SimpleCard("Hello World", speech_text)).set_should_end_session(
            False)
        return handler_input.response_builder.response
The can_handle function returns True if the incoming request is a LaunchRequest. The handle function generates and returns a basic greeting response.
HelloWorldIntent handler
The following code example shows how to configure a handler to be invoked when the skill receives an intent request with the name HelloWorldIntent. Type or paste the following code into your hello_world.py file, after the previous handler.
class HelloWorldIntentHandler(AbstractRequestHandler):
def can_handle(self, handler_input):
# type: (HandlerInput) -> bool
return is_intent_name("HelloWorldIntent")(handler_input)
def handle(self, handler_input):
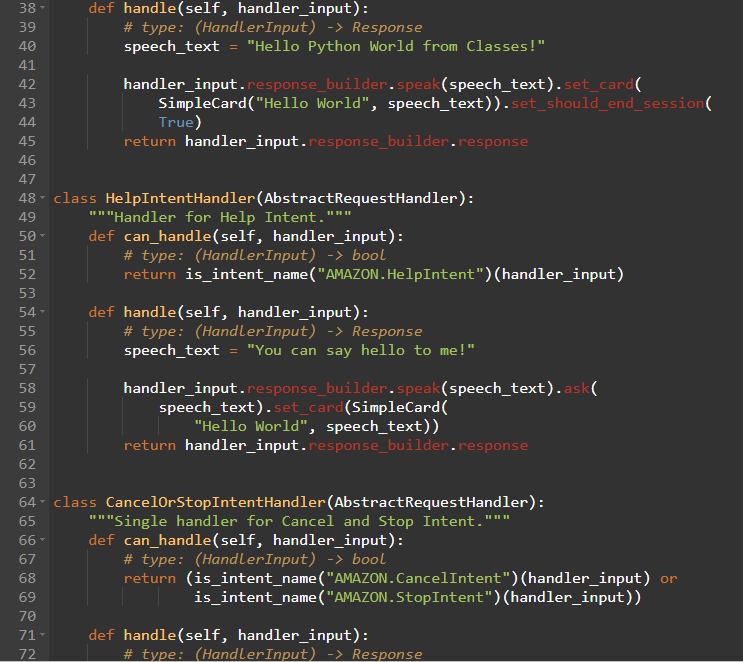
# type: (HandlerInput) -> Response
speech_text = "Hello World"
handler_input.response_builder.speak(speech_text).set_card(
SimpleCard("Hello World", speech_text)).set_should_end_session(
True)
return handler_input.response_builder.response
The can_handle function detects if the incoming request is an IntentRequest, and returns True if the intent name is HelloWorldIntent. The handle function generates and returns a basic “Hello World” response.
HelpIntent handler
The following code example shows how to configure a handler to be invoked when the skill receives the built-in intent AMAZON.HelpIntent. Type or paste the following code into your hello_world.py file, after the previous handler.
class HelpIntentHandler(AbstractRequestHandler):
    def can_handle(self, handler_input):
        # type: (HandlerInput) -> bool
        return is_intent_name("AMAZON.HelpIntent")(handler_input)

    def handle(self, handler_input):
        # type: (HandlerInput) -> Response
        speech_text = "You can say hello to me!"

        handler_input.response_builder.speak(speech_text).ask(speech_text).set_card(
            SimpleCard("Hello World", speech_text))
        return handler_input.response_builder.response
Similar to the previous handler, this handler matches an IntentRequest with the expected intent name. Basic help instructions are returned, and .ask(speech_text) causes the user’s microphone to open up for the user to respond.
CancelAndStopIntent handler
The CancelAndStopIntentHandler is similar to the HelpIntent handler, as it is also triggered by the built-In AMAZON.CancelIntent or AMAZON.StopIntent Intents. The following example uses a single handler to respond to both intents. Type or paste the following code into your hello_world.py file, after the previous handler.
class CancelAndStopIntentHandler(AbstractRequestHandler):
def can_handle(self, handler_input):
# type: (HandlerInput) -> bool
return is_intent_name("AMAZON.CancelIntent")(handler_input)
or is_intent_name("AMAZON.StopIntent")(handler_input)
def handle(self, handler_input):
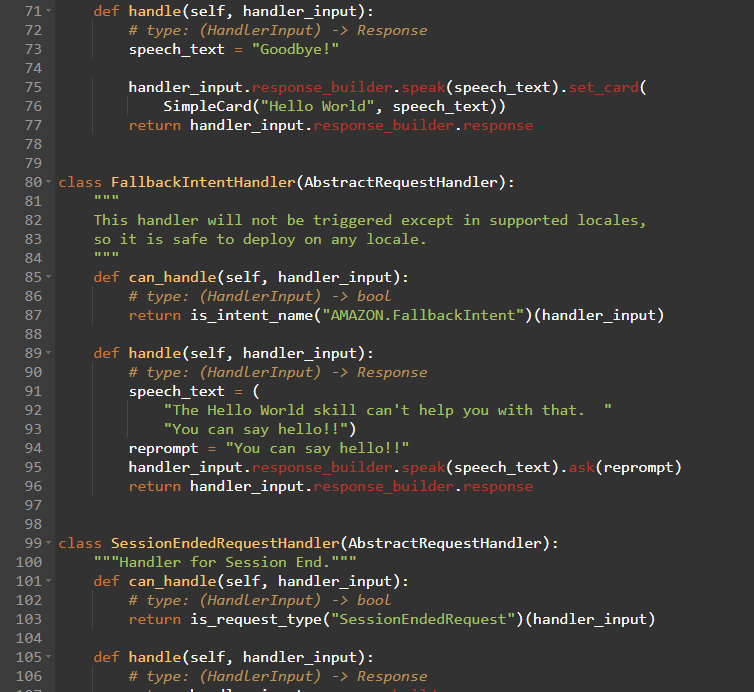
# type: (HandlerInput) -> Response
speech_text = "Goodbye!"
handler_input.response_builder.speak(speech_text).set_card(
SimpleCard("Hello World", speech_text)).set_should_end_session(True)
return handler_input.response_builder.response
The response to both intents is the same, so having a single handler reduces repetitive code.
SessionEndedRequest handler
Although you cannot return a response with any speech, card or directives after receiving a SessionEndedRequest, the SessionEndedRequestHandler is a good place to put your cleanup logic. Type or paste the following code into your hello_world.py file, after the previous handler.
class SessionEndedRequestHandler(AbstractRequestHandler):
    def can_handle(self, handler_input):
        # type: (HandlerInput) -> bool
        return is_request_type("SessionEndedRequest")(handler_input)

    def handle(self, handler_input):
        # type: (HandlerInput) -> Response
        # any cleanup logic goes here

        return handler_input.response_builder.response
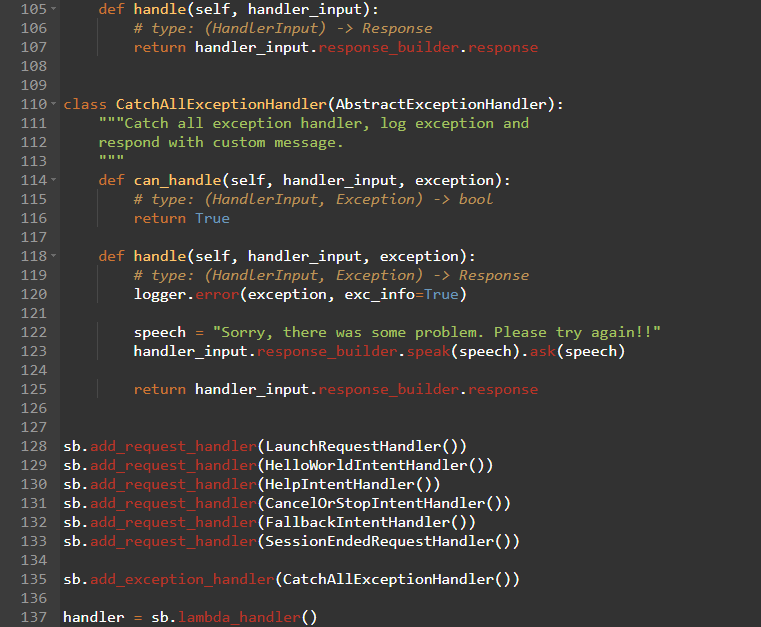
Implementing exception handlers-
The following sample adds a catch all exception handler to your skill, to ensure the skill returns a meaningful message for all exceptions. Type or paste the following code into your hello_world.py file, after the previous handler.
from ask_sdk_core.dispatch_components import AbstractExceptionHandler

class AllExceptionHandler(AbstractExceptionHandler):

    def can_handle(self, handler_input, exception):
        # type: (HandlerInput, Exception) -> bool
        return True

    def handle(self, handler_input, exception):
        # type: (HandlerInput, Exception) -> Response
        # Log the exception in CloudWatch Logs
        print(exception)

        speech = "Sorry, I didn't get it. Can you please say it again!!"
        handler_input.response_builder.speak(speech).ask(speech)
        return handler_input.response_builder.response
Creating the Lambda handler-
The Lambda handler is the entry point for your AWS Lambda function. The following code example creates a Lambda handler function to route all inbound requests to your skill. The Lambda handler function creates an SDK skill instance configured with the request handlers that you just created.
Type or paste the following code into your hello_world.py file, after the previous handler.
sb.add_request_handler(LaunchRequestHandler())
sb.add_request_handler(HelloWorldIntentHandler())
sb.add_request_handler(HelpIntentHandler())
sb.add_request_handler(CancelAndStopIntentHandler())
sb.add_request_handler(SessionEndedRequestHandler())

sb.add_exception_handler(AllExceptionHandler())

handler = sb.lambda_handler()
By the end of the above step, your hello_world.py file should look like this.
Preparing your code for AWS Lambda-
Your code is now complete and you need to create .zip files that contain the files ready to upload to Lambda. When you upload your code to AWS Lambda, you must include your skill code and its dependencies inside a zip file as a flat file structure, so you’ll place your code in the same folder as the ASK SDK for Python, before zipping it.
Since we used a virtual environment, the dependencies are installed in the site-packages folder in your virtual environment. So, navigate to skill_env/lib/Python3.6 folder, then the site-packages folder. Copy the hello_world.py file into the site-packages folder and create a .zip file of the contents of the folder and name the file skill.zip.
With this, you have successfully created an Alexa Skills Kit SDK using python. You can go further with the process, by uploading your code to AWS Lambda and creating the skills on the Alexa Developer Portal. The next process will be further discussed using an example in the next blog, which focuses on using AWS Lambda function.
Thank you for reading, Have a great time! 🙂