What is Azure Data Factory?
Azure data factory (adf) is a service provided by the Microsoft Azure which is used to transfer the data from one place to another place and preform ETL operations on the data. For example, adf is used to transfer data between one data store to another data store or transferring the data from on-premises to cloud. This can be achieved by creating pipelines. A Pipeline is a data-driven workflow. These pipelines can be scheduled and can run as a job on the clusters for any specific interval of time.
Step by Step demo of create and usage of adf:
I have a text file consists of customer data which resides in my machine, and I want to add this data into SQL database. Let us consider this small example and implement it using the adf. We need the following before starting to work on it.
- SQL Server Management Studio installed in your machine
- A resource group in adf.
Step1: – Creating the SQL database
- Navigate: Portal Home –> SQL databases –> Create.
- Subscription and Resource Group: Select the resource group you are using for this demo.
- Enter a Database Name which satisfies the naming convention.
- Create a new database server by clicking on create server. Enter server name and location. Choose SQL authentication as Authentication method enter the admin login and password. click on okay.
- Choose no for SQL elastic pool
- Workload environment as Development
- For Compute and storage click on configure database which gives you the option to choose service tier basic (For less demanding workloads) and click on apply
- Backup-storage redundancy choose Locally redundant backup-storage
- You can click through the Networking, Security, additional settings and Tags tabs to explore the options available. We will be taking all the defaults. Or you can click on Review and Create to skip these tabs.
- After Deployment is completed click on resource group Click through the resource pages for your SQL server and SQL database and confirm that you can find server name and status.
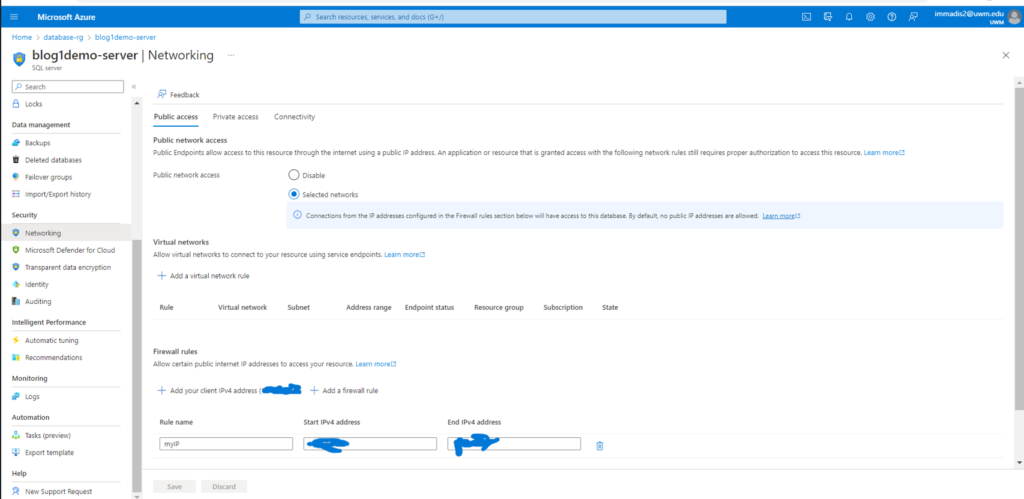
- Now we need to configure the network firewall for connecting the SQL database in SSMS (SQL Server Management Studio). Navigate to the resource group page click on the SQL Server. Scroll down so that you can find the Networking option under security tab. click on the networking option you can see the public access tab. Under public access tab you can see the firewall rules there is an option to add your client IPv4 address add the IP address and select Exceptions check box which will allow you to access the azure services and resources on that server.
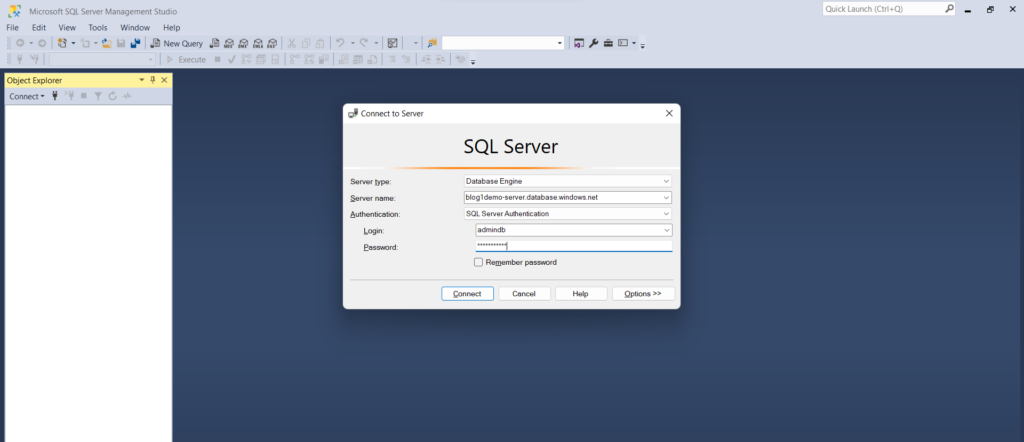
- Now open SSMS and click on add new connection. Enter the Server name and select the Authentication as SQL Server authentication and enter the login and password.
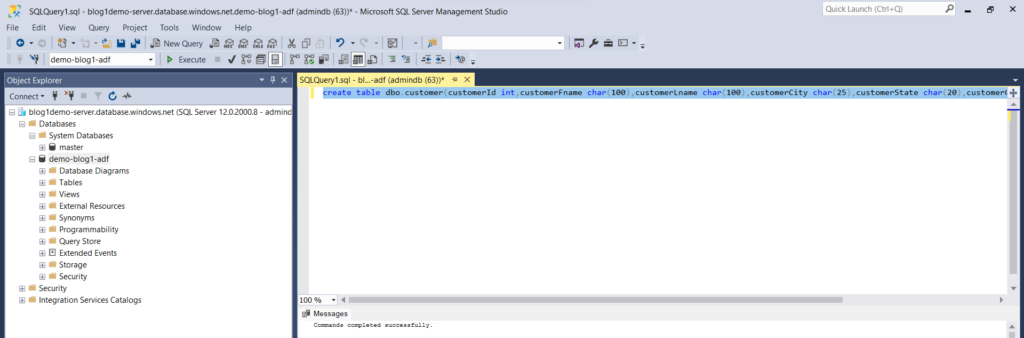
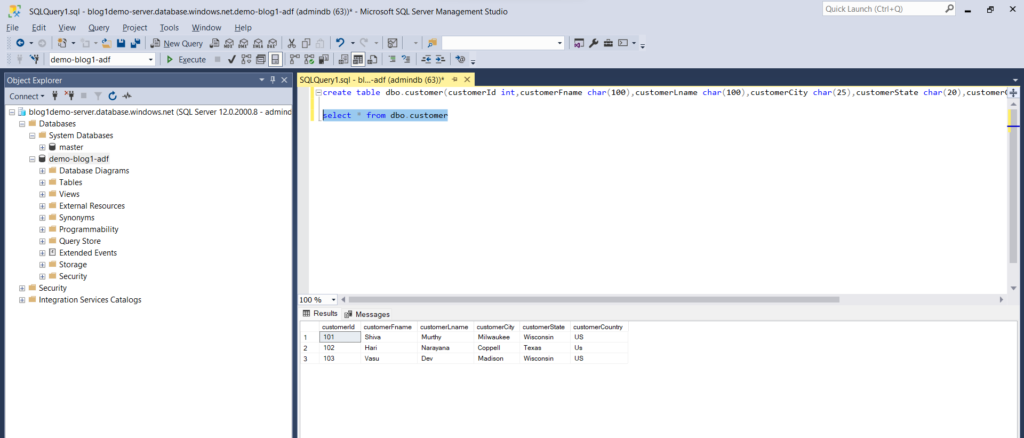
- Create a table in the database which we created just now.
Step2: – Creating an Azure data factory
- Navigate: Portal Home –> Data factories –> Create
- These data factories are ETL tools used to read the data from the file and load into the SQL database
- Subscription and Resource Group: Select the resource group you are using for this demo.
- Now enter the instance details and select the region
- You can click through the Git configuration (Config git later), Networking, Security, additional settings and Tags tabs to explore the options available. We will be taking all the defaults. Or you can click on Review and Create to skip these tabs.
Step3: – Creating Storage Account
- Navigate: Portal Home –> Storage account –> Create
- Provide the subscription, resource group name, enter the storage account name, select the required region, choose performance as standard, and redundancy as locally redundant storage (LRS)
- For this exercise, you can take the defaults for all other options. To do so, click on Review, and then Create.
- Now create a container in the storage account and load the data file into the container.
Step4: – Creating a pipeline
- Navigate: Portal Home –> Data factories –> open azure data factory studio
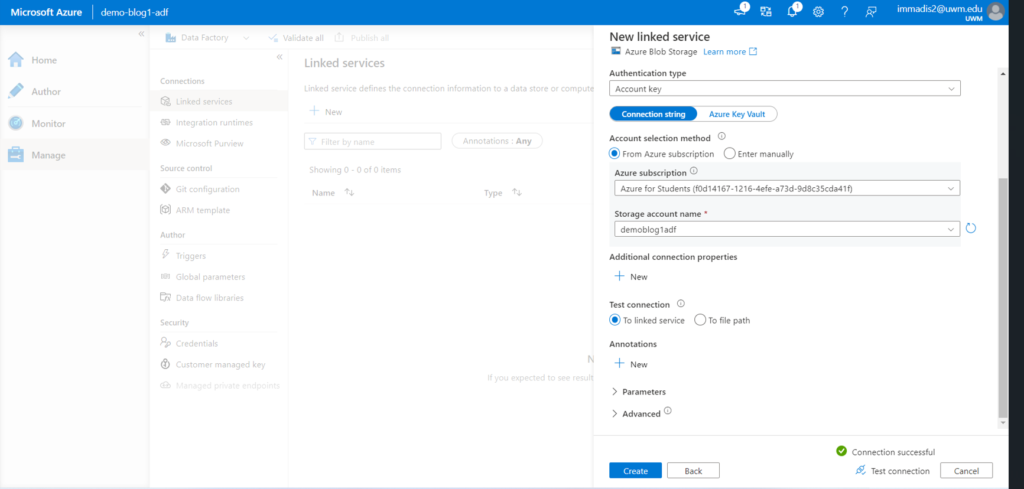
- A new tab will be opened, on the left Panel click on the manage button to create the link for the services.
- Here we are creating 2 link services.
- First, we create a link service source connection to get the data file from the container present in the storage account
- Second, we will create a link service destination connection to Azure SQL to store the data.
- Clink on the create linked service, from the right-side search box search for the blob storage click it and continue. Then enter the name and leave the default options, for the storage account name select the storage account which you are using for this scenario. Then test the connection after it is successful click the create button.
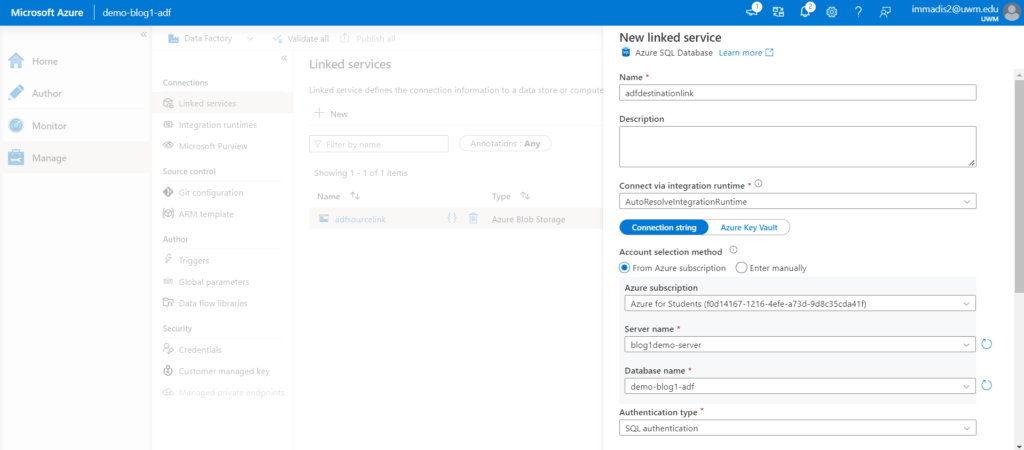
- Now create a link to the azure SQL database. click on create new link and search for Azure SQL database.
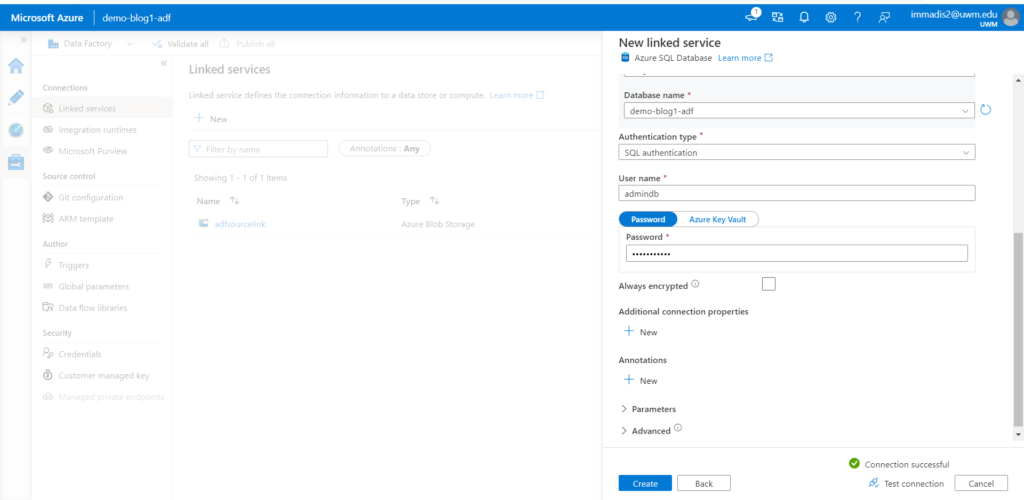
- Enter the name for the link and enter the server details and database name. Select the authentication type as SQL authentication and enter the login and password and test the connectivity and click on create.
- If the connection is failed check on more info side of the error and add the mentioned IP address to the network firewall and save it. Please check that the all the resources are in the same resource group otherwise it will be an issue.
- Now click on the author section so that you can create a new pipeline enter the name of the pipeline. Then under the Activities tab drag and drop the copy data filed into the white space.
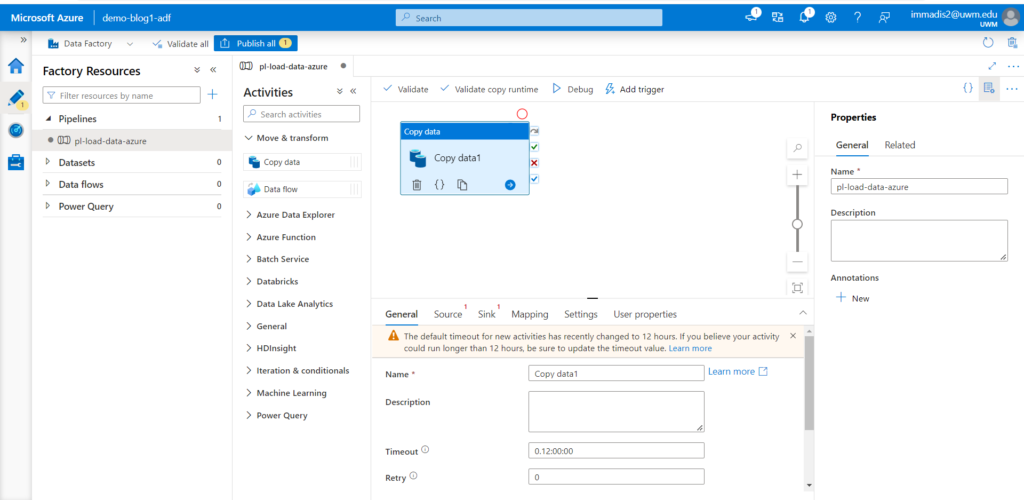
- Enter the name of the copy data in the general section.
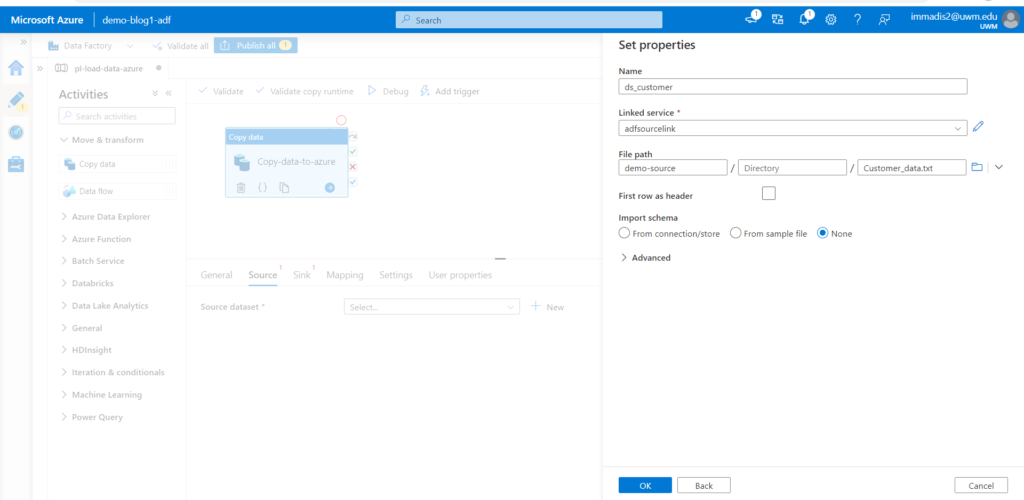
- Select the source folder in the source section and then choose the type of your data file.
- Set the name of the source and select the source link under linked service, also chose the path where your data file resides in the container.
- Select import schema as none and click ok button.
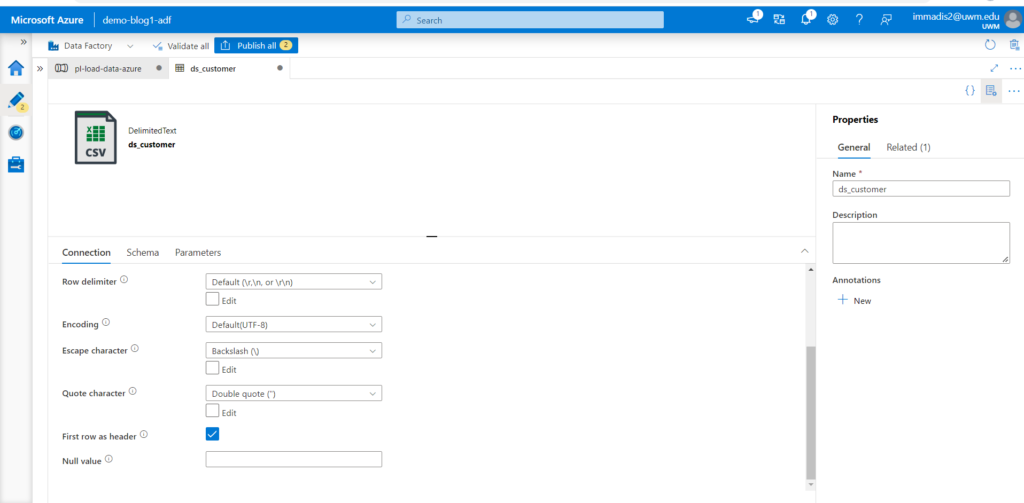
Click the open option under the Source beside the source dataset to choose the first line as header.
- After selecting don’t close the tab as it doesn’t save the change. click on pipeline tab to continue further. Now go to sink tab now create a table in SSMS by connecting with the Next go for the sink tab and select the Azure SQL database shown as below.
- Now set the properties of the sink by filling the linked service with the destination link service name and the table name you created in the beginning.
- We will be taking all the defaults for Mappings, settings, User properties. Click on the white space to check for validation.
- Now you can click on the Debug option to check whether the pipeline has any errors. Once it is successful it will be shown in the below output screen.

- Now you can check the database and make sure you have all the data in it.
Now in the Azure data factory tab click on the publish button then it will save the pipeline publish the pipeline which will be accessible when you open data factory next time.
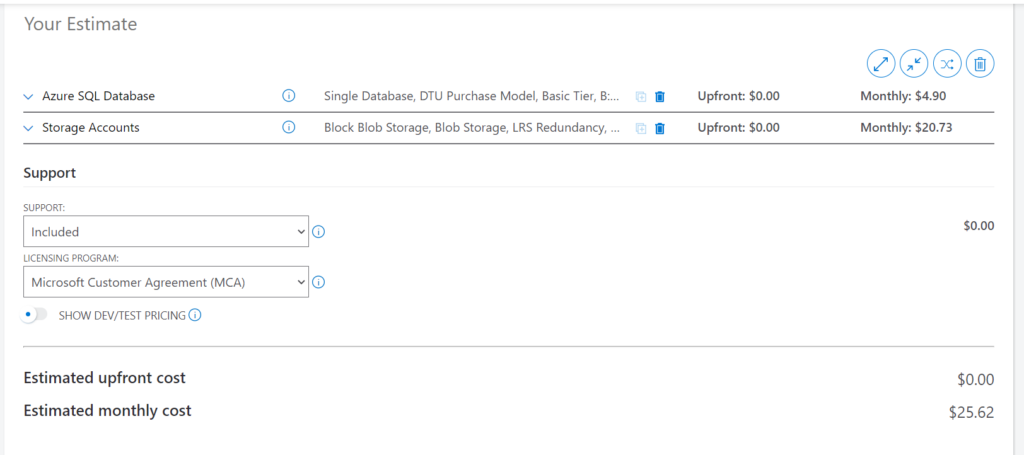
Below is the total estimation cost of the services if ran for 730 hours.
Thanks for reading my blog.