AWS Athena is a service that lets you build databases on and query the data from the data files stored on S3 storage buckets. It is an interactive service that is quite useful when you have huge data files in S3 and don’t want to write separate ETL code to parse data and store it on to a separate SQL DB.
Basically, Athena allows you to write queries and retrieve data directly from the files stored on S3.
While the AWS console is quite useful for performing operations and testing the process, in real-time when you must use this service in your python applications and processes, it could prove a bit complex and face problems.
In this blog, we will discuss connecting to the Athena database using Python and performing some queries using sample data in S3 storage buckets.
Methodology:
We will perform the task using AWS Python SDK called Botot3. Let’s discuss the high-level process of how Athena works before deep diving into it,
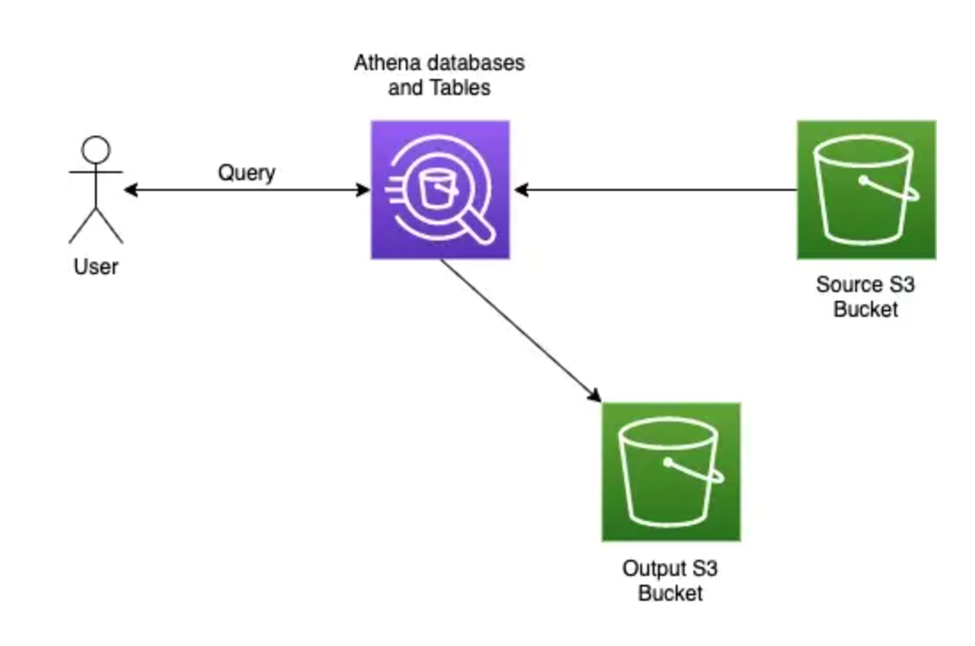
When a user makes a query on the Athena database (assuming a database and tables are created according to the data present in the source s3 bucket), then Athena will fetch the data from the source s3 bucket and return the query result to the user and also writes the result to a CSV file and put it in an output s3 bucket which is part of Athena’s instance.
As a prerequisite, we need to login as an IAM user and attach Athena managed policies to the user, create an s3 bucket for outputting the result in CSV format and store it. A note, we will be using sample Amazon CloudFront log data in the location “s3://athena-examples-myregion/cloudfront/plaintext/”, where myregion is your current AWS Region.
Along with this we also need to create an Athena database schema and a table based on the sample CloudFront data using the AWS Athena console. We will these steps now,
Attaching Athena Managed Policies to the IAM user:
There are two policies that need to be assigned to the IAM user, they are,
- AmazonAthenaFullAccess
- AWSQuicksightAthenaAccess
These policies will give the user permission to Athena to query Amazon s3 and write the results of the query to an output S3 bucket on the user’s behalf.
Let’s use some screenshots to explain the process in detail:
- Go to the IAM portal, policies section, and search for one of the policies.
- Select the policy, select the “Actions” drop-down, and choose the “attach” option.
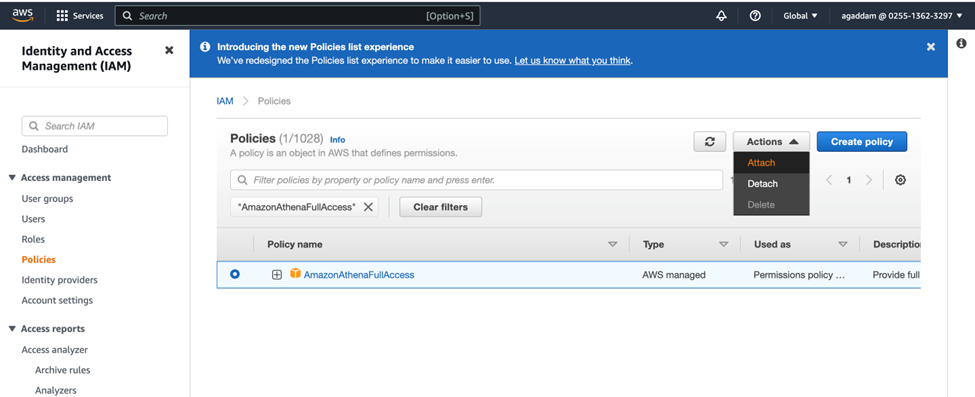
Then the policy will be attached to the IAM user and follow the same process to attach the other policy too to the user.
Creating an S3 Bucket to output the results of the query in CSV files:
- Go to the Amazon S3 console and click on the “Create bucket” option
- Give a name to the bucket and leave all other options with their default selections and click on the “Create bucket” button at the end of the page
I’ve created a bucket called “blog2bucket1” for my demonstration.
Creating Athena DB Schema and Table based on the sample CloudFront data:
- Database:
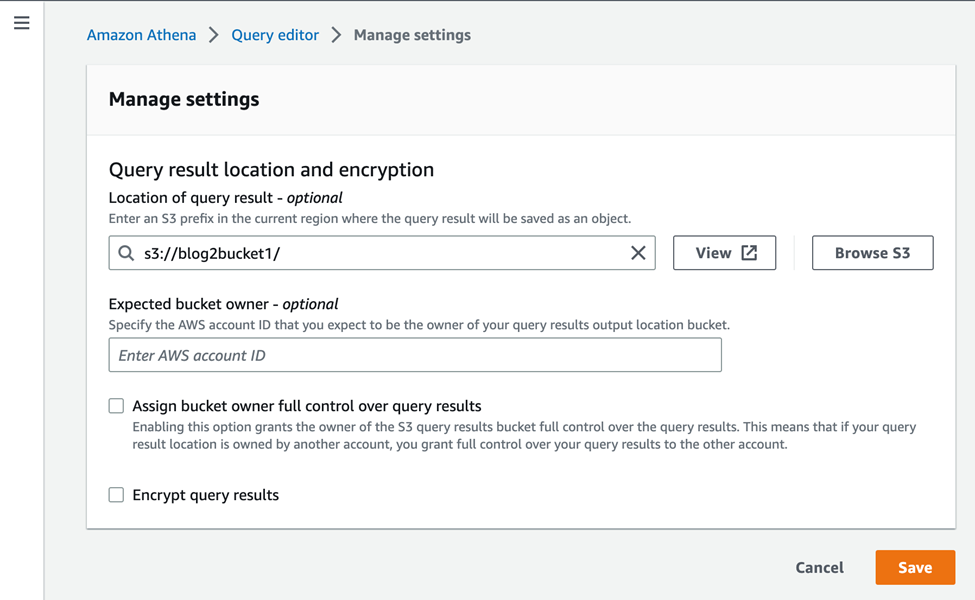
To create an Athena database, we can use the AWS Athena console. When you are on the console page even before creating a database, we need to set up the output s3 bucket URL information. To do that, go to “Query editor”, then click on the “Settings” option and click on the “Manage” option,

Inside the manage settings page, you can use the “Browse S3” option to select the S3 bucket as your output bucket and save it, here I selected “blog2bucket1” as my output bucket.
Now click on the “Editor” option to go to the query editor page and execute the below statement to create the “blog2” database. “Create database blog2” and click on Run, “blog2” database will be created.
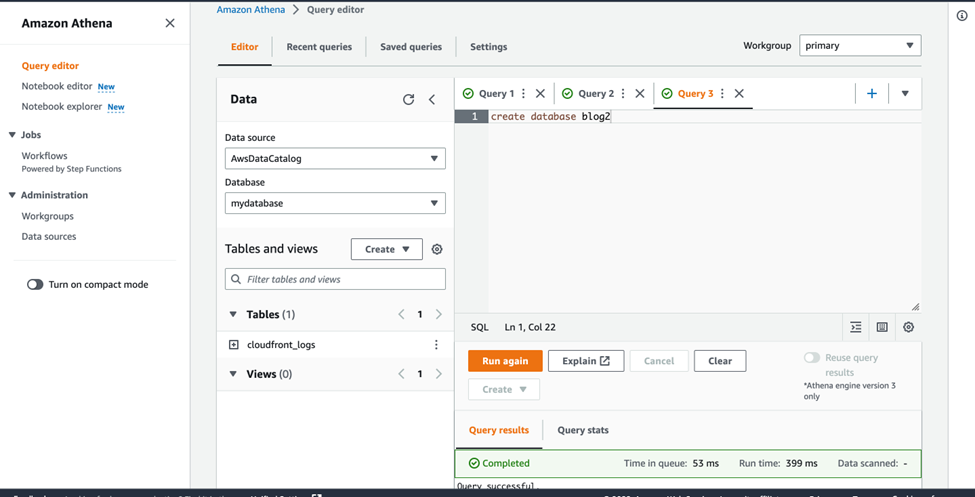
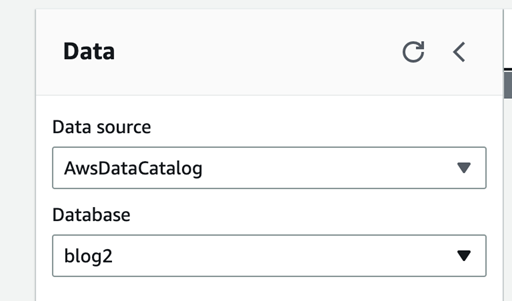
Choose “blog2” database under the Database option to the left,
- Table:
Since we have created a database, we can create a table for it. The table will be created based on the sample data in the sample cloud front log data. The sample data is in the tab-separated format like below,

The location of the data is: s3://athena-examples-myregion/cloudfront/plaintext/, where myregion is your current AWS Region.
We can use the below statement to create the table and defines columns that map to the data, specifies how data is delimited, and specifies the S3 location where sample data is present.
CREATE EXTERNAL TABLE IF NOT EXISTS cloudfront_logs (
  `Date` DATE,
  Time STRING,
  Location STRING,
  Bytes INT,
  RequestIP STRING,
  Method STRING,
  Host STRING,
  Uri STRING,
  Status INT,
  Referrer STRING,
  ClientInfo STRING
  )
  ROW FORMAT DELIMITED
  FIELDS TERMINATED BY '\t'
  LINES TERMINATED BY '\n'
  LOCATION 's3://athena-examples-my-region/cloudfront/plaintext/';
The statement creates a table “cloudfront_logs” and specifies the name and datatype for each field/column. ROW FORMAT DELIMITED means, Athena uses a library called LazySimpleSerDe to parse the data. The statement also specifies that the fields are tab-separated (FIELDS TERMINATED BY ‘\t’) and that each record in the file ends in a newline character (LINES TERMINATED BY ‘\n). The LOCATION clause specifies the path in Amazon S3 where the data is located.
The sample data which is in the format below,
Mozilla/5.0%20(Android;%20U;%20Windows%20NT%205.1;%20en-US;%20rv:1.9.0.9)%20Gecko/2009040821%20IE/3.0.9
Since the statement specifies the fields are field delimited this field cannot be broken into columns and thus we can use regular expressions here to divide this file into columns. The below syntax can be used to use regex expression in the create statement and Athena uses the “Regex SerDe” library for the job.
ROW FORMAT SERDE 'org.apache.hadoop.hive.serde2.RegexSerDe'
  WITH SERDEPROPERTIES ("input.regex" = "regular_expression")
Finally, create a statement after all the modifications and including the region ‘us-east-1’ is,
CREATE EXTERNAL TABLE IF NOT EXISTS cloudfront_logs (
  `Date` DATE,
  Time STRING,
  Location STRING,
  Bytes INT,
  RequestIP STRING,
  Method STRING,
  Host STRING,
  Uri STRING,
  Status INT,
  Referrer STRING,
  os STRING,
  Browser STRING,
  BrowserVersion STRING
  )
  ROW FORMAT SERDE 'org.apache.hadoop.hive.serde2.RegexSerDe'
  WITH SERDEPROPERTIES (
  "input.regex" = "^(?!#)([^ ]+)\\s+([^ ]+)\\s+([^ ]+)\\s+([^ ]+)\\s+([^ ]+)\\s+([^ ]+)\\s+([^ ]+)\\s+([^ ]+)\\s+([^ ]+)\\s+([^ ]+)\\s+[^\(]+[\(]([^\;]+).*\%20([^\/]+)[\/](.*)$"
  ) LOCATION 's3://athena-examples-us-east-1/cloudfront/plaintext/';
After running this statement, the table cloudfront_logs is created and appears under the list of Tables for the blog2 database.
Python script to connect to Athena DB and run queries:
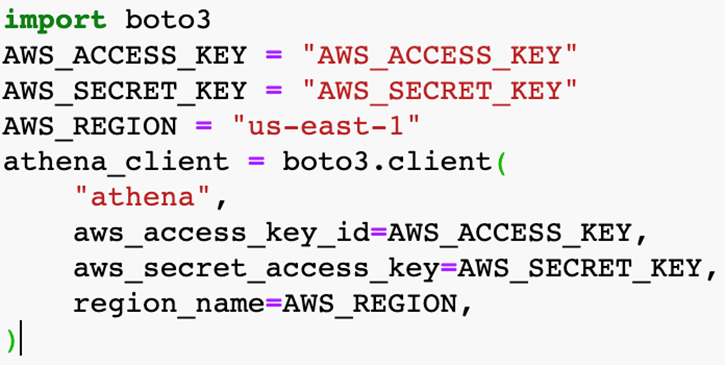
- First, we will build Athena client, using boto3:
Note: We will not reveal Access Key and Secret Key here, anyone who wishes to execute the program can input their own keys and run it.
So, here we are mentioning the access keys and the region for the Athena client.
We can use this client to run queries,
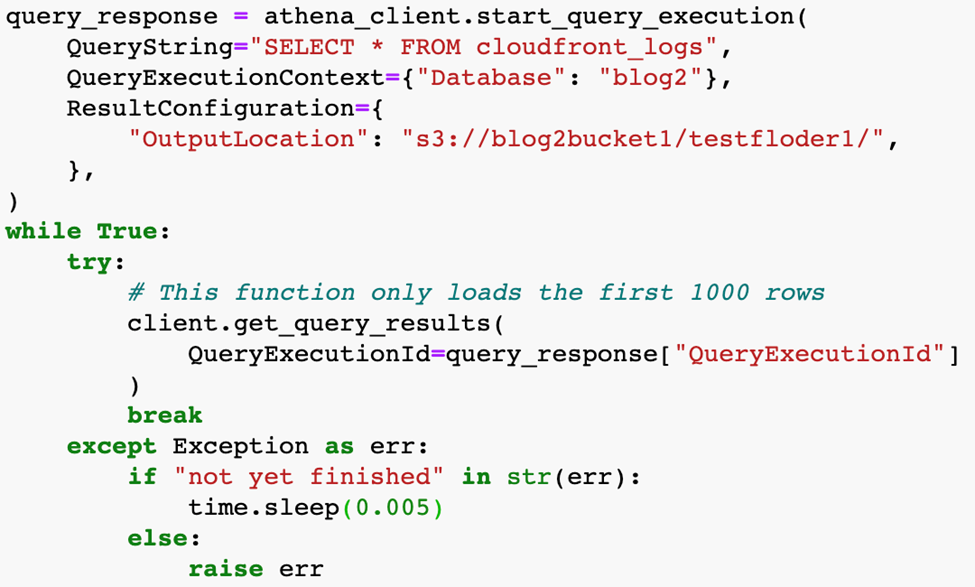
“QueryString” is the query you wish to execute and “QueryExecutionContext” is the database name you wish to run the query against, in our case, it’s the “blog2” database that we have created for demonstration.
In the “ResultConfiguration” we are mentioning the output s3 bucket location and encryption configuration.
Inside the try statement, the “get_query_results” will execute the query and load the execution IDs of the query into the “QueryExecutionId” variable.
Now, we can create an s3 client using boto3 to download the query result file from s3,
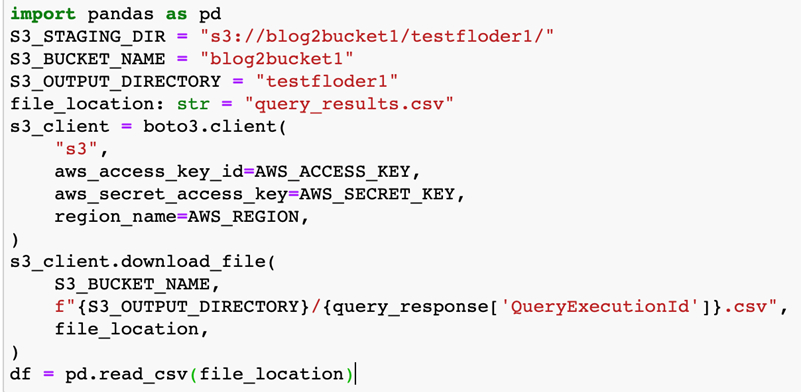
The S3 client is created just like the Athena client. The “s3_client.download_file(…)” line will actually download the results into a file called “query_results.csv” mentioned for variable “file_location”. The data then can be loaded into Pandas data frame using “pd.read_csv(..)”.
More Organized Code:
import time
from typing import Dict
import boto3
import pandas as pd
AWS_ACCESS_KEY = "XXXXXXXXXXXXXXXXXXXX"
AWS_SECRET_KEY = "XXXXXXXXXXXXXXXXXXXXXXXXXXXXXXXX"
SCHEMA_NAME = "blog2"
S3_STAGING_DIR = "s3://blog2bucket1/testfloder1/"
S3_BUCKET_NAME = "blog2bucket1"
S3_OUTPUT_DIRECTORY = "testfloder1"
AWS_REGION = "us-east-1"
def download_query_results(
client: boto3.client, query_response: Dict
) -> pd.DataFrame:
while True:
try:
# This function only loads the first 1000 rows
client.get_query_results(
QueryExecutionId=query_response["QueryExecutionId"]
)
break
except Exception as err:
if "not yet finished" in str(err):
time.sleep(0.001)
else:
raise err
print(f"Time to complete query: {time.time() - start_time}s")
file_location: str = "query_results.csv"
s3_client = boto3.client(
"s3",
aws_access_key_id=AWS_ACCESS_KEY,
aws_secret_access_key=AWS_SECRET_KEY,
region_name=AWS_REGION,
)
s3_client.download_file(
S3_BUCKET_NAME,
f"{S3_OUTPUT_DIRECTORY}/{query_response['QueryExecutionId']}.csv",
file_location,
)
return pd.read_csv(file_location)
athena_client = boto3.client(
"athena",
aws_access_key_id=AWS_ACCESS_KEY,
aws_secret_access_key=AWS_SECRET_KEY,
region_name=AWS_REGION,
)
print("Created athena connection")
start_time = time.time()
response = athena_client.start_query_execution(
QueryString="SELECT * FROM cloudfront_logs",
QueryExecutionContext={"Database": SCHEMA_NAME},
ResultConfiguration={
"OutputLocation": S3_STAGING_DIR,
},
)
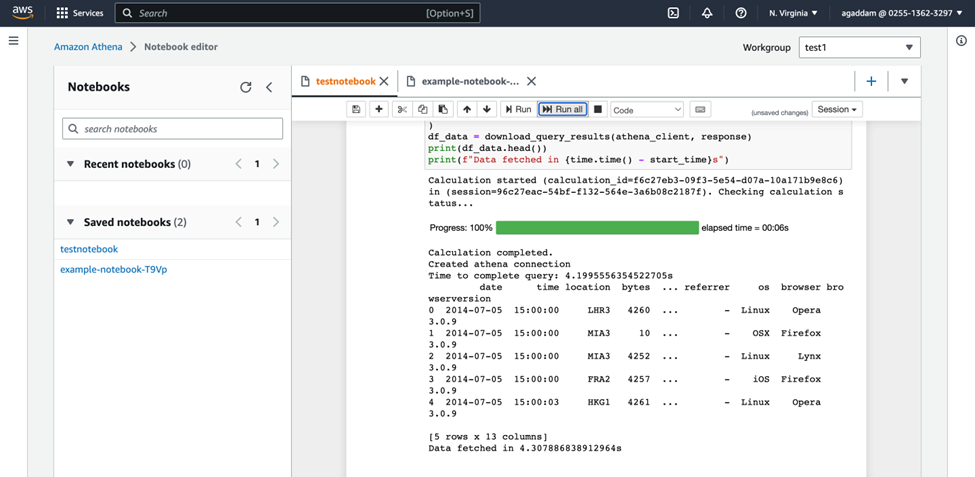
df_data = download_query_results(athena_client, response)
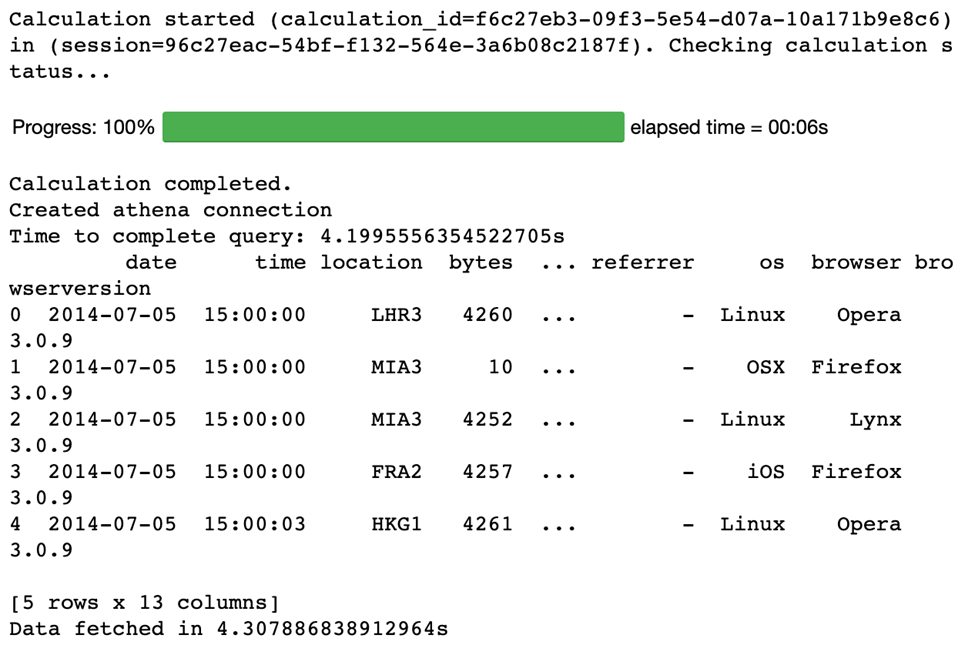
print(df_data.head())
print(f"Data fetched in {time.time() - start_time}s")
Query Results (After using valid access keys):
The entire Demonstration is performed in Athena Notebook Editor: