In today’s digital world, image processing and manipulation are becoming more critical. Resizing images to fit different designs, applications, and other needs is often necessary. Manual resizing images can be a tedious and time-consuming task. Fortunately, there is a way to automate the process using serverless technology and Python.
In this blog post, we will look at the architecture for a serverless function that can automatically resize images using Python. We will start by discussing the basic components of a serverless function and how they work together. Then, we will look at how to use the Python Imaging Library (PIL) to resize images. Finally, we will discuss deploying the serverless function to AWS serverless platform.
What is Serverless Technology?
Serverless technology is a cloud computing model in which the cloud provider dynamically allocates resources on demand. It enables developers to write code without having to manage the underlying infrastructure. This reduces the amount of time and effort required to deploy applications.
The main benefit of serverless technology is that it eliminates the need to manage virtual machines and other server resources. This allows developers to focus on writing code and deploying applications quickly.
What is S3?
Amazon S3 (Simple Storage Service) is a cloud storage service offered by Amazon Web Services (AWS). It provides secure and durable storage for various data types, including images. It is a popular choice for hosting images, as it is highly scalable and cost-effective.
Application Flow
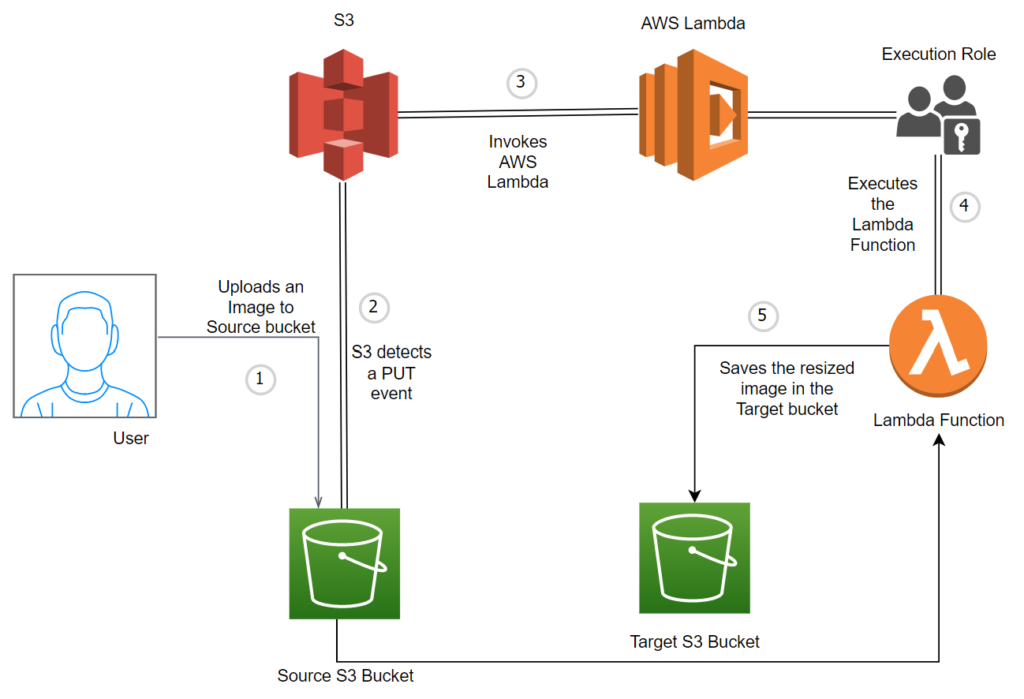
A user uploads an object to an Amazon S3 source bucket. S3 detects this object and creates an event published to AWS Lambda. AWS Lambda invokes the Lambda function and receives the event data. The function uses this data to identify the source bucket name and object key name. Using graphic libraries, the function reads the object and creates a thumbnail image which is then saved to the target bucket.
The below diagram illustrates the flow of the application:
Steps to Configure the Serverless Application
Step 1: Create two S3 buckets
- Log into AWS and navigate to the Amazon S3 service.
- Click on the “Create bucket” button and specify a unique name for the first bucket (e.g., original-images)
- Select the “AWS Region” where you want the first bucket to be located.
- Click on the “Create” button to complete the first bucket creation.
- Click on the “Create bucket” button again and specify a name for the second bucket that follows the name of the first bucket, followed by “-resized” (e.g., original-images-resized).
- Choose the same “AWS Region” as the first bucket’s region for the second bucket.
- Click on the “Create” button to complete the second bucket creation.
Step 2: Create a Lamda Execution User Role
A Lamda Execution User Role provides a secure way to grant access to Lamda functions to users who need to execute specific tasks. This role provides an additional layer of security and control over who can execute Lamda functions, ensuring that sensitive data and operations remain secure.
- Open the Roles page in the IAM console.
- Choose Create role.
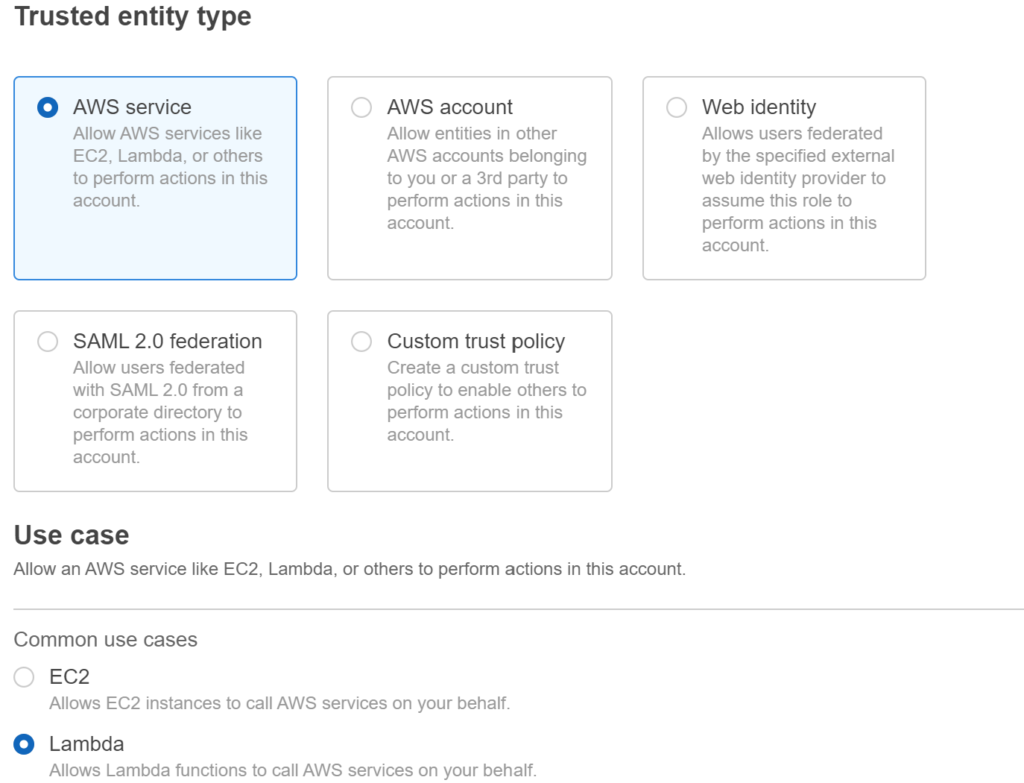
- Under Trusted entity type, choose AWS service; under Use case, choose Lambda and Click on Next.
- In the Permissions policies, search for AWSLambdaBasicExecutionRole and AmazonS3FullAccess and select them by clicking on the check box.
- Click on Next.

- Enter a meaningful name to identify this role (e.g., lambda-execution-role) and Click on Create role.
Step 3: Create an AWS Lambda function
Note: Create the Lambda function in the same region as your S3 bucket.
- Log into the Amazon Web Services (AWS) console and navigate to the Lambda service page.
- Click “Create Function” and select the “Author from scratch” option.

- Enter a name for the function and select the runtime environment as Python 3.9.
- For the Architecture, choose the x86_64 option.
- In the Permissions, choose the Execution role as “Use an existing role.” Choose the role which you have created in Step 2.
- Click on Create Function.
Step 4: Configure an Amazon S3 bucket as the Lambda Trigger
Once the function is created, we need to add a trigger. Adding a trigger to a Lambda function allows it to be invoked in response to an event or other external request. This makes it easier to automate tasks or respond to user actions. For this application, we trigger the Lambda function when a new file is uploaded to an S3 bucket.
- Click on Add trigger.
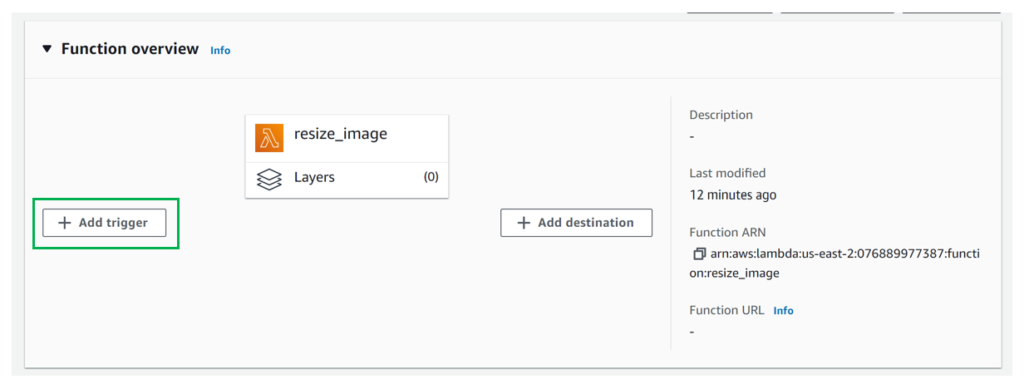
- For the Source, choose S3.
- In the Bucket, choose the first Bucket you have created (e.g., original-images). If you can’t find your Bucket, ensure your lambda function and S3 Bucket are in the same region.
- For the Event type, choose PUT.
- Click on the “I acknowledge” check box and Click on Add.
Step 5: Configuring a PIL (pillow) Dependency Library to Your AWS Lambda Layer
We can use the Python Imaging Library (PIL) to resize images using Python. This library provides an easy-to-use interface for manipulating images. We can use the library to open an image, resize it, and then save it to the storage bucket.
You can follow the post below to add external Python Libraries to a Lambda function. The post below provides an example of adding pandas and numpy libraries. You can follow similar steps to add the PIL library.
Add External Python Libraries to AWS Lambda using Lambda Layers.
Using the above method, we need to
- Install packages on our local machine and zip them.
- Create a lambda layer and upload zip packages
However, for this blog, we will use Klayers, a collection of AWS Lambda Layers for Python3. Using Klayers, we can skip the above two steps and directly add our dependency to our lambda function.
To add our dependency, we need to find the AWS Resource Name(ARN) for our PIL(pillow) library, which should be in the same region as our function. You can find the ARNs here.
Choose any one of the three formats JSON, CSV, or HTML. I chose the us-east-2 region since my function is created in that region.

You can download the csv file for your region, filter with pillow, and copy the ARN. ARN for my region is arn:aws:lambda:us-east-2:770693421928:layer:Klayers-p39-pillow:1

Steps to add a dependency layer to the lambda function
- Click on the Layers
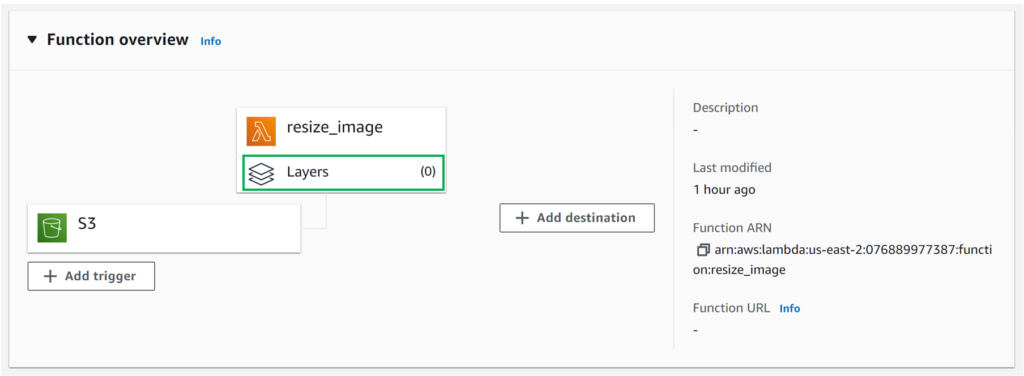
- Click on Add a Layer; choose Specify an ARN, paste the arn for the pillow library for your region, and click Verify.
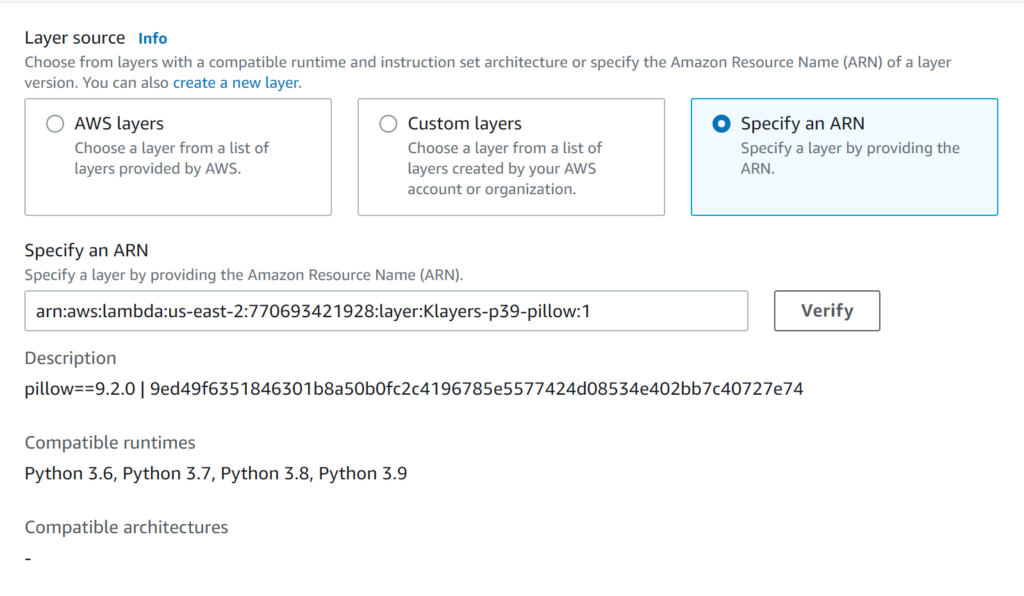
- Click on Add to add the layer to the lambda function.
Step 6: Python code to resize the images
Now that we have set up the serverless function, we can write the code. We can use the PIL library since we have added the dependency in Step 5.
The code below is a Python Lambda function used to resize images uploaded to an AWS S3 bucket. The function takes the event and context parameters and uses the boto3 library to create an S3 client. It then loops through the records in the event parameter, which contains information about the S3 bucket and the object key of the uploaded image.
The resize_image function takes two parameters: the path to the original image and the path to save the resized image. The function then uses the thumbnail() method from the Pillow library to reduce the image size by half and saves the resized image in the specified path.
The lambda_handler function extracts the file name and extension. If the extension is a jpeg, jpg, or png (checks the extension of the file to ensure it is an image file), it will download the file from the first S3 bucket and store it in a temporary file. Then, it will resize the image, store it in the temporary file, and save the resized image in another temporary file. Finally, it will upload the resized image to the second S3 bucket with a “-resized” suffix.
You can find the documentation here to know more about the PIL Image library.
import boto3
import os
import sys
import uuid
from PIL import Image
import PIL.Image

s3_client = boto3.client('s3')

def resize_image(image_path, resized_path):
    with Image.open(image_path) as image:
        (width, height) = (image.width // 2, image.height // 2)
        image.thumbnail((width, height))
        image.save(resized_path)


def lambda_handler(event, context):
    for record in event['Records']:
        bucket = record['s3']['bucket']['name']
        key = record['s3']['object']['key']
        file_name = key.split("/")[-1]
        extension = file_name.split(".")[1]
        if extension in ["jpeg", "jpg", "png"]:
            download_path = '/tmp/{}{}'.format(uuid.uuid4(), key)
            upload_path = '/tmp/resized-{}'.format(key)
            s3_client.download_file(bucket, key, download_path)
            resize_image(download_path, upload_path)
            s3_client.upload_file(upload_path, '{}-resized'.format(bucket), key)
Copy the above code, paste it into the code editor, and deploy it.
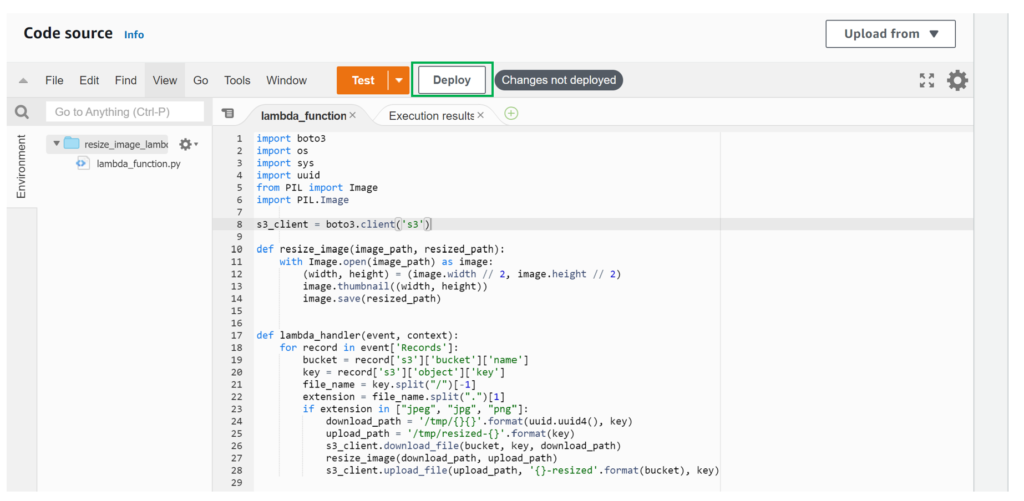
Step 7: Verify the Serverless function
Once the code is deployed, you can verify the function by uploading an image to the first bucket. Once the image is uploaded to the first bucket, open the second bucket to check the resized image.
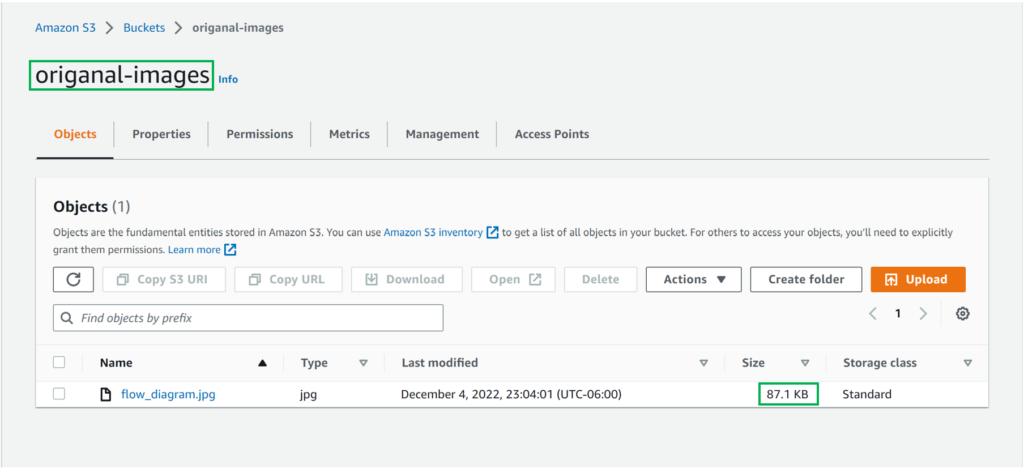
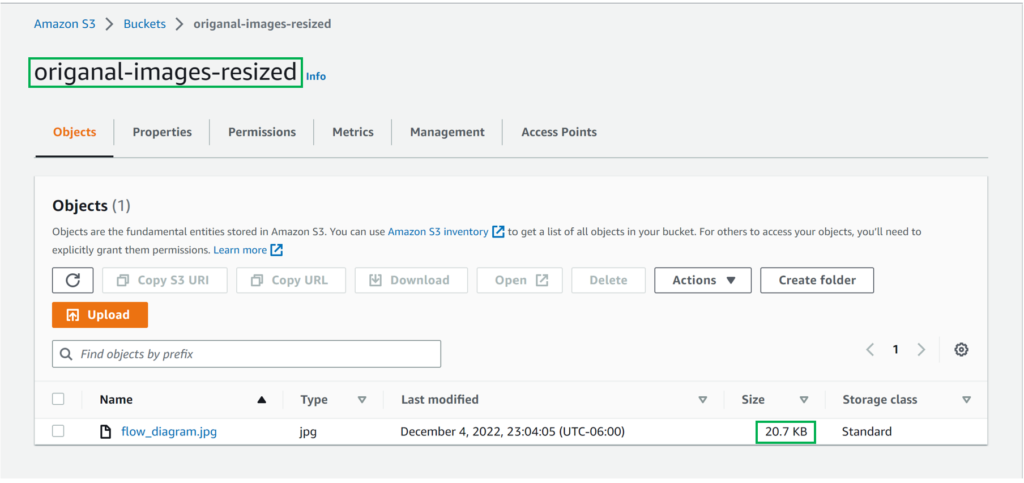
As you can see, the size of the resized image is lesser than the original image. You can also download the images and see the difference.
This blog post discussed using Python to create a serverless function to automatically resize images. We started by discussing the basic components of a serverless function and how they work together. Then, we looked at how to use the Python Imaging Library (PIL) to resize images. Finally, we discussed deploying the serverless function to the AWS Serverless Platform. Following the steps outlined in this blog post, developers can quickly and easily create a serverless function to automate image resizing.