Hola! Cloud Computing Clan (CCC),
In this blog, I intend in walking you through building serverless API with Azure Functions. Before we go into the practical stuff, let us first understand what Azure Functions are.
What is an Azure Function?
Azure Functions allows for the effective execution of small pieces of code. They provide a variety of triggers and bindings that handle linking input and output data and simplify programming. Azure Functions may be hosted on a serverless consumption plan, which grows automatically and charges you only when your Function is in use.
Serverless API
API is the most important part of any customer facing web application since it’s directly tied up to the satisfaction of customers and the health of the business. Among numerous alternative ways of creating an API, serverless is one approach gaining popularity during the last few years because of its cost efficiency, scalability, and relative simplicity.
Combining Azure Function + Serverless API together
With serverless Functions, creating an API is simple. A Function that automatically spins up and scales executes each API call. You simply pay for what you need and don’t have to worry about growing when utilizing Functions as your API.
Here is a short video by Azure Developers who give us a brief overview of Azure Functions:
Now that we have an understanding of what Azure Functions are, we’ll look at how to use Azure Functions to develop a serverless API.
Prerequisites
You will require the following in order to follow along:
- An Azure membership (if you don’t already have one, sign up for one for free before you start)
Let’s build a serverless API
Creating an Azure Function in the Azure portal is your first step in building a serverless API by converting a function into an API.
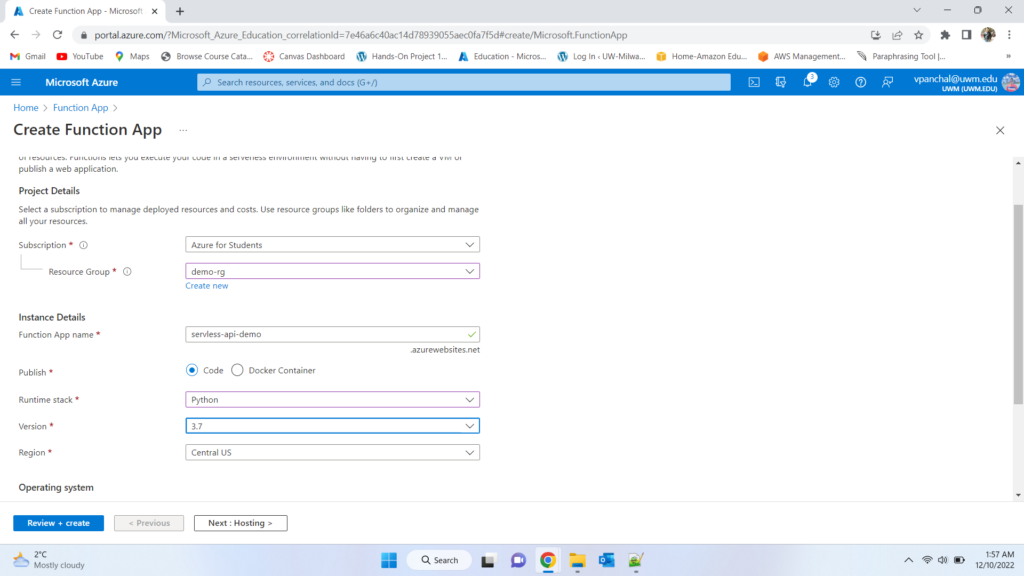
Create Azure Function App
- Click the Create a resource button (the plus sign in the top left corner)
- Search for Functions, select the “Function App” result and click Create
- This brings you to the Create Function App blade
- Select a Resource Group
- Fill in a Name for the service
- Select the Runtime stack, which in this demo will be .NET
- Choose the Region for the service
- Click Next: hosting
- Check that the Plan type is set to Consumption (Serverless)
- Click Next: Monitoring
- Select No for Enable Application Insights
- Click Review + create and Create after that to create the Function App
Add a Function
When the Function App is created, navigate to it in the Azure portal. Function Apps contain one or more Functions. Let’s create a new Function.
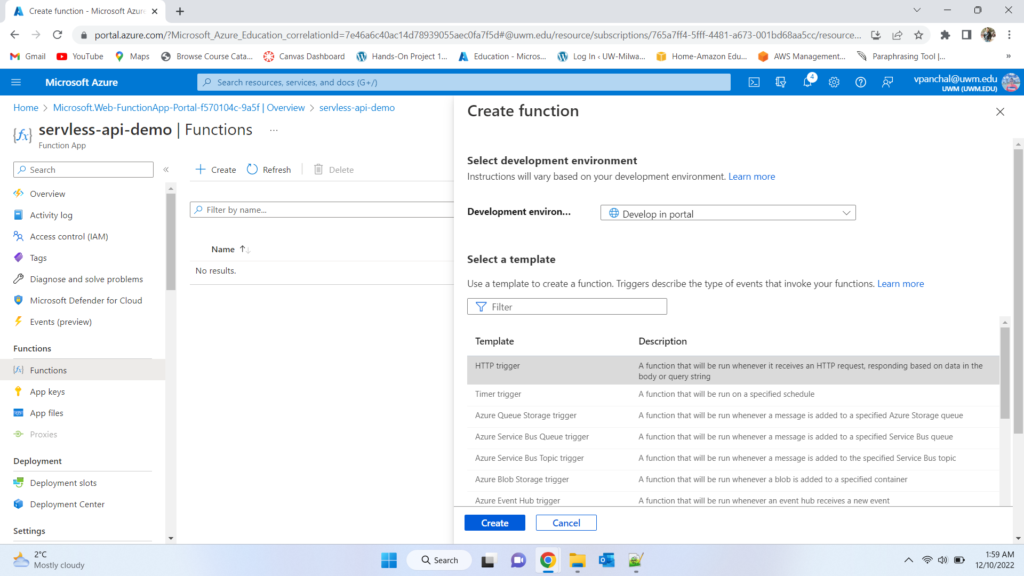
- In the Function App, in the Azure portal, navigate to the Functions blade
- Click Add to start adding a Function. This opens the Add function blade
- Select Develop in the portal for the Development environment setting
- Pick HTTP trigger as the Template
- Give the Function a Name
- Select Anonymous for the Authorization level
- Click Add to create the Function
Implementation in Function
When the Function is created, it will open in the portal. We’ll turn it into an API and try it out.
- In the Function in the portal, click on the Integration menu. This will show the trigger, inputs, and outputs for the Function
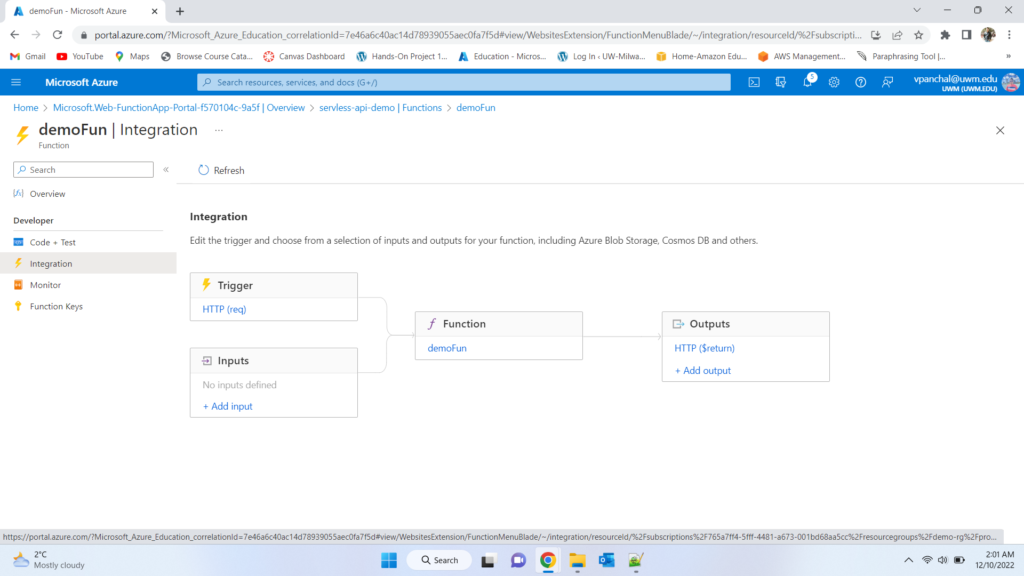
- The trigger for the Function is the HTTP trigger. Click on HTTP (req), to edit the trigger
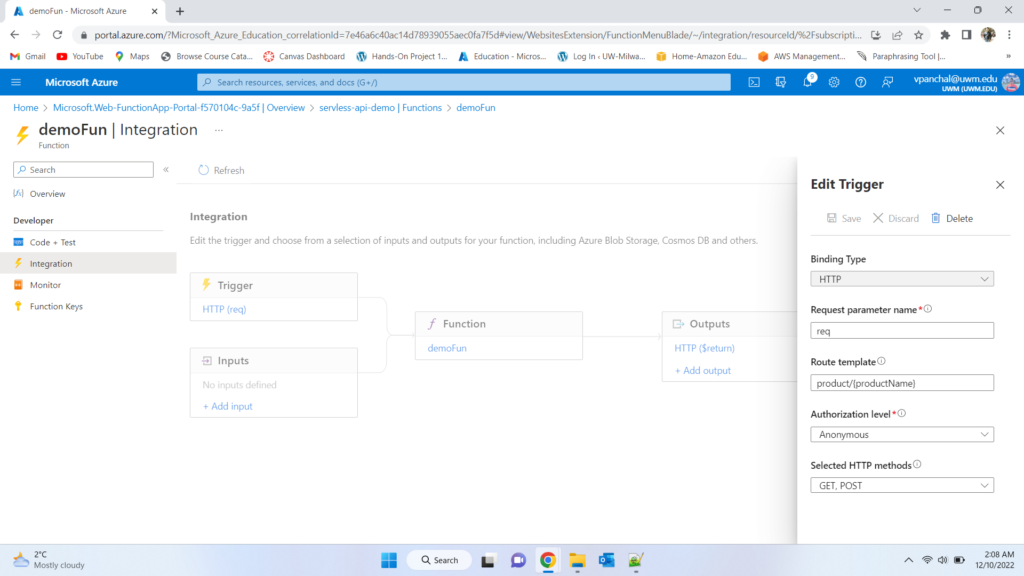
- By default, you would trigger the Function by navigating to its endpoint and performing an HTTP operation, like a GET or POST against it. That is the behavior of most APIs. However, you might want to change the way you fire HTTP requests at the Function, to make it more of a REST API.
- Add a Route template to the Function. Type “product/{productName}”. This will expose the HTTP trigger as functionurl/api/product
- Click Save to save the changes
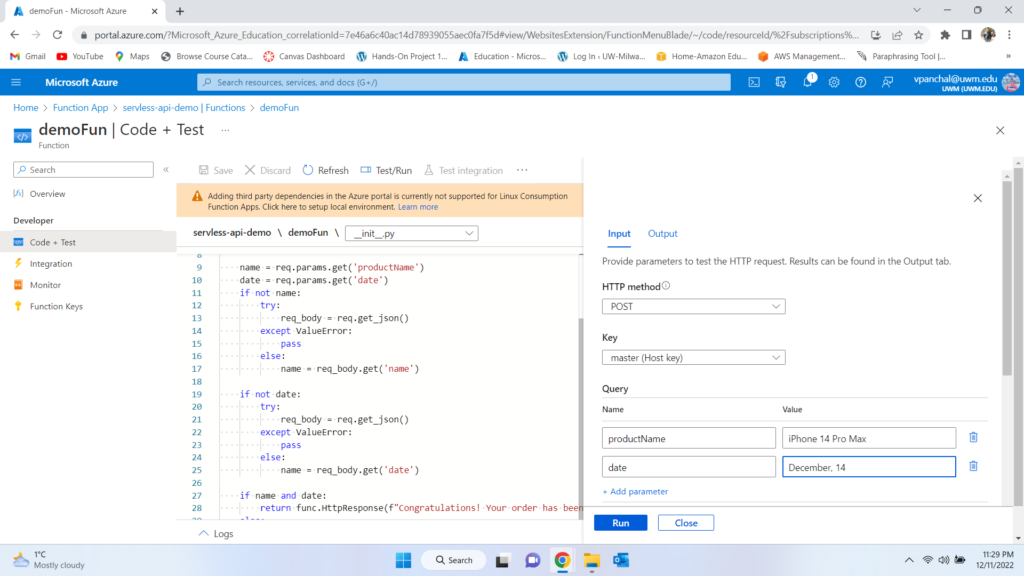
- Next, we’ll edit the code of the Function. Click on the Code + Test menu. This opens the code editor
- The Function code comes from the standard HTTP trigger template. You need to change it into the code below, which contains two changes:
- The Run method now contains a string productName, which catches the productName, and string date, which catches the date parameter of the API route
- string name now comes from the productName parameter
- string date now comes from the date parameter
import logging

import azure.functions as func


def main(req: func.HttpRequest) -> func.HttpResponse:
    logging.info('Python HTTP trigger function processed a request.')

    name = req.params.get('productName')
    date = req.params.get('date')
    if not name:
        try:
            req_body = req.get_json()
        except ValueError:
            pass
        else:
            name = req_body.get('name')

    if not date:
        try:
            req_body = req.get_json()
        except ValueError:
            pass
        else:
            name = req_body.get('date')

    if name and date:
        return func.HttpResponse(f"Congratulations! Your order has been placed successfully. Estimated delivery of {name} will be {date}.")
    else:
        return func.HttpResponse(
             "This HTTP triggered function executed successfully. Pass a name in the query string or in the request body for a personalized response.",
             status_code=200
        )
- Click Save to save the changes and compile the code
- Select Test/Run to open the test window
- Fill in a value for the productName and date Query parameter
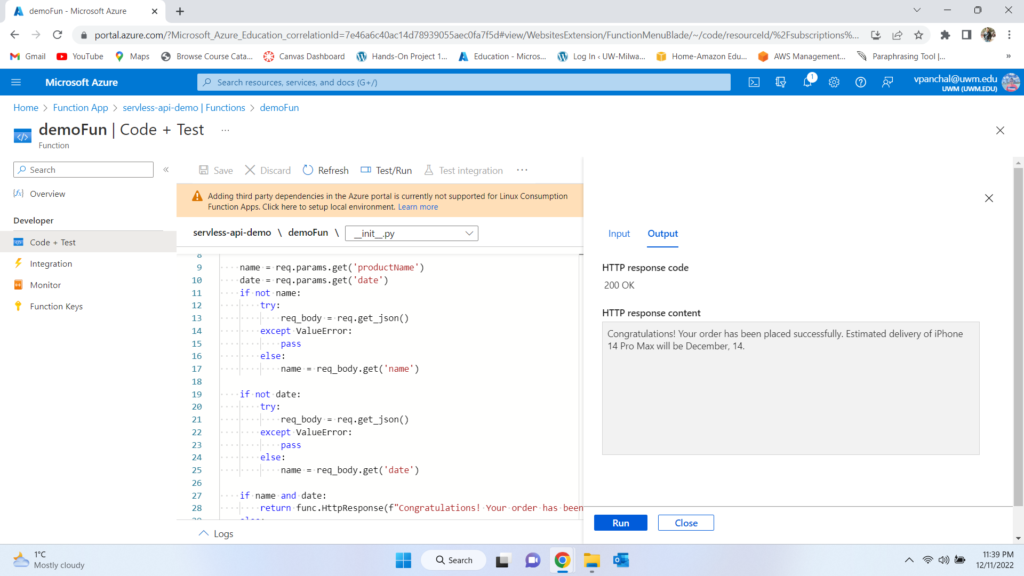
- Next, click Run to try out the code
- If the call succeeded, you should see the value that you entered in the Output tab
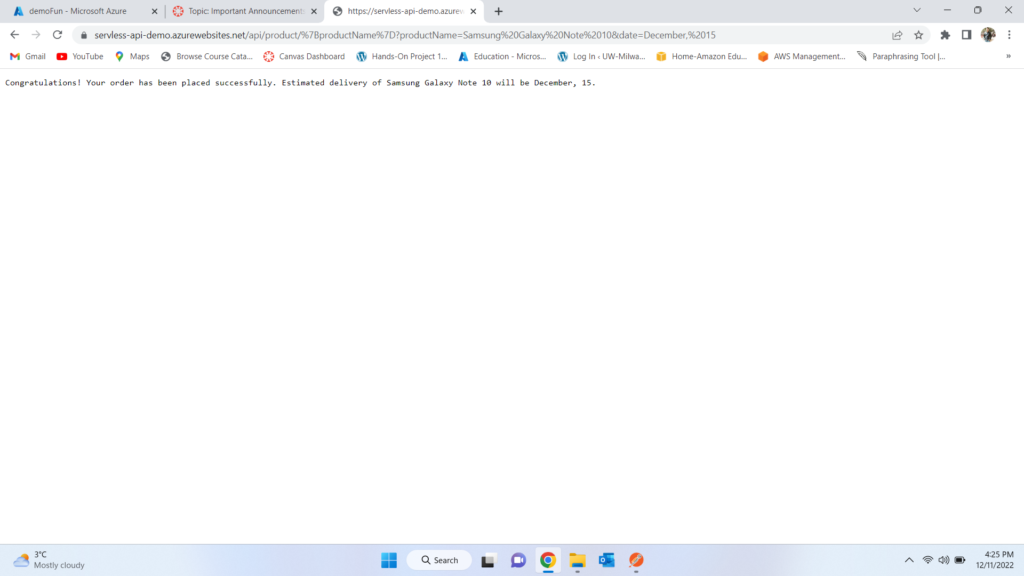
- Let’s see if we can call the Function like an API. Click on the Get Function URL button and copy the URL
- Paste the URL in a new browser window and replace the {productName} and {date} at the end of the URL with a value. The URL would look something like
https://servless-api-demo.azurewebsites.net/api/product/%7BproductName%7D?productName=Samsung%20Galaxy%20Note%2010&date=December,%2015 - When you submit the URL, you should see the value of the product and date parameter in the result.
- Let’s see if we can call the Function in the Postman API tool. Click on the Get Function URL button and copy the URL
- Select the POST request and paste the URL into a Request window
- Click on the params button and add two parameters:
- productName and date with a value.
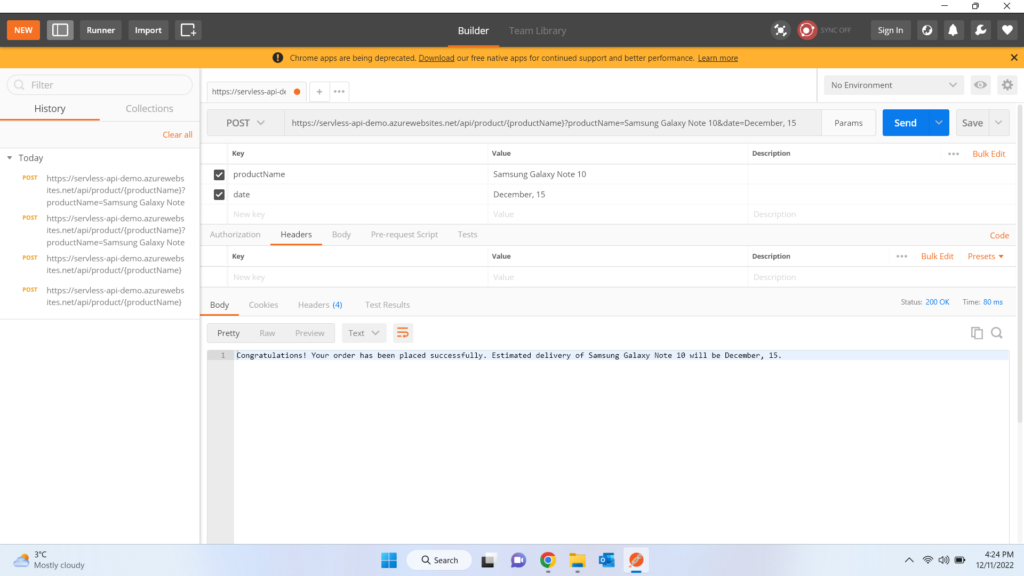
Bravo!! We simply used a serverless Azure Function to construct an API endpoint. You may create several Functions, each of which serves a different function and is accessible through a different URL endpoint, to build a comprehensive API.
Conclusion
Azure Functions is a serverless application platform that allows you to develop stateless logic and is event-driven, so you never overprovision resources. Because they can be triggered by HTTP requests and scale automatically, Azure Functions are ideal for running APIs at scale. There are several downsides to them as well, such as execution time and frequency. Furthermore, when you operate them as serverless, you only pay for them when they are used. Hope you find this blog useful. Go ahead and give it a go!