There are multiple storage offerings in AWS. Some of the popular storage solutions are:
- AWS S3
- AWS EBS
- AWS EFS
In this blog, we will discuss EFS architecture.

What is an Amazon Elastic File System?
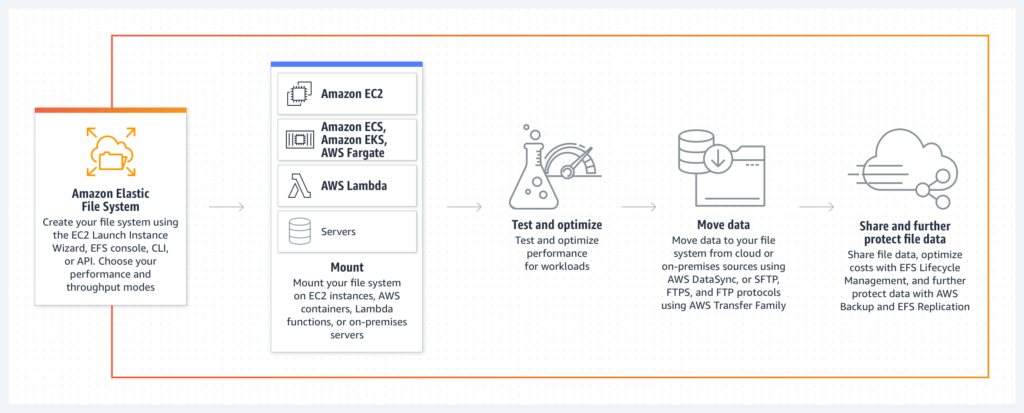
Amazon Elastic File System (EFS) is a cloud-based file storage service for applications and workloads that run in the Amazon Web Services public cloud. Amazon EFS has a simple web services interface that allows you to create and configure file systems quickly and easily. The service manages all the file storage infrastructure for you, meaning that you can avoid the complexity of deploying, patching, and maintaining complex file system configurations.
EFS can be mounted by multiple EC2 instances, meaning many virtual machines may store files within an EFS instance. Its main feature is its scalability. AWS automatically deploys and manages the infrastructure for Elastic File System (EFS), which is distributed across an unlimited number of servers to avoid performance bottlenecks. Amazon EFS provides flexible storage capacity that scales to accommodate workloads that run on AWS Elastic Compute Cloud (EC2) instances and access files through an application programming interface (API) requests.
Below is the short video which will help us to know Amazon EFS visually:
What kind of storage is EFS?
EFS is a file storage system. File storage is the system you’ll likely be most familiar with, as it’s how files are stored in the hard drive on your computer. File storage is fast and accessible, but it doesn’t offer the increased potential for complex queries that object storage does (more on that in the S3 section).
Amazon EFS Architecture
AWS Elastic File System (EFS) is the AWS implementation of NFS (Network File System) v4. It is a managed file storage, which can be mounted on only Linux-based operating systems. With its elastic storage capacity, it can grow and shrink automatically as you add and remove files from it providing read-after-write consistency.
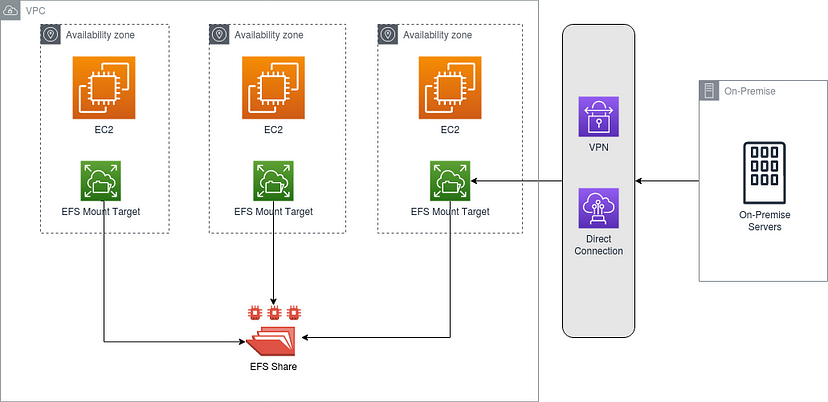
You can access your Amazon EFS file system by connecting multiple compute instances (EC2, ECS, Lambda) running in multiple AZs within a VPC in an AWS Region. Within the region, It can be connected to multiple VPCs as well via VPC Peering connections. If there is a need to access the EFS from an on-premise location, that also could be done via VPN or Direct Connect connections (See Figure 1).
Storage Classes
With Amazon EFS, you can choose from a range of storage classes that are designed for different use cases:
- EFS Standard – A regional storage class for frequently accessed data. It offers the highest levels of availability and durability by storing file system data redundantly across multiple Availability Zones in an AWS Region.
- EFS Standard-Infrequent Access (Standard-IA) – A regional storage class for infrequently accessed data. It offers the highest levels of availability and durability by storing file system data redundantly across multiple Availability Zones in an AWS Region.
- EFS One Zone – For frequently accessed files stored redundantly within a single Availability Zone in an AWS Region.
- EFS One Zone-IA (One Zone-IA) – A lower-cost storage class for infrequently accessed files stored redundantly within a single Availability Zone in an AWS Region.
Mount Targets
To access your file system, you must create mount targets in your VPC. Each mount target has the following properties: the mount target ID, the subnet ID in which it is created, the file system ID for which it is created, an IP address at which the file system may be mounted, VPC security groups, and the mount target state. You can use the IP address or the DNS name in your mount command.
Each file system has a DNS name of the following form.
file-system-id.efs.aws-region.amazonaws.com
You can specify this DNS name in your mount command to mount the Amazon EFS file system. Suppose you create a efs-mount-point subdirectory off of your home directory on your EC2 instance or on-premises server. Then, you can use the mount command to mount the file system. For example, on an Amazon Linux AMI, you can use the following mount command.
$ sudo mount -t nfs -o nfsvers=4.1,rsize=1048576,wsize=1048576,hard,timeo=600,retransIf you are using EFS with a standard storage class, you can create an EFS mount target in each Availability Zone in an AWS Region (See Figure 2).

For EFS file systems that use One Zone storage classes, you can only create a single mount target in the same Availability Zone as the file system (See Figure 3).

When to use EFS?
EFS may be used whenever you need a shared file storage option for multiple EC2 instances with automatic, high-performance scaling.
This makes it a great candidate for file storage for content management systems; for lift and shift operations, as its autoscaling potential means you do not need to re-architect; for application development, as EFS’s shareable file storage is ideal for storing code and media files.
Working with EFS (Let’s Try)
You can learn how to quickly create an Amazon Elastic File System (Amazon EFS) file system. As part of this process, you mount your file system on an Amazon Elastic Compute Cloud (Amazon EC2) instance in your virtual private cloud (VPC).
There are four steps that you need to perform to create and use your first Amazon EFS file system:
- Create your Amazon EFS file system.
- Create your Amazon EC2 resources, launch your instance, and mount the file system.
- Transfer files to your EFS file system using AWS DataSync.
- Clean up your resources and protect your AWS account.
Assumptions
For this exercise, we assume the following:
- You’re already familiar with using the Amazon EC2 console to launch instances.
- Your Amazon VPC, Amazon EC2, and Amazon EFS resources are all in the same AWS Region. This guide uses the US West (Oregon) Region.
- You have a default VPC in the AWS Region.
- You haven’t changed the default inbound access rule for the default security group.
Step 1: Create your Amazon EFS file system
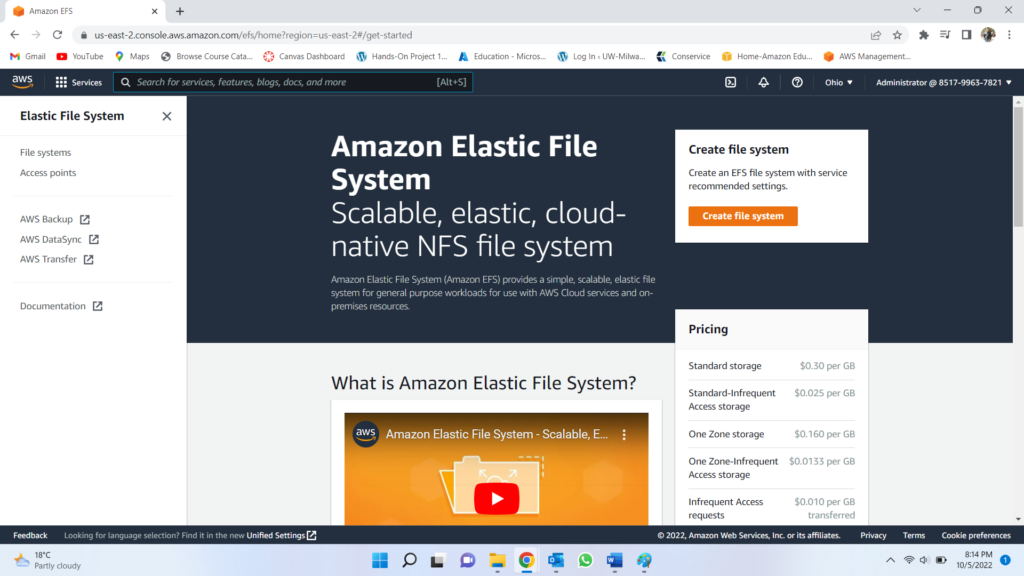
- Open the Amazon EFS Management Console at https://console.aws.amazon.com/efs/.
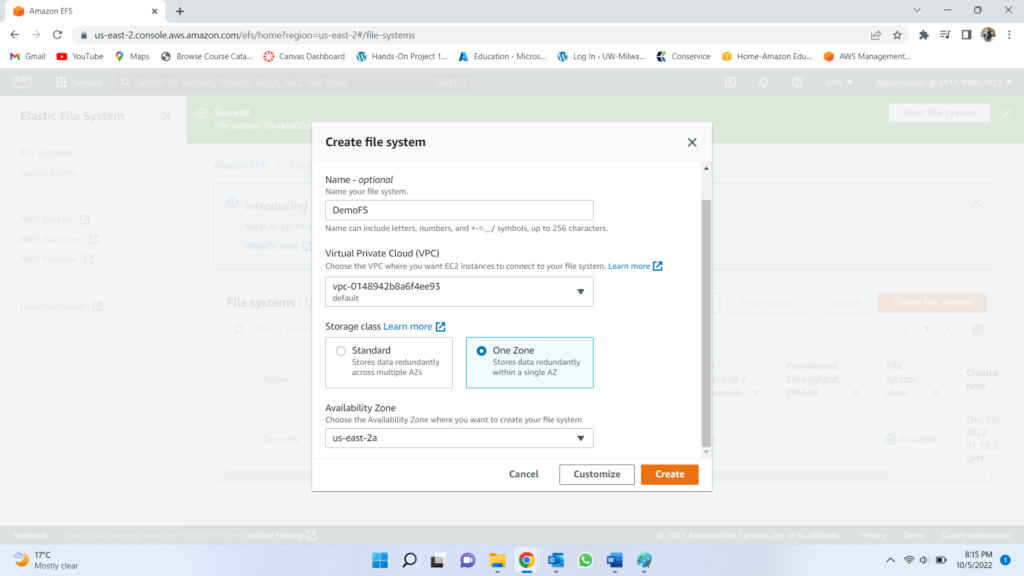
- Choose Create file system to open the Create file system dialog box.
- (Optional) Enter a Name for your file system.
- For Virtual Private Cloud (VPC), choose your VPC, or keep it set to your default VPC.
- For Availability and Durability, choose one of the following:
- For Availability and Durability, choose one of the following:
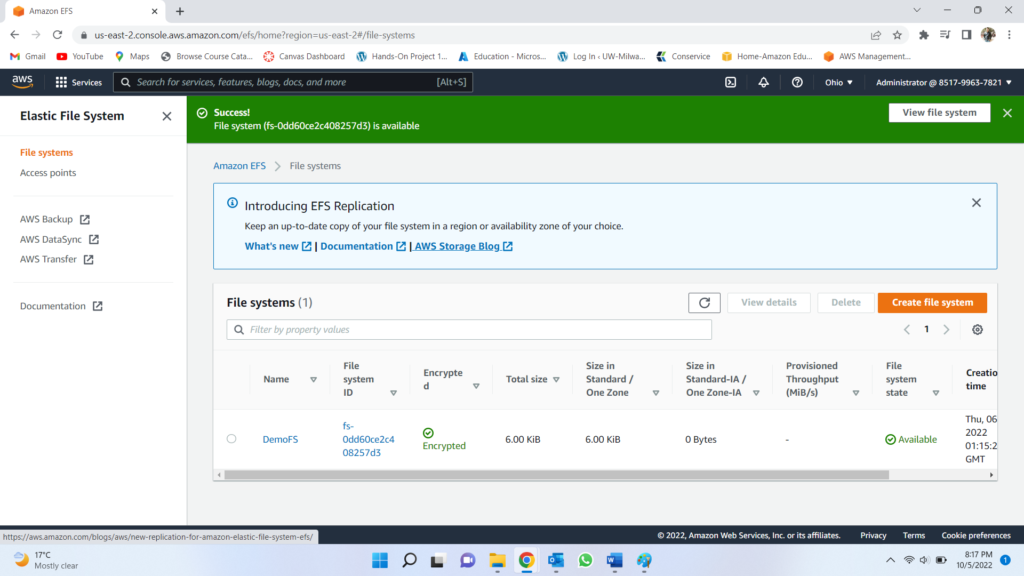
- The File systems page appears with a banner across the top showing the status of the file system you created.
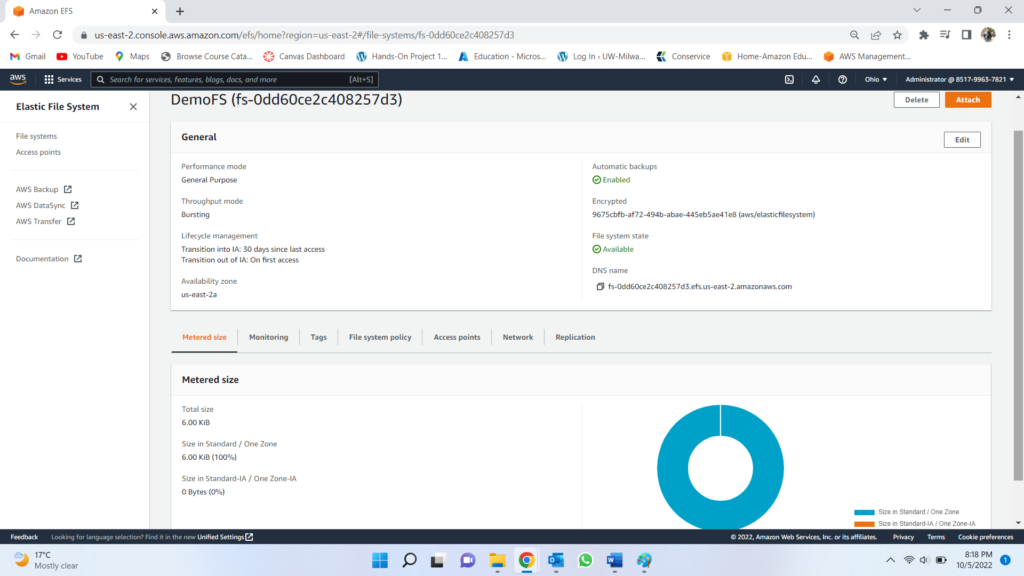
Step 2: Create your EC2 resources and launch your EC2 instance
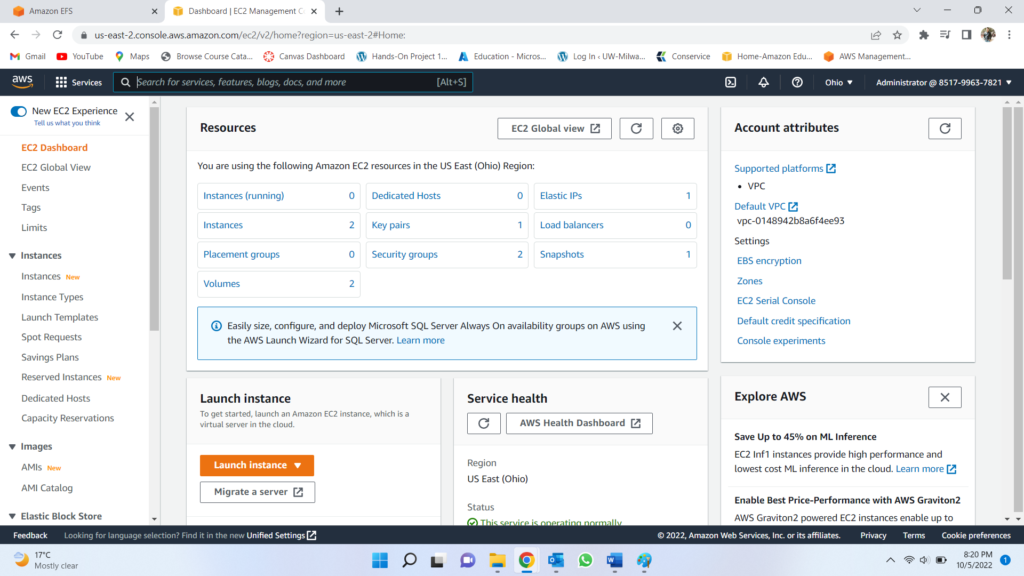
- Create your EC2 resources
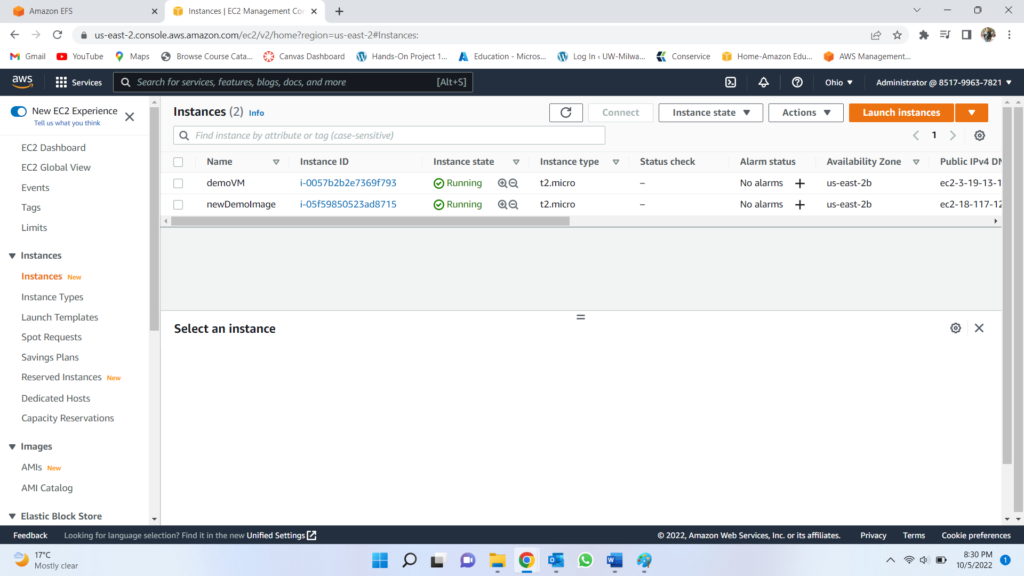
- Launch your EC2 Instance
Step 3: Transfer files to Amazon EFS using AWS DataSync
Now that you have created a functioning Amazon EFS file system, you can use AWS DataSync to transfer files from an existing file system to Amazon EFS. AWS DataSync is a data transfer service that simplifies, automates, and accelerates moving and replicating data between on-premises storage systems and AWS storage services over the internet or AWS Direct Connect. AWS DataSync can transfer your file data, and also file system metadata such as ownership, timestamps, and access permissions.
Before you begin
In this step, we assume that you have the following:
- A source NFS file system that you can transfer files from. This source system needs to be accessible over NFS version 3, version 4, or 4.1. Example file systems include those located in an on-premises data center, self-managed in-cloud file systems, and Amazon EFS file systems.
- A destination Amazon EFS file system to transfer files to. If you don’t have an Amazon EFS file system, create one.
- Your server and network meet the AWS DataSync requirements.
To transfer files from a source location to a destination location using AWS DataSync, you do the following:
- Download and deploy an agent in your environment and activate it.
- Create and configure a source and destination location.
- Create and configure a task.
- Run the task to transfer files from the source to the destination.
Step 4: Clean up resources and protect your AWS account
To clean up resources and protect your account
- Connect to your Amazon EC2 instance.
- Unmount the Amazon EFS file system with the following command.
$ sudo umount efs - Open the Amazon EFS console at https://console.aws.amazon.com/efs/.
- Choose the Amazon EFS file system that you want to delete from the list of file systems.
- For Actions, choose Delete file system.
- In the Permanently delete file system dialog box, type the file system ID for the Amazon EFS file system that you want to delete, and then choose Delete File System.
- Open the Amazon EC2 console at https://console.aws.amazon.com/ec2/.
- Choose the Amazon EC2 instance that you want to terminate from the list of instances.
- For Actions, choose Instance State and then choose Terminate.
- In Terminate Instances, choose Yes, Terminate to terminate the instance that you created for this Getting Started exercise.
- In the navigation pane, choose Security Groups.
- Select the name of the security group that you created
- For Actions, choose Delete Security Group.
- In Delete Security Group, choose Yes, Delete to delete the security group.
EFS’s key benefits
Within its role as a shared file storage service for multiple EC2 instances, EFS provides many benefits:
- Adaptive throughput – EFS’s performance can scale in line with its storage, operating at a higher throughput for sudden, high-volume file dumps, reaching up to 500,000 IOPS or 10 GB per second.
- Totally elastic – once you’ve spun up an EFS instance, you can add files without worrying about provisioning or disturbing your application’s performance.
- Additional accessibility – EFS can be mounted from different EC2 instances, but it can also cross the AWS region boundary via the use of VPC peering.
For more information regarding Amazon EFS, see https://aws.amazon.com/efs/