You can create a remote desktop connection to a virtual machine (VM) running Windows in Azure.
To connect to a Windows VM from a Mac, you will need to install an RDP client for Mac such as Microsoft Remote Desktop.
How to connect using Remote Desktop and sign on to an Azure virtual machine running Windows
Prerequisites: Connect to the Virtual Machine
Add a data disk
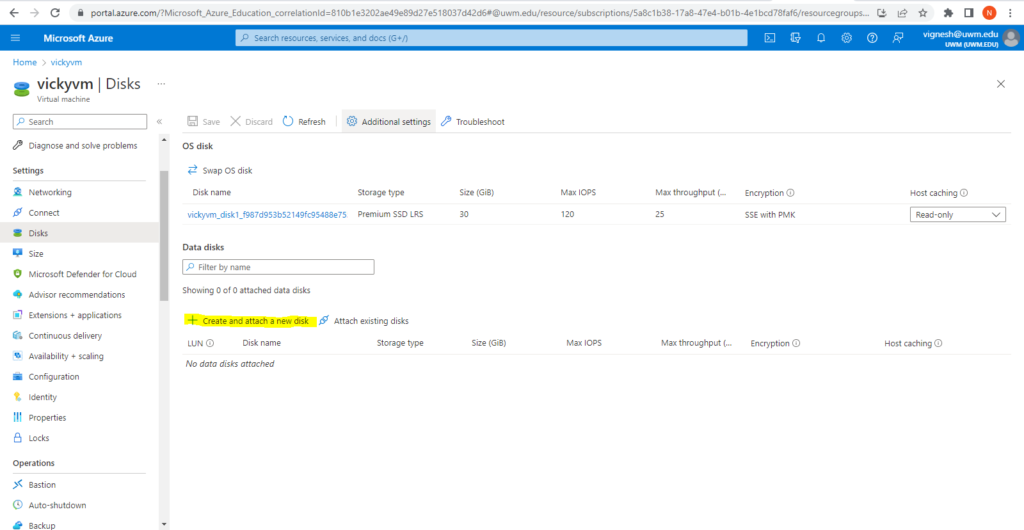
In Azure, do the following steps to add a disk to virtual machine
- From the Azure Portal, Navigate: Portal Home –> Virtual Machines –> select virtual machine
- In the left menu under Settings, select Disks.
- On the Disks pane, select Create and attach a new disk.
4. In the drop-downs for the new disk, make the selections you want, and name the disk.
5. Select Save to create and attach the new data disk to the VM.

Initialize a new data disk
In Azure, do the following steps to initialize a new disk to virtual machine
- From the Azure Portal, Navigate: Portal Home –> Virtual Machines –> select virtual machine
- Connect to the VM.
- Select the Windows Start menu inside the running VM and enter diskmgmt.msc in the search box. The Disk Management console opens.
- Disk Management recognizes that you have a new, uninitialized disk and the Initialize Disk window appears.
- Verify the new disk is selected and then select OK to initialize it.
- The new disk appears as unallocated. Right-click anywhere on the disk and select New simple volume. The New Simple Volume Wizard window opens.
- Proceed through the wizard, keeping all of the defaults, and when you’re done select Finish.
- Close Disk Management.
- A pop-up window appears notifying you that you need to format the new disk before you can use it. Select Format disk.
- In the Format new disk window, check the settings, and then select Start.
- A warning appears notifying you that formatting the disks erases all of the data. Select OK.
- When the formatting is complete, select OK.
Detach a data disk from a Windows virtual machine
In Azure, do the following steps to detach a disk from the virtual machine
- From the Azure Portal, Navigate: Portal Home –> Virtual Machines –> select virtual machine
- On the Virtual machine pane, select Disks.
- In the Disks pane, to the far right of the data disk that you would like to detach, select the X button to detach.
- Select Save on the top of the page to save your changes.
The disk stays in storage but is no longer attached to a virtual machine. The disk isn’t deleted.