Here, we are going to see how to copy an object from one bucket to another bucket within the same account using Python SDK.
Bucket policies and IAM policies
To copy an object between buckets, you must make sure that the correct permissions are configured. To copy an object between buckets in the same AWS account, you can set permissions using IAM policies. To copy an object between buckets in different accounts, you must set permissions on both the relevant IAM policies and bucket policies.
For copying, objects between buckets of different accounts follow the below link to do the necessary policies setup before proceeding further.
How to create Bucket policies and IAM policies
Need for Boto3
Using the AWS SDK for Python (Boto3) we can create, configure, and manage AWS services, such as Amazon Elastic Compute Cloud (Amazon EC2) and Amazon Simple Storage Service (Amazon S3). The SDK provides an object-oriented API as well as low-level access to AWS services. They provide various functionalities to automate the AWS services.
In case of copying objects between buckets, they help us to skip unnecessary manual work like:
- Downloading the image from the source bucket and saving it.
- Again, uploading them in the destination bucket.
Moreover, it is quicker and more reliable. ‘We can share the object securely without copying or sharing to an external device.
Prerequisite: Steps to be followed
Initially, you are required to have an AWS account and personal storage. Here we are implementing the program in a fully-functional Linux development computer, in the cloud. So, we are required to make the following setup for the program.
- Create your AWS Account
- Get Some Personal Storage (AWS)
- Provision Your Virtual Machine (AWS)
- Prepare a Virtual Machine to be a Development PC – AWS
- Install Ubuntu Desktop Over Ubuntu Server
- Install Development Tools on Your Cloud PC
Once all the above steps are executed then the setup is ready. (Note: You can skip if you already have the setup)
1. Once you connect to your remote desktop, you can create a new project by providing the below command in the terminal.
mkdir sample
cd sample
code .
2. Using pipenv, you create a virtual environment simply by installing the first Python package you need. We will install a very popular numerical package for Python called numpy. We won’t really be using numpy for this example – it’s just some package we can install. Usually, when you create a new virtual environment and project, you know which package you need to install first.
Within VS Code, open a New Terminal window, then enter the following command:
pipenv install numpy3. Within the folder create a new python file. You can choose your own name, I have created sample.py. Open the terminal from VS code, and start installing the below packages.
To access the AWS service we are required the following things:
- Boto3
- awscli
- aws configure
4. Boto3, which is the latest version of the SDK, provides support for Python versions 2.6.5, 2.7, and 3.3. Boto3 includes several service-specific features to ease development. Boto supports all current AWS cloud services, including Elastic Compute Cloud, DynamoDB, AWS Config, CloudWatch, and Simple Storage Service.
pipenv install boto35. AWS Command Line Interface or CLI is a set of open-source tools that allows you to manage and automate AWS services using commands. It supports multiple platforms like Windows, Linux, and macOS and provides direct access to public APIs for AWS. Further, automation of tedious infrastructure tasks is easily possible in a CLI environment.
sudo apt update
sudo apt install awscli
6. The “aws configure“ command is the fastest way to set up your AWS CLI installation. When you enter this command, the AWS CLI prompts you for four pieces of information:
- Access key ID
- Secret access key
- AWS Region
- Output format
Access keys consist of an access key ID and a secret access key, which are used to sign programmatic requests that you make to AWS. If you don’t have access keys, you can create them from the AWS Management Console. The only time that you can view or download the secret access key is when you create the keys. You cannot recover them later. However, you can create new access keys at any time.
aws configureAWS Configure will help authenticate the user account using the security credentials. The access key and secret access key will be in .CSV file downloaded from security credentials while creating the user in the IAM console. It looks like below:

The Default region can be seen near the account. For me, it is “us-east-2”, you can see the region in your account. The Output format will be “json”

You can provide all the value in the terminal.

7. Initially, we are required to know which buckets we are going to use. We can get the list of buckets present in the account. Since we are using buckets from the same account, run the below program to know the list of buckets within the account.
import boto3

def list_bucket():
    s3_res = boto3.resource('s3')
    buckets = s3_res.buckets.all()
    for bucket in buckets:
        print(bucket.name)

list_bucket()
You will be able to see the list of buckets within the account

8. From the above list of buckets you can choose your source and destination bucket. I have chosen ‘awsbucketvn’ as the source bucket. To select which object to be copied you can get the list of objects within the source bucket.
import argparse
import boto3

def object_parser():
    parser = argparse.ArgumentParser()
    parser.add_argument("bucket", help = "Bucket Name")
    args = parser.parse_args()
    return args

def list_object(bname):
    s3_res = boto3.resource('s3')
    bucket = s3_res.Bucket(bname)
    #For loop will iterate all the objects within the bucket
    print("List of objects with the bucket")
    for obj in bucket.objects.all():
        #obj.key provide only object name
        print(obj.key)


def main():
    bucket_name = object_parser()
    list_object(bucket_name.bucket)

if __name__ == "__main__":
    main()
Here we are trying to pass the bucket name as an argument – “argparse” module makes it easy to write user-friendly command-line interfaces. The program defines what arguments it requires, and argparse will figure out how to parse those out of sys.argv.
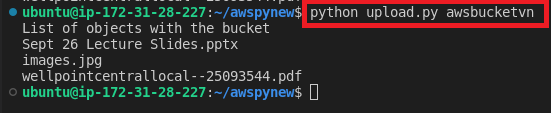
In the above code, we are passing only one parameter i.e source bucket. In order to pass the argument we have run the code as
python <filename.py> <bucketname>It looks more like the below screenshot
9. From the above list we can choose any object to be copied to the destination bucket.
It’s a simple program, we are trying to copy the object from the source to the destination bucket within the same account. So, we don’t have to think about access policies and security which are taken care of by using “aws configure”
import argparse
import boto3
import logging
from botocore.exceptions import ClientError

s3_client= boto3.client('s3')

def copy_parser():
    parser = argparse.ArgumentParser()
    parser.add_argument("bucket1", help = "Bucket Name1")
    parser.add_argument("bucket2", help = "Bucket Name2")
    parser.add_argument("filename", help = "filename")
    parser.add_argument("Outputfile", help = "Ofilename")
    args = parser.parse_args()
    return args

def copy_file(source,dest,fname,outputfn):

    copy_source = {
         #Source bucket name
        'Bucket': source,
        #Source file to be copied to destination
        'Key': fname
    }
    try:
        #s3_client.copy(copy_source, destination_bucket, object_name)
        s3_client.copy(copy_source, dest, outputfn)
        print("File Copied Successfully")
    except ClientError as e:
        #Provides log message
        logging.error(e)
        return False
    return True

def main():
    global s3_client
    arg_val =copy_parser()
    copy_file(arg_val.bucket1,arg_val.bucket2,arg_val.filename, arg_val.Outputfile)


if __name__ == "__main__":
    main()
In copy_source, the bucket will be the “name of source_bucket”, and the key will be the “name of the object” to be copied.
s3_client.copy(copy_source, destination_bucket, object_name) – I have provided my destination_bucket which should be changed according to yours and object_name can be any name the way you wanted the file to be stored in the destination bucket along with the extension.
The try and except block help in identifying the type of error in case of a FileNotFound, credential error.
Config (boto3.s3.transfer.TransferConfig) — The transfer configuration is been used when performing the copy.
So, here I am trying to pass all the values using argparse which we have seen in the previous step. Here we are passing 4 parameters – Source and destination bucket, filename to be copied, and destination filename in what name file to be stored.
10. Run the python files as
python <filename.py> <sourcebucket> <destinationbucket> <filetobecopied> <destinationfilename>
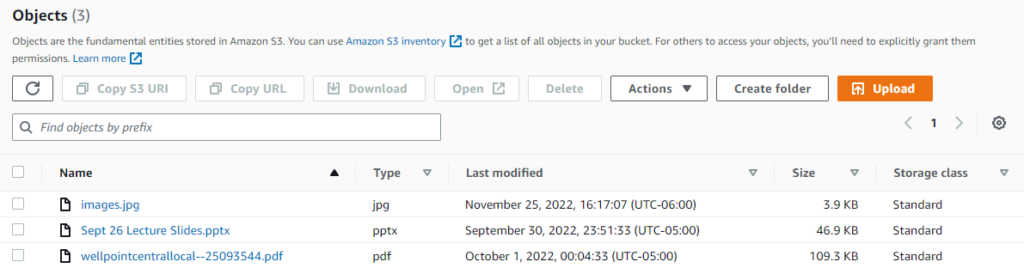
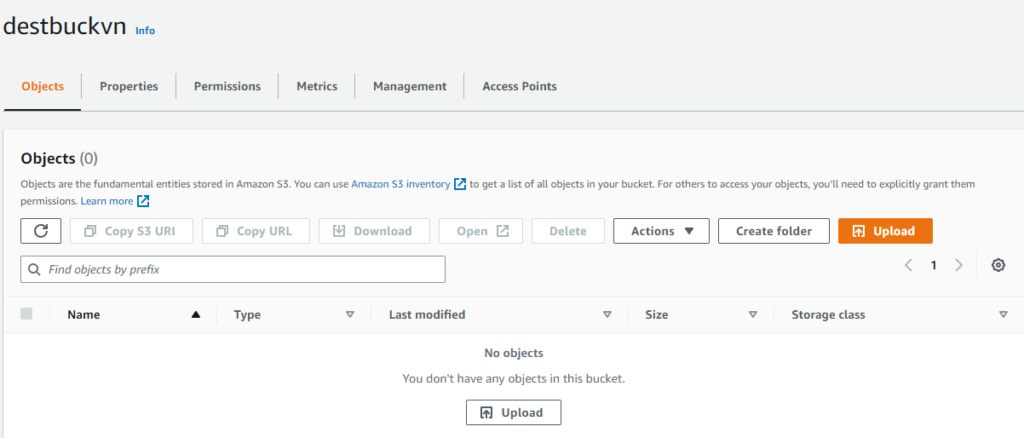
In AWS Console initially, this is the Source bucket- awsbucketvn, and the destination bucket – destbuckvn

Objects within the Source bucket, images.jpg is to be copied to the destination bucket
The destination bucket is empty before copying.
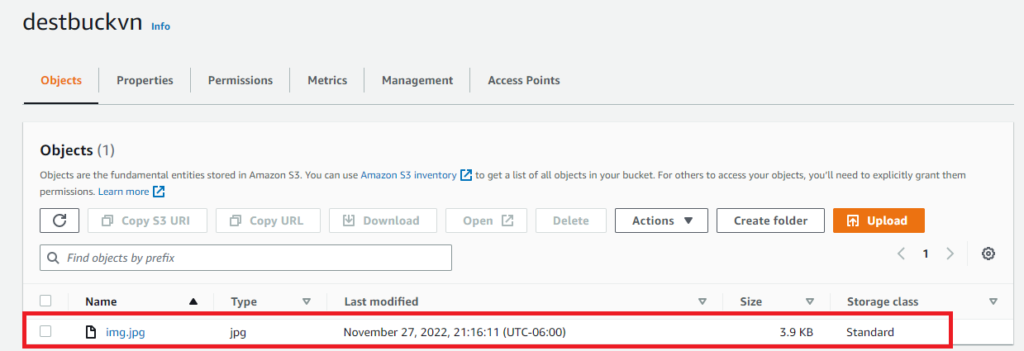
After, running the program the object is copied to the destination bucket
Hope you find my blog informative. Using, AWS SDK for Python (Boto3) we can automate various services similar to the above functionality. Moreover, argparse helps in sending the value from the console rather than using the value within the program using AWS SDK
Thanks for reading my blog!!!