Back to Azure Virtual Machine Scale Sets
Prerequisites for Creating an Azure VMSS:
Before creating an Azure VMSS through Python SDK we need to do a few following steps.
- Create an azure account in the Azure portal.
- Install Visual Studio code on your local pc.
After finishing the above step, we need the below libraries.
Necessary Libraries:
- azure-mgmt-resource
- azure-mgmt-compute
- azure-mgmt-network
- azure-identity
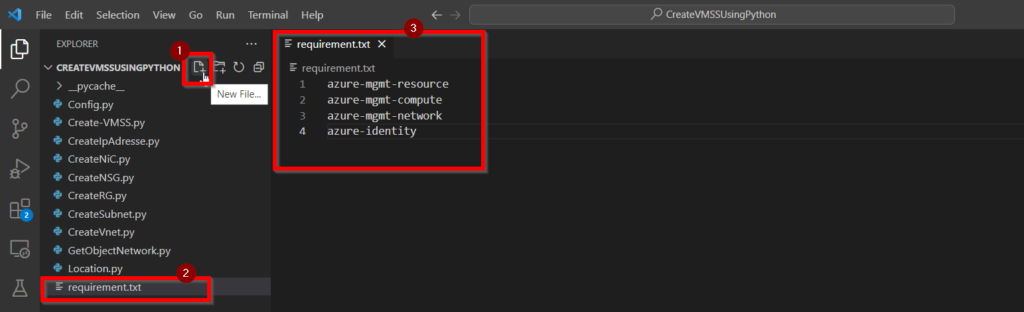
Procedure for Installing the above-Required Libraries:
- Open Visual Studio Code
- Create a file and name it requirements.txt and enter the below libraries.
- azure-mgmt-resource
- azure-mgmt-compute
- azure-mgmt-network
- azure-identity
Now Open the terminal by using CTRL+SHIFT+` key and enter this command pip install -r requirements.txt.
This command will install the libraries.
VMSS deployment using Python SDK:
To create an Azure VMSS through Python SDK we need a Resource group, Virtual Network, Subnet, IP address, and Network Interface client.
We’ll make each of them individually, step by step.
1. Create Config.py file:
Paste the code below into a new Config.py file.
Without entering login information, this file allows us to access information about an Azure account.
import os
from azure.identity import AzureCliCredential
from azure.mgmt.resource import ResourceManagementClient

credential = AzureCliCredential()
"Put your subscriber ID here."
subscription_id = "AZURE_SUBSCRIPTION_ID"

resource_client = ResourceManagementClient(credential, subscription_id)
group_list = resource_client.resource_groups.list()

for group in group_list:
    print(group)
2. Create Location.py file:
Paste the code below into a new Location.py file.
LOCATION = "westus2" #A location can be selected based on your needs.3. Create a Resource Group:
Paste the code below into a new CreateRG.py. it will create a new resource group.
from azure.mgmt.resource import ResourceManagementClient
import Config
import Location


Location

# Step 1 Create a resource group
rg_client = ResourceManagementClient(Config.credential, Config.subscription_id)

RESOURCE_GROUP_NAME = "vmss_rg"


result = rg_client.resource_groups.create_or_update(RESOURCE_GROUP_NAME, {"location" : Location.LOCATION})
print(f"Created resource group name {result.name} In the region {result.location} ")
4. Create an object network:
Past the code below to a new GetObjectNetwork.py.
from azure.mgmt.network import NetworkManagementClient
import Config


network_client = NetworkManagementClient(Config.credential, Config.subscription_id)
5. Create a Network Security group:
The Azure network security group help us to filter the network traffic between Azure resources in an Azure virtual network.
Paste the code below into a new CreateNSG.py.
import GetObjectNetwork
import CreateRG
import Location
from azure.mgmt.network.models import NetworkSecurityGroup
from azure.mgmt.network.models import SecurityRule
import Config

network_client = GetObjectNetwork.NetworkManagementClient(Config.credential, Config.subscription_id)
NSG_NAME = "nsg-test"


parameters = NetworkSecurityGroup()
parameters.location = Location.LOCATION
parameters.security_rules = [SecurityRule(
        protocol = 'Tcp',
        access = 'Allow',
        direction = 'Inbound',
        description='Allow RDP port 3389',
        source_address_prefix = '*',
        destination_address_prefix = '*',
        source_port_range='*',
        destination_port_range='3389',
        priority=100,
        name='RDP1')]
poller = network_client.network_security_groups.begin_create_or_update(CreateRG.RESOURCE_GROUP_NAME, NSG_NAME, parameters)

nsg_result = poller.result()
6. Create Virtual Network:
Paste the below code into a new CreateVnet.py file.
import GetObjectNetwork
import CreateRG
import Location
import Config

network_client = GetObjectNetwork.NetworkManagementClient(Config.credential, Config.subscription_id)

VNET_NAME = "vnet-test"

poller = network_client.virtual_networks.begin_create_or_update(CreateRG.RESOURCE_GROUP_NAME,
    VNET_NAME,
    {
        "location": Location.LOCATION,
        "address_space" : {
            "address_prefixes": ["192.0.0.0/16"]
        }
    }
)
vnet_result = poller.result()
7. Create Subnet:
A subnet is referred to as An IP address range in the virtual network. A virtual network can be divided into several subnets for organization and security.
Paste the below code into a new CreateSubnet.py file
import GetObjectNetwork
import CreateRG
import CreateVnet
import Config

network_client = GetObjectNetwork.NetworkManagementClient(Config.credential, Config.subscription_id)
SUBNET_NAME = "subnet-test"

poller = network_client.subnets.begin_create_or_update(CreateRG.RESOURCE_GROUP_NAME,
    CreateVnet.VNET_NAME, SUBNET_NAME, {"address_prefix": "192.0.0.0/24" }
)
subnet_result = poller.result()
8. Create IP Address:
Paste the code below into a new CreateIpAddress.py file.
import GetObjectNetwork
import CreateRG
import Location
import Config

network_client = GetObjectNetwork.NetworkManagementClient(Config.credential, Config.subscription_id)
IP_NAME = "ip-adress"

poller = network_client.public_ip_addresses.begin_create_or_update(CreateRG.RESOURCE_GROUP_NAME, IP_NAME,{
    "location" : Location.LOCATION,
    "sku": { "name": "Standard"},
    "public_ip_allocation_method": "Static",
    "public_ip_address_version": "IPV4"

})
ip_address_result = poller.result()
9. Create a Network Interface:
Paste the code below into a new CreateNiC.py file.
import GetObjectNetwork
import CreateRG
import Location
import CreateNSG
import CreateSubnet
import CreateIpAdresse
import Config

network_client = GetObjectNetwork.NetworkManagementClient(Config.credential, Config.subscription_id)
NIC_NAME = "nic-test"
IP_CONFIG_NAME = "ip-config-test"


poller = network_client.network_interfaces.begin_create_or_update(CreateRG.RESOURCE_GROUP_NAME, NIC_NAME, {
    "location" : Location.LOCATION,
    'network_security_group': {
        'id': CreateNSG.nsg_result.id
    },
    "ip_configurations": [{
        "name" : IP_CONFIG_NAME,
        "subnet" : { "id": CreateSubnet.subnet_result.id},
        "public_ip_address": {"id": CreateIpAdresse.ip_address_result.id}

    }]
})
nic_result = poller.result()
Now Create a Create-VMSS.py file. If you’d like, you can use the appropriate name.
Import the below code into it.
The below code creates a new VMSS in your azure portal.
import logging
from azure.mgmt.compute import ComputeManagementClient
import Config
import Location
import CreateRG
import CreateSubnet
import CreateIpAdresse
import CreateNSG
import CreateNiC
import CreateVnet


print(f"Creating a VMSS in Azure")

# Step 1 Create a resource group
CreateRG

# Step 2 - Create the IP address
CreateIpAdresse

# Step 3 -Create the NSG with the RDP port
CreateNSG

# Step 4 - Create the network interface
CreateNiC

# Step 5 - Creation of the VMSS | Basic Setup
Compute_client = ComputeManagementClient(Config.credential, Config.subscription_id)
VMSS_NAME = "blog_vmss"
Username = "USERNAME"
PASSWORD = "PSW"

print(f"providing the VMSS Name: {VMSS_NAME}; this operation may take a few minutes !")
# sizing & Version
poller = Compute_client.virtual_machine_scale_sets.begin_create_or_update(CreateRG.RESOURCE_GROUP_NAME, VMSS_NAME,
{
    "location": Location.LOCATION,
    "overprovision": True,
    "upgrade_policy": {
        "mode": "Manual"
    },
    'sku': {
        'name': 'Standard_A1',
        'tier': 'Standard',
        'capacity': 5
    },

    'virtual_machine_profile': {
     'storage_profile': {
        'image_reference': {
            "publisher": 'canonical',
            "offer": "UbuntuServer",
            "sku": "20_04-lts-gen2",
            "version": "latest"
        }
    },

    'os_profile':{
        'computer_name_prefix': VMSS_NAME,
        'admin_username': ubuntu,
        'configuration': {
                "disable_password_authentication": True,
                    "ssh": {
                        "public_keys": [{
                            "path": "/home/{}/.ssh/authorized_keys".format(USERNAME),
                            "key_data": "enter your ssh key here"
                        }]
                    }
                }
    },
    'network_profile': {
        'network_interface_configurations': [{

            'ip_configurations': [{

                    "id": CreateNiC.nic_result.id,

                }]

        }]
    }
    }
})
vm_result = poller.result()

print(f" Virtaul machine scale set name: {vm_result.name}")
Debug the above code. You can see an output message in the terminal with a success message.
Then Open your Azure portal after opening it Navigate to the VMSS page. You may see the VMSS there that we recently created using the Python SDK.
The full source code is available here.
Thanks for taking the time and reading my blog.