We know the process of provisioning the VM in Azure manually Provision Your Virtual Machine (Azure) – UW-Milwaukee Cloud Computing (uwm-cloudblog.net). In this blog we will discusses about provisioning a VM (Ubuntu 20_04 version ) in Azure using Azure Python SDK and the steps involved in it.
What is Azure Python SDK and its advantages?
The Azure Python SDK is a set of libraries which allow you to interact with the Azure platform from your Python code. It includes a range of tools to make working with Azure easier, including a command-line interface, a web-based interface, and a set of SDKs for popular programming languages.
- The Azure python SDK makes it easy to provision a new Virtual Machine with a few lines of code. This is much faster and simpler than provisioning a new VM manually.
- The Azure python SDK provides a higher level of abstraction than the manual provisioning process. This makes it easier to understand and use.
- The Azure python SDK can automate the provisioning process. This means that you can provision new VMs without having to manually log in and configure each one.
- The Azure python SDK is more reliable than the manual provisioning process. This means that you are less likely to encounter errors when provisioning new VMs.
- The Azure python SDK is less likely to cause disruptions to your existing infrastructure. This is because the provisioning process is more isolated and controlled.
Requirements for Provisioning a VM
Before we get into the process of provisioning a VM, we need the following setup to be done.
The Required Libraries
Below are the details of azure management libraries which needs to be installed in our VS code before we processed further.
- azure-mgmt-resource (This library enables you to manage your Azure Resource Manager resources)
- azure-mgmt-compute (The azure-mgmt-compute library allows you to manage your Azure Compute resource)
- azure-mgmt-network (This ready contains multiple API versions, to help you deal with all of the Azure network services)
- azure-identity (The azure-identity library provides a default Azure Identity class that can be used to authenticate with Azure services)
Steps involved in Installing Needed Libraries
- Open Visual Studio code
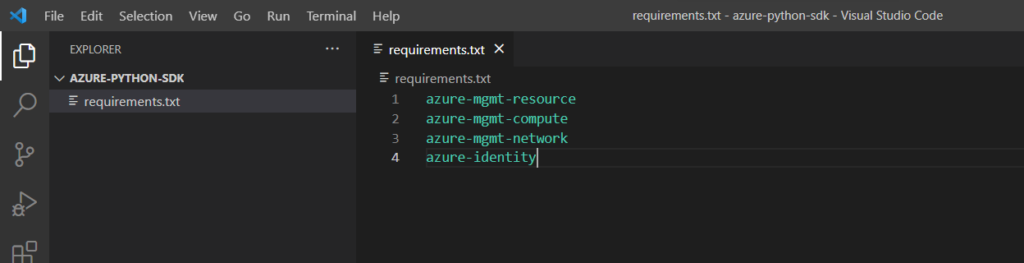
- Create a requirement.txt file and place the below libraries in it
- azure-mgmt-resource
- azure-mgmt-compute
- azure-mgmt-network
- azure-identity
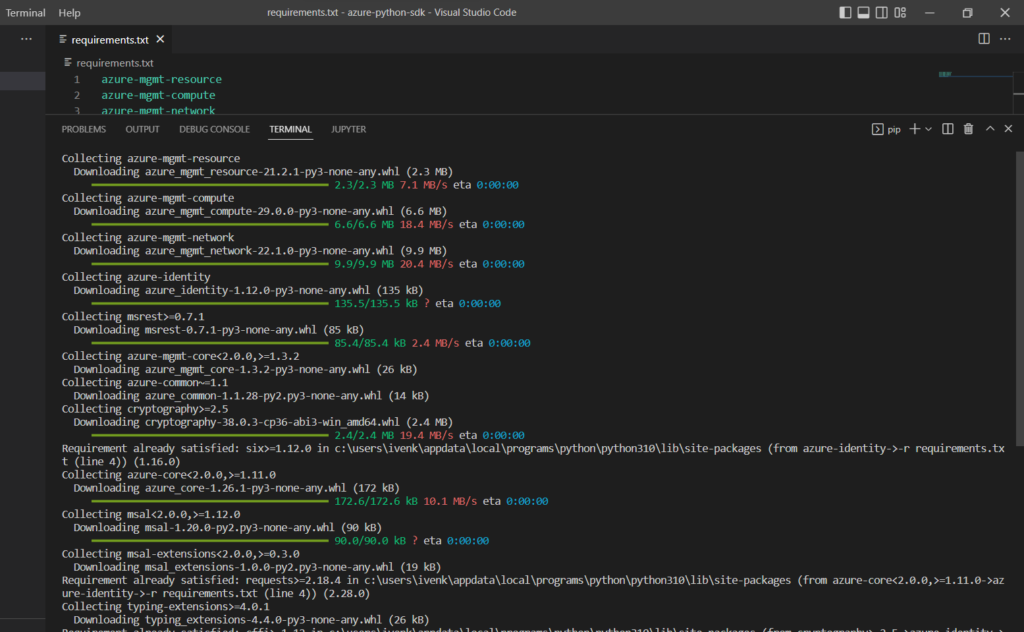
- Open a new terminal in Visual Studio Code and run this command pip install -r requirements.txt This command downloads and installs the management libraries listed in the requirements.txt file you created in step two

Provisioning VM through Python SDK
Now we will dive into python SDK which will provision a VM in Azure. VM in azure needs a resource group, Virtual Network, Subnet, IP address, Network Interface client, VM with required specification like ubuntu 20.04 version. We will create all of these one by one.
Create a vm-azure.py and started writing the python code in it.
- First start with importing the required modules from the libraries.
from azure.identity import AzureCliCredential
from azure.mgmt.resource import ResourceManagementClient
from azure.mgmt.network import NetworkManagementClient
from azure.mgmt.compute import ComputeManagementClient
from azure.mgmt.network.v2020_04_01.models import NetworkSecurityGroup, SecurityRule
import os
- Use AzureCliCredential which help us to get information of azure account without typing login command. Store the Azure subscription ID in an environment variable. This allows the code to be reused in different environments without having to hard-code the subscription ID.
print(f"Provisioning a virtual machine in Azure using Python.")
# Acquire credentials
credential = AzureCliCredential()

# Retrieve subscription ID from environment variable.
subscription_id = os.environ["AZURE_SUBSCRIPTION_ID"] = "enter your subscription id here"
1. Creating Resource Group
- The Below code creates a new resource group.
resource_client = ResourceManagementClient(credential, subscription_id)
RESOURCE_GROUP_NAME = "python-sdk-azure-vm-rg"
LOCATION = "eastus"
# creates the resource group.
rg_result = resource_client.resource_groups.create_or_update(RESOURCE_GROUP_NAME,
    {
        "location": LOCATION
    }
)

print(f"Provisioned resource group {rg_result.name} in the {rg_result.location} region")
- First, it defines the credentials to use for authenticating with Azure.
- Next, it creates a ResourceManagementClient object, passing in the credentials and subscription ID.
- Then, it defines the name and location for the new resource group.
- Finally, it calls the create_or_update method to create the resource group.
- Refer Resource Groups – Create Or Update – REST API (Azure Resource Management) | Microsoft Learn for more details.
2. Provision the Virtual Network
- The below code is used for provisioning the Virtual Network
VNET_NAME = "python-sdk-azure-vm-vnet"
SUBNET_NAME = "python-sdk-azure-vm-subnet"
IP_NAME = "python-sdk-azure-vm-ip"
IP_CONFIG_NAME = "python-sdk-azure-vm-ip-config"
NIC_NAME = "python-sdk-azure-vm-nic"

# Get the management object for the network
network_client = NetworkManagementClient(credential, subscription_id)
#create nsg

nsg_params = NetworkSecurityGroup(id= "testnsg", location="East US", tags={ "name" : "testnsg" })
nsg = network_client.network_security_groups.begin_create_or_update(RESOURCE_GROUP_NAME, "testnsg", parameters=nsg_params)

#create nsg rule
poller=network_client.security_rules.begin_create_or_update(
    RESOURCE_GROUP_NAME,
    "testnsg",
	"SSH",
	SecurityRule(priority= 1250,
	protocol= 'Tcp',
	source_port_range= '*',
	destination_port_range= '22',
	source_address_prefix= '*',
	destination_address_prefix= '*',
	access= 'Allow',
	direction= 'Inbound',
	name= 'SSH',
	description= 'Allow SSH')
)

nsg_result=poller.result()
# Create the virtual network
poller = network_client.virtual_networks.begin_create_or_update(RESOURCE_GROUP_NAME,
    VNET_NAME,
    {
        "location": LOCATION,
        "address_space": {
            "address_prefixes": ["10.0.0.0/16"]
        }
    }
)

vnet_result = poller.result()
print(f"Provisioned virtual network {vnet_result.name} with address prefixes {vnet_result.address_space.address_prefixes}")
- The network_client.virtual_networks.begin_create_or_update method creates a new virtual network.
- The RESOURCE_GROUP_NAME, VNET_NAME, and LOCATION parameters specify the resource group, virtual network name, and location of the new virtual network.
- The address_prefixes parameter defines the address space of the new virtual network.
- The poller.result() method waits for the virtual network to be created and returns the result.
- Refer Network Security Groups – Create Or Update – REST API (Azure Virtual Networks) | Microsoft Learn for more details.
3. Create a subnet
- Below code is used for creating a subnet
poller = network_client.subnets.begin_create_or_update(RESOURCE_GROUP_NAME,
    VNET_NAME, SUBNET_NAME,
    { "address_prefix": "10.0.0.0/24"}
)
subnet_result = poller.result()
print(f"Provisioned virtual subnet {subnet_result.name} with address prefix {subnet_result.address_prefix}")
- We create a new poller object by calling the begin_create_or_update() method on the subnets collection of the network_client object.
- We pass in the resource group name, virtual network name, and subnet name as well as a dictionary containing the desired address prefix and network security group for the subnet.
- We call the result () method on the poller object, which blocks until the subnet has been created or updated, and then returns the resulting subnet object.
- Refer Subnets – Create Or Update – REST API (Azure Virtual Networks) | Microsoft Learn for more details.
4. Create the IP address
- Below code is used for creating the IP address.
poller = network_client.public_ip_addresses.begin_create_or_update(RESOURCE_GROUP_NAME,
    IP_NAME,
    {
        "location": LOCATION,
        "sku": { "name": "Standard" },
        "public_ip_allocation_method": "Static",
        "public_ip_address_version" : "IPV4"
    }
)
print(f"Provisioned public IP address {ip_address_result.name} with address {ip_address_result.ip_address}")
- The ip_name variable specifies the name of the IP address, and the resource_group_name variable specifies the name of the resource group it belongs to.
- The location variable specifies the location of the resource group.
- The sku variable specifies the SKU of the public IP address.
- The public_ip_allocation_method variable specifies that the IP address should be statically allocated.
- The public_ip_address_version variable specifies that the IP address should be an IPv4 address.
- Refer Public IP Addresses – Create Or Update – REST API (Azure Virtual Networks) | Microsoft Learn for more details.
5. Create the Network Interface Client
- Below code is used for creating the Network Interface Client
poller = network_client.network_interfaces.begin_create_or_update(RESOURCE_GROUP_NAME,
    NIC_NAME,
    {
        "location": LOCATION,
        "ip_configurations": [ {
            "name": IP_CONFIG_NAME,
            "subnet": { "id": subnet_result.id },
            "public_ip_address": {"id": ip_address_result.id }
        }]
    }
)

nic_result = poller.result()
print(f"Provisioned network interface client {nic_result.name}")
- The code above creates a network interface (NIC) named NIC_NAME and attaches it to a subnet with the ID subnet_result.id.
- The NIC also has an IP configuration named IP_CONFIG_NAME that uses the public IP address with the ID ip_address_result.id.
- Refer Network Interfaces – Create Or Update – REST API (Azure Virtual Networks) | Microsoft Learn for more details.
6. Create the Virtual Machine
- Below code creates a new VM.
ompute_client = ComputeManagementClient(credential, subscription_id)

VM_NAME = "PythonAzureVM"
USERNAME = "pythonazureuser"
print(f"Provisioning virtual machine {VM_NAME}; this operation might take a few minutes.")
poller = compute_client.virtual_machines.begin_create_or_update(RESOURCE_GROUP_NAME, VM_NAME,
    {
        "location": LOCATION,
        "storage_profile": {
            "image_reference": {
                "publisher": 'Canonical',
                "offer": "0001-com-ubuntu-server-focal",
                "sku": "20_04-lts-gen2",
                "version": "latest"
            }
        },
        "hardware_profile": {
            "vm_size": "Standard_D2s_v3"
        },
        "os_profile": {
            "computer_name": VM_NAME,
            "admin_username": USERNAME,
			"linux_configuration": {
				"disable_password_authentication": True,
					"ssh": {
						"public_keys": [{
							"path": "/home/{}/.ssh/authorized_keys".format(USERNAME),
							"key_data": "enter your ssh key here"
						}]
					}
				}

			},
        "network_profile": {
            "network_interfaces": [{
                "id": nic_result.id,
            }]
        }
    }
)

vm_result = poller.result()
print(f"Provisioned virtual machine {vm_result.name}")
- This code provisions a virtual machine using the compute management client.
- The VM_NAME, USERNAME, and LOCATION variables are used to specify the name of the VM, the user name for the VM, and the location of the VM.
- The poller variable is used to specify the create or update operation for the virtual machine.
- The vm_result variable is used to store the result of the create or update operation.
- Refer Virtual Machines – Create Or Update – REST API (Azure Compute) | Microsoft Learn for more details.
Link NSG to NIC
In this section we are adding the nsg group to NIC
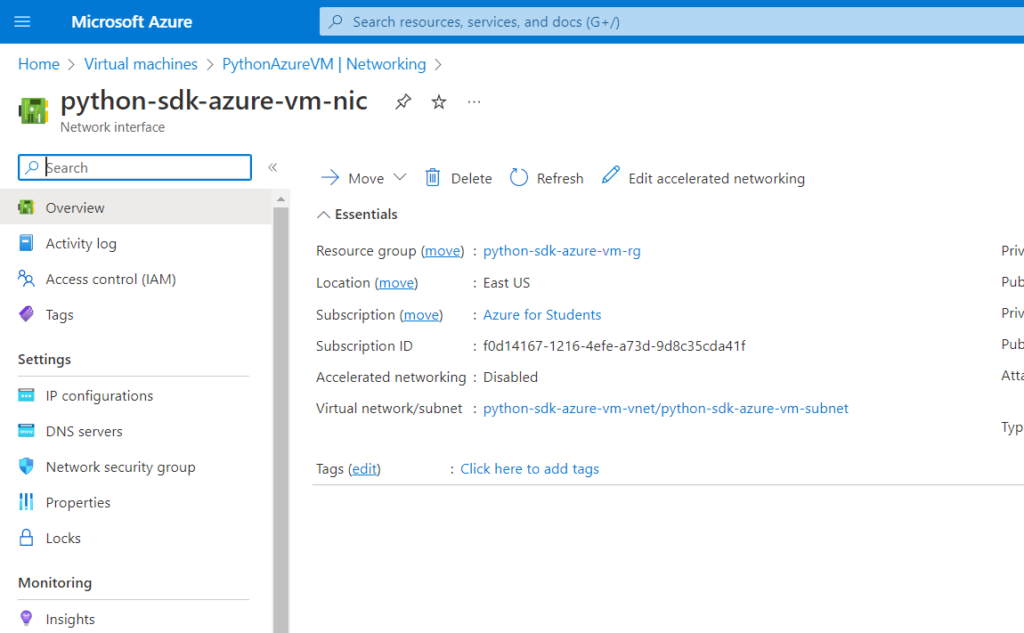
- login to portal.azure.com
- click on the new vm ‘PythonAzureVM‘ which was created just now.
- Now go to networking module which is in Settings section.
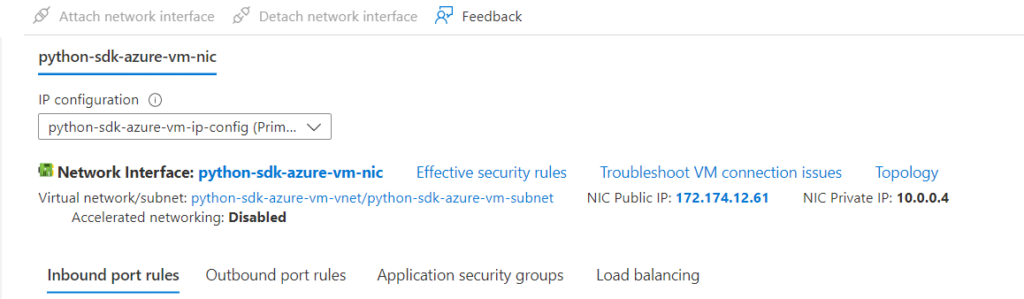
- Now click on the Network Interface you will be redirected to the following page
- Here click on the Network Security group in the settings section.
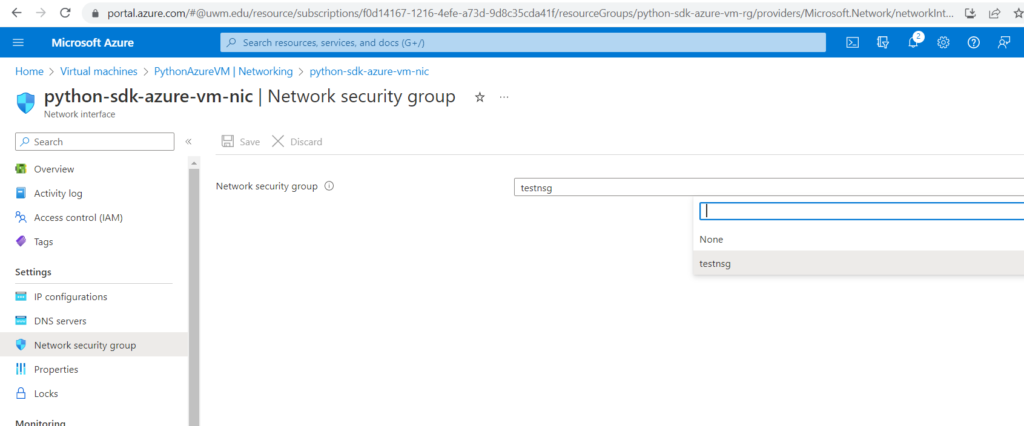
- Select the testnsg which was created earlier and save the section.
You can get the complete here.
Finally, you can see the below terminal output message without any errors.

Thanks for reading my blog.