In this blog, we will create and delete an S3 Bucket using Python SDK or Boto3.
We will make use of the inbuilt functions from Boto3 to create and delete an S3 bucket.
I’ll also be sharing tips for some error messages I encountered when working on this and these tips will be shared in their respective sections.
Initial steps
Before we get started with creating a Boto3 function let us make sure we have everything updated in the system.
sudo apt update && sudo apt upgrade -yThis will ensure all the packages are updated and upgraded. Make sure this command is run before proceeding with the next steps.
sudo apt autoremove -yThis is to remove any unwanted packages and clear space. This command is completely optional.
Getting started with AWS CLI
The first step is to ensure we have our AWS access keys configured. This step ensures the function can access our AWS resources using our development environment, in this case, VS Code.
Run the below command in a terminal to get started with the configuration.
aws configureOnce the command has been executed, you should be able to see something as shown below:

As you can see, the access key configuration was done before. In case you want to change the keys and region, you should be able to do it once the command has been executed.
To make sure you have the right credentials, you can navigate to .aws as shown in the image and run the below command:
cd .aws
cat credentials
This command will display the contents of the credentials file, which contains our Access key ID and Secret Access key. You can then use the values and replace them by running the configuration command.
Possible errors
In this section, I personally ran into an issue when running the configuration command. If you face the same error, I’ll show you how we can correct it.
Error: ImportError: cannot import name ‘docevents’ ….
If you come across a similar error after running the configure command, the following tip should work for you.
One of the reasons we see this error is due to the version of the awscli we have on our system. Once we update it, we should not having any issues.
As per the documents provided by Amazon, we can update or install awscli using the below command. It will download the version2 of awscli on our system.
curl "https://awscli.amazonaws.com/awscli-exe-linux-x86_64.zip" -o "awscliv2.zip"
unzip awscliv2.zip
sudo ./aws/install
The above commands should work. You can run the below command to check the version just to be sure.
aws --versionOnce done, try running the configuration command again. It should work.
For more information, please refer to AWS CLI Install/Update.
Creating S3 Bucket
Now, let’s get started with creating an S3 Bucket.
We will be writing a Python script to create an S3 Bucket.
Before we get started with the script let us make sure we have the right interpreter selected.
For VS Code, please use the keys ‘Ctrl + Shift + P’ to access the command palette and from there please select the Python interpreter which supports Python 3 or above.
For this exercise, we can go ahead with the recommended interpreter.
Note: Both the scripts function by creating a Client level API.
The script is given below:
import sys
import boto3
import botocore

def main():

    REGION = 'us-east-1'   # AWS region


    args = sys.argv[1:]
    if len(args) < 1:
        print('Not enough parameters.\n'\
              'Proper Usage is: python createS3.py <BUCKET_NAME>')
        sys.exit(1)

    bucket_name = args[0]
    print('Bucket name: ' + bucket_name)

    # Create an S3 Client
    s3_client = boto3.client('s3')

    # Create the bucket object
    try:
        print('Creating bucket ...')
        response = s3_client.create_bucket(ACL='private',
                                          Bucket=bucket_name)
        print(response)
        print('\nCreated')
        print(response['Location'])

    except botocore.exceptions.ClientError as e:
        if e.response['Error']['Code'] == "BucketAlreadyOwnedByYou":
            print("Error: Bucket already created and owned by you!!")
        elif e.response['Error']['Code'] == "BucketAlreadyExists":
            print("Error: Bucket already exist!!")
        elif e.response['Error']['Code'] == "InvalidBucketName":
            print("Error: Invalid Bucket name!!")
        else:
            raise

    return


if __name__ == '__main__':
    main()
In this code, the only section that needs updating is the region. Based on your region, update it accordingly. Here, the region of my instance is us-east-1.
Run the following command on the terminal:
python <filename.py> <bucket_name>Once executed, you should see the following output:

Once the bucket has been created we can check it under AWS Management Console
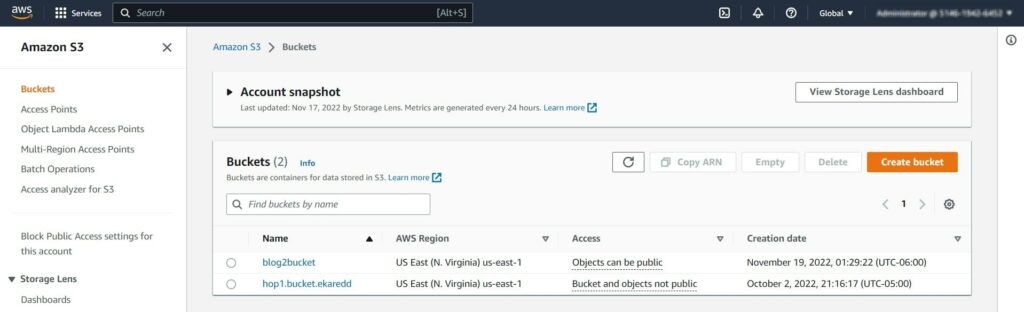
As you can see, the bucket has been created. We can upload objects and files into this bucket for our use.
With this, we have seen how we can create an S3 Bucket using Boto3.
Deleting S3 Bucket
Now let’s delete the bucket we just created.
Note: To delete a bucket, we need to make sure the bucket is empty. If it’s not empty we will not be able to delete it.
The python script is given below:
import sys
import boto3
import botocore

def main():

    args = sys.argv[1:]
    if len(args) < 1:
        print('Not enough parameters.\n'\
              'Proper Usage is: python deleteS3.py <BUCKET_NAME>')
        sys.exit(1)

    bucket_name = args[0]
    print('Bucket name: ' + bucket_name)

    # Create an S3 Client
    s3_client = boto3.client('s3')

    # Delete the bucket object
    try:
        print('Deleting bucket ...')
        response = s3_client.delete_bucket(Bucket=bucket_name)
        print(response)
        print('\nDeleted')

    except botocore.exceptions.ClientError as e:
        if e.response['Error']['Code'] == "NoSuchBucket":
            print("Error: Bucket does not exist!!")
        elif e.response['Error']['Code'] == "InvalidBucketName":
            print("Error: Invalid Bucket name!!")
        elif e.response['Error']['Code'] == "AllAccessDisabled":
            print("Error: You do not have access to the Bucket!!")
        else:
            raise

    return


if __name__ == '__main__':
    main()
Run the following command on the terminal:
python <filename.py> <bucket_name>Once executed, you should see the following output:

Lets now verify under AWS Management Console.
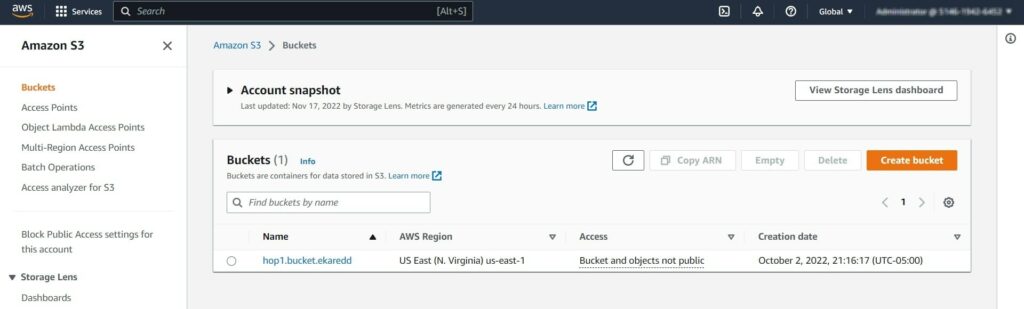
As you can see the bucket has been deleted successfully.
Thank you for reading!