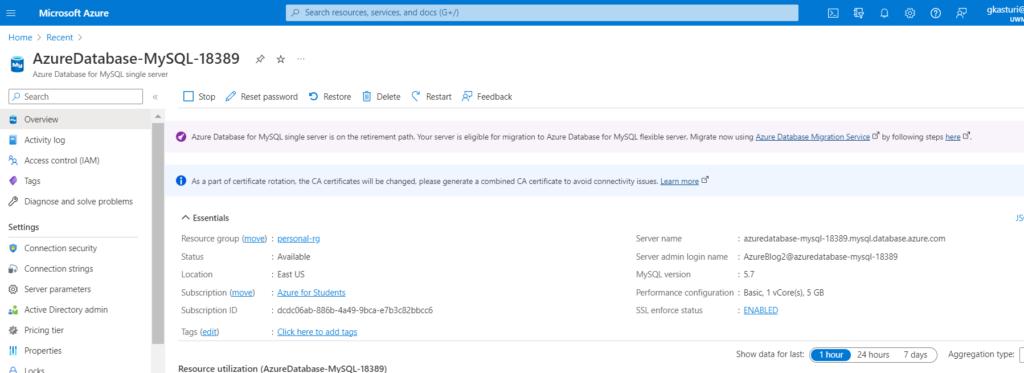
This blog will provide the steps that need to perform in order to create a database in Azure MySQL using Visual Studio Code.
1. Set up the Local Environment on Remote Desktop.
2. Install the Azure Libraries.
3. Code provisioning to create the database.
4. Code provisioning to insert the data into the database.
1. Setup the Local Environment
To Develop any Python application first need to create a local environment by creating an account in Azure and logging into Remote Desktop through the Bitvise SSH Client and Post login into Remote Desktop install all the required software such as Visual Studio Code, Python through the command line.
In order to set up the Python SDK and access Azure services please follow the below instructions:
Use Python SDK to access Cloud Storage-Azure
2. Install the Azure Libraries
This is step 2 where the installation of all the Azure Libraries should be taken place for that create a file named requirements.txt in the folder created through the command line and open it through the visual studio code using the commands:
mkdir Blog2
cd Blog2
code .
Then create a requirements.txt file in the Blog2 folder and these packages should be described in it:
azure-mgmt-resource
azure-mgmt-rdbms
azure-identity
mysql
mysql-connector
azure-mgmt-resource: This package is used in order to manage the resources and resource groups in the account.
Post that runs the install command for these libraries:
pip install -r requirements.txtThese libraries’ installation sums up the procedure of Step 2.
3. Code provisioning to create the database
Create a file named database.py in the Blog2 folder in Visual studio code:
import random, os
from azure.identity import AzureCliCredential
from azure.mgmt.resource import ResourceManagementClient
from azure.mgmt.rdbms.mysql import MySQLManagementClient
from azure.mgmt.rdbms.mysql.models import ServerForCreate, ServerPropertiesForDefaultCreate, ServerVersion

credential = AzureCliCredential()
subscription_id = "your_subscription_ID"

RESOURCE_GROUP_NAME = 'personal-rg'
LOCATION = "eastus"

resource_client = ResourceManagementClient(credential, subscription_id)
rg_result = resource_client.resource_groups.create_or_update(RESOURCE_GROUP_NAME,{"location": LOCATION })
print(f"Provisioned resource group {rg_result.name}")

db_server_name = os.environ.get("DB_SERVER_NAME", f"AzureDatabase-MySQL-18389")
db_admin_name = os.environ.get("DB_ADMIN_NAME", "AzureBlog2")
db_admin_password = os.environ.get("DB_ADMIN_PASSWORD", "Blog2pass#")
mysql_client = MySQLManagementClient(credential, subscription_id)
poller = mysql_client.servers.begin_create(RESOURCE_GROUP_NAME, db_server_name,
    ServerForCreate(
        location=LOCATION,
        properties=ServerPropertiesForDefaultCreate(
            administrator_login=db_admin_name,
            administrator_login_password=db_admin_password,
            version=ServerVersion.FIVE7
        )
    )
)
server = poller.result()
print(f"Provisioned MySQL server {server.name}")
RULE_NAME = "allow_ip"
ip_address = "20.25.163.22"
poller = mysql_client.firewall_rules.begin_create_or_update(
             RESOURCE_GROUP_NAME,db_server_name,RULE_NAME,{
               "start_ip_address": ip_address, "end_ip_address": ip_address })
firewall_rule = poller.result()
print(f"Provisioned firewall rule {firewall_rule.name}")
db_name = os.environ.get("DB_NAME", "example-db1")
poller = mysql_client.databases.begin_create_or_update(
RESOURCE_GROUP_NAME,db_server_name,db_name,{}
)
db_result = poller.result()
print(f"Provisioned MySQL database {db_result.name} with ID {db_result.id}")
Let’s see about the code fragments:
credential = AzureCliCredential()
- As in the Azure portal, we have credentials to log in and these can be obtained by the Azure CLI.
subscription_id = "your_subscription_ID"
- Acquire the subscription_id from the subscription blade from the Azure portal
RESOURCE_GROUP_NAME = 'personal-rg'
- The resource group should be created and assigned to the RESOURCE_GROUP_NAME variable, LOCATION will have the region of the place at which the resource group has been created.
db_server_name = os.environ.get("DB_SERVER_NAME", f"AzureDatabase-MySQL-18389")
db_admin_name = os.environ.get("DB_ADMIN_NAME", "AzureBlog2")
db_admin_password = os.environ.get("DB_ADMIN_PASSWORD", "Blog2pass#")- Providing the DB_SERVER_NAME, DB_USER_NAME, and DB_USER_PASSWORD to the variables and these values will have the naming constraints please read the below password policy protocols.
mysql_client = MySQLManagementClient(credential, subscription_id)- Let’s see what is MySQLManagementClient as we have passed our azure credentials and subscription_id as parameters. MySQLManagementClient provides create, read, update, and delete functionality for Azure MySQL resources including servers, databases, firewall rules, VNET rules, log files and configurations with the new business model.
- Please refer to the Azure Learn portal to know more about the MySQLManagementClient and what are the valid parameters which can be parameterized – https://learn.microsoft.com/en-us/python/api/azure-mgmt-rdbms/azure.mgmt.rdbms.mysql.mysqlmanagementclient?view=azure-python
mysql_client.servers.begin_create- Providing the server by parameterizing all the values, assigning to a variable, and waiting for the server to respond.
db_name = os.environ.get("DB_NAME", "example-db1")- Providing the Database name and assigning it to a variable.
Run the file using the command
python database.pyThe output will be:

There are some limitations that I faced with password policies and these are the rules for setting up the password:
- The password does not contain the account name of the user.
- The password is at least eight characters long.
- Latin uppercase letters (A through Z)
- Latin lowercase letters (a through z)
- Base 10 digits (0 through 9)
- Non-alphanumeric characters such as: exclamation point (!), dollar sign ($), number sign (#), or percent (%).
Adhere to these policies while creating the passwords in MySQL Azure Database.
4. Code provisioning to insert the data into the database
This is the final step in the blog where another file query.py will be created in the Blog2 folder in Visual Studio Code.

Please use the below code in the file query.py
import os,random
import mysql.connector

db_server_name = "azuredatabase-mysql-18389"
db_admin_name = os.getenv("DB_ADMIN_NAME", "AzureBlog2")
db_admin_password = os.getenv("DB_ADMIN_PASSWORD", "Blog2pass#")
db_name = os.getenv("DB_NAME", "example-db1")
db_port = os.getenv("DB_PORT", 3306)

connection = mysql.connector.connect(user=f"{db_admin_name}@{db_server_name}",
    password=db_admin_password, host=f"{db_server_name}.mysql.database.azure.com",
    port=db_port, database=db_name, ssl_ca='./BaltimoreCyberTrustRoot.crt.pem')

table_name = "students"
sql_create = f"CREATE TABLE {table_name} (name varchar(255), code int)"
cursor.execute(sql_create)
print(f"Successfully created table {table_name}")

sql_insert = f"INSERT INTO {table_name} (name, code) VALUES ('Gayatri', 790)"
insert_data = "('Gayatri', 790)"
cursor.execute(sql_insert)
print("Successfully inserted data into table")

sql_select_values= f"SELECT * FROM {table_name}"
cursor.execute(sql_select_values)
row = cursor.fetchone()
while row:
    print(str(row[0]) + " " + str(row[1]))
    row = cursor.fetchone()
Let’s see about the code fragments:
db_server_name = "azuredatabase-mysql-18389"
db_admin_name = os.getenv("DB_ADMIN_NAME", "AzureBlog2")
db_admin_password = os.getenv("DB_ADMIN_PASSWORD", "Blog2pass#")
db_name = os.getenv("DB_NAME", "example-db1")
db_port = os.getenv("DB_PORT", 3306)- This fragment of code will deal with the assignment of values, to check whether the Database has been created for the earlier program please check about the db_server_name in the azure portal at Azure Database for MySQL single server and will get the server name, db_admin-name, db_admin_password,db_name are the values which are given in the database.py file.
connection = mysql.connector.connect(user=f"{db_admin_name}@{db_server_name}",
    password=db_admin_password, host=f"{db_server_name}.mysql.database.azure.com",
port=db_port, database=db_name, ssl_ca='./BaltimoreCyberTrustRoot.crt.pem')- BaltimreCyberTrustRoot is the certificate needed to install & place in the Blog2 folder of VisualStudio Code as it is needed to communicate over SSL with our Azure Database for MySQL server. (Use the link below the code to install this certificate).
- Please use this link to download the Baltimore Cyber Trust certificate and save the certificate file to the same folder as the Python file:- https://www.digicert.com/CACerts/BaltimoreCyberTrustRoot.crt.pem
- Baltimore Cyber Trust Root is a part of DigiCert which provides all software and hardware that supports X.509 certificate functionality, such as web browsers, email clients, VPN clients, mobile devices, operating systems, etc.
- For issuing TLS Certificates to DigiCert customers, including international educational, financial, and governmental institutions, DigiCert root certificates are widely trusted and used.
table_name = "students"
sql_create = f"CREATE TABLE {table_name} (name varchar(255), code int)"- I have created a variable table_name and provided the value “students” which is the table name and created two columns in the student’s table which are name and code.
sql_insert = f"INSERT INTO {table_name} (name, code) VALUES ('Gayatri', 790)"
insert_data = "('Gayatri', 790)"
cursor.execute(sql_insert)- Post creation of the table I have inserted the values Gayatri & 790 into the table by using the insert_data variable and cursor.execute()
- Please refer to the link to know more about the MySQL Cursor methods – https://dev.mysql.com/doc/connector-python/en/connector-python-api-mysqlcursor-execute.html
Run the file using the command:
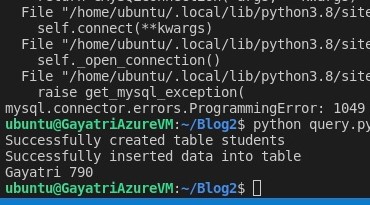
python query.pyThe output will be:

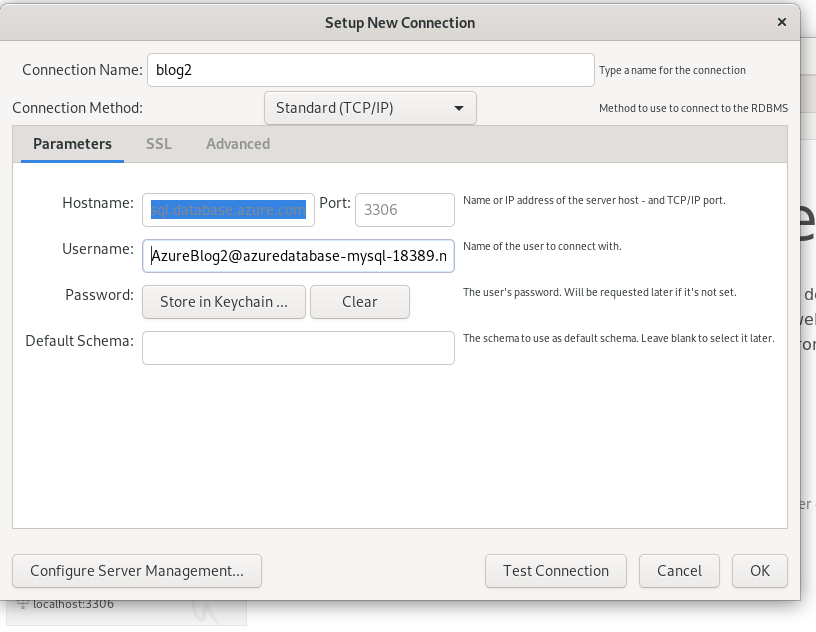
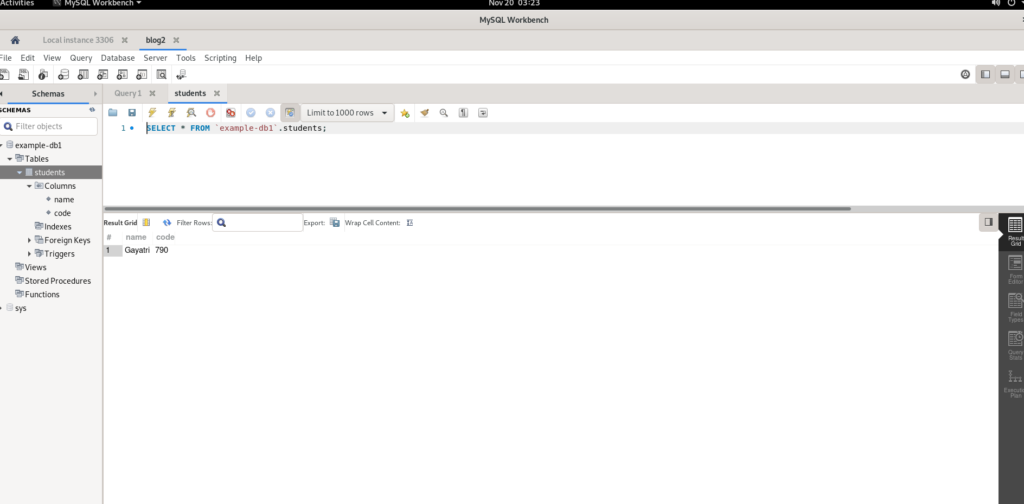
I have set up a connection in MySQL workbench in Remote Desktop Cloud PC for the database created.

The database looks like this:

Please refer to this video which I found useful for the Azure SQL database.
Thanks for reading my blog!!