AWS Lambda is a robust event-driven platform for serverless use-cases, one of which may be mass emailing. We will walk through the creation of such a function on AWS.
We want to facilitate this sequence of events:
- A user uploads a .csv file with email data to cloud storage (we’ll use AWS S3)
- This upload triggers a Lambda function
- The Lambda function reads the .csv file and sends its message to addresses that are also in the file.
Creating the Function
There are additional matters such as permissions which we will handle later. For now, let’s create the function.
Navigate to Lambda within AWS. Click create function. AWS features blueprints for functions, which can come in handy. We’ll try using the “Get S3 object” blueprint for Python. After selecting it, you’ll be prompted for “basic information”. Name your function and role. The role controls what permissions your function has. Note its name, because we will refer to it later.
Scrolling down, you’ll see a box for the S3 trigger, which is present because we chose the blueprint. Select a bucket that the .csv files will be uploaded to. If you don’t have one, you can go to a new tab, create the bucket, then come back and select it (click the refresh symbol inside the S3 box if you don’t see your new bucket as an option).
You will be forced to select the acknowledgement about recursive invocation. This isn’t relevant to us because we are not writing or uploading anything to S3 within our function.
Everything else can be left alone. Click “Create function” at the bottom.
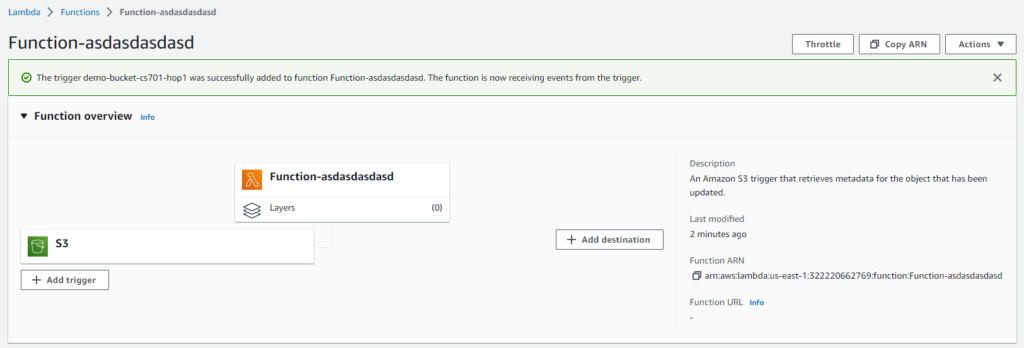
Our function is created, but you may get a notice that there was an issue validating destination configurations. Click “Add trigger”, find the S3 trigger again, and create it, and it should work. You will see this intuitive graphic showing that our function gets triggered by S3 and could in turn signal a destination (but we will not use this).
Programming the Function
Now it is time to write the function’s code. We can do this conveniently in AWS’s online console. Navigate to the code tab on this same page.
As a reminder, the function is triggered when a file is uploaded to the S3 bucket. We’ll first need to find and read the file before sending any emails.
We can get the bucket name and key (file name) from the event data, and using those we can request the file from the bucket. If the file is not a .csv file, we return immediately, because we are only interested in .csv files.
import json
import urllib.parse
import boto3
import botocore

print('Loading function')

s3 = boto3.client('s3')

def lambda_handler(event, context):

    print("Received event: " + json.dumps(event, indent=2))

    # Get the object from the event and show its content type
    bucket = event['Records'][0]['s3']['bucket']['name']
    key = urllib.parse.unquote_plus(event['Records'][0]['s3']['object']['key'], encoding='utf-8')

    if not key.endswith('.csv'):
        return

    response = s3.get_object(Bucket=bucket, Key=key)
Before we continue, let’s think about how the data is represented in the .csv file. Here is the format that I decided to use:
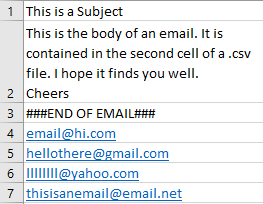
I have all data vertically stacked. The first cell is the subject, the second cell is the body, the third cell is to help with processing later, and the remaining cells are email addresses.
Next, we will get the text from the .csv file, and then process it. I created separate subject, body, and address variables. These are convenient things to print for the logs, in case they are related to bugs.
    text = response['Body'].read().decode('utf-8')
    text = text.split("\n")  # our elements are stacked vertically so we're using newlines

    emailBody = ""
    addresses = []
    subject = ""
    atAddresses = 0
    for i in range(len(text)):
        if i == 0:
            subject = text[0]
        elif "###END OF EMAIL###" in text[i]:
            atAddresses = 1
        elif not atAddresses:
            emailBody += text[i] + "\n"
        elif atAddresses:
            addresses.append(text[i])

    print(f"Subject: {subject}")
    print(f"Body: {emailBody}")
    print(f"Addresses: {addresses}")
Finally we will send the email. We need to specify additional variables such as sender (this may be you), charset (the character encoding), and the region. You need to provide the region associated with your SES identity.
Speaking of, naturally we can’t “just send the emails”. We will need an email service. AWS SES (Simple Email Service) is a convenient option. Access the SES service like any other service on AWS. You will provide an email address that you already own, and after you acknowledge a confirmation email, your email address will be verified for use with SES, and there will be a region associated with it.
Provide that region as AWS_REGION in this code, or the function will not be able to establish a connection to the email service.
One more thing: Unless you submit a “request for production access”, you will be kept in a “sandbox” environment. This means that you can only send emails from, and to, verified email addresses. You can manually verify more email addresses through SES.
    # Code adapted from AWS documentation.
    # This address must be verified with Amazon SES.
    SENDER = "Sender Name <demo@email.edu>"
    RECIPIENT = ""

    # Amazon SES region
    AWS_REGION = "us-east-1"  # If this is not set properly the function will fail to connect

    # The character encoding for the email.
    CHARSET = "UTF-8"
    # Create a new SES resource and specify a region.
    client = boto3.client('ses',region_name=AWS_REGION)

    # destinations = ','.join(addresses)
    # Try to send the email.
    try:
        for addr in addresses:
            response = client.send_email(
                Destination={
                    'ToAddresses': [
                        addr,
                    ],
                },
                Message={
                    'Body': {
                        'Text': {
                            'Charset': CHARSET,
                            'Data': emailBody,
                        },
                    },
                    'Subject': {
                        'Charset': CHARSET,
                        'Data': subject,
                    },
                },
                Source=SENDER,
            )
    except Exception as e:
        print(e.response['Error']['Message'])
    else:
        print("Sent!")
And that’s the whole function. Now we only need to concern ourselves with permissions.
Permissions for Function
If you’ve been following along, you can test your function by uploading a .csv file to the bucket associated with this function. If you check the logs (see the Monitoring tab on the function’s page) you will see that we get an error due to insufficient permissions. The function is not permitted to send emails.
To remedy this, first navigate to IAM (Identity and Access Management) from the main AWS page. Go to Policies, and click Create policy. Click over to the JSON editor, delete what is currently there, and paste this:
{
    "Version": "2012-10-17",
    "Statement": [
        {
            "Effect": "Allow",
            "Action": [
                "ses:SendEmail",
                "ses:SendRawEmail"
            ],
            "Resource": "*"
        }
    ]
}
Then click Tags, then Review. Add a name for this policy, such as EmailPermission. Click Create policy.
Now navigate to Roles, just above Policies. Find the role you made earlier for your function (I told you that you should note it!). It will probably be near the top of the list since it is recent. Select it, click Add permissions in its summary page, and click attach policies. Find the policy you just made, select the checkbox next to it, and click Attach policies at the bottom.
Since your function already has this role, it will automatically gain this new policy and thus its permissions. Now it will be able to send emails.
Test it out by uploading a .csv file, with the proper data, to your bucket.
Troubleshooting
There is a lot here that can go wrong. If you aren’t receiving the emails, check that all the data in your .csv is correct and that all variables in the function have appropriate values.
You can also look at the logs on the function’s monitoring page, which will contain information about exceptions and anything printed.
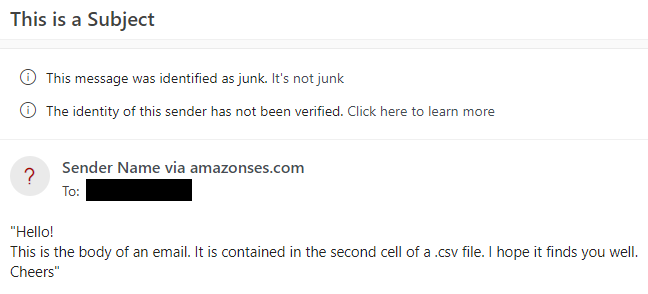
Finally, don’t forget to check you spam folder!