The cloud has revolutionized how businesses operate, and Amazon Web Services (AWS) is one of the leading cloud computing platforms. With AWS, developers can build applications and services without worrying about infrastructure. This blog post will look at how to use the Python boto3 library to manage EC2 instances on AWS. We’ll discuss setting up credentials, creating and deleting instances, and listing all running instances. With this knowledge, you’ll be able to use Python to quickly and easily manage your EC2 infrastructure.
Python boto3 is a library that allows developers to interact with the Amazon Web Services (AWS) API. Boto3 integrates your Python application, library, or script quickly with AWS services, including Amazon S3, Amazon EC2, Amazon DynamoDB, and more.
Boto3 was written from the ground up to provide native support for Python types and improve the library’s overall usability. The goal was to make it easier for developers to write Python code interacting with AWS services.
To setup Python SDK and access AWS services, use the below instructions:
Use the Python SDK to Access Cloud Storage – AWS
Setting up credentials for boto3:
The first thing you need to do when working with boto3 is to set up your credentials. Boto3 will look for your credentials in the following order:
Environment variables: AWS_ACCESS_KEY_ID and AWS_SECRET_ACCESS_KEY
Config file: ~/.aws/config
Credentials file: ~/.aws/credentials
Boto3 requires API access to your AWS account. This is done via an access key you create using the AWS IAM service. If you do not already have an access key, create one using the instructions here.
Once the access key is created, you can either copy Access Key Id and Secret Access Key to a secure location or download the .csv file. The Secret Access Key can be viewed or downloaded only one time. You cannot recover them later. However, you can create new access keys at any time.
Here is what the Access Key Id and Secret look like if you open the CSV file with Excel:

Once you have the above information use the below command to configure the AWS credentials.
aws configureAt the prompts, paste in
- Your Access Key Id. Press Enter
- Your Secret access key. Press Enter
- A default region. If most of your resources are in Ohio, enter us-east-2 for your default region. Press Enter
- A default output format. There are several choices for the default output format, but please choose json. Press Enter
When the aws configure command is complete, your credentials are stored in two files Config file and Credentials file on your VM’s file system.
You can find more information about setting up your credentials in the boto3 documentation here.
Creating a new EC2 instance using Boto3:
Before creating an instance first we need to create an EC2 key pair.
A key pair consists of a private key and a public key. These are required to be able to access an EC2 instance securely. Amazon stores the public key and we store the private key.
You can create an SSH key pair for your virtual machine using these instructions:
Creating an SSH Key Pair Using ssh-keygen
Import an SSH Public Key into EC2:
Upload the public key into the EC2 console:
- Open the Amazon EC2 console at https://console.aws.amazon.com/ec2/.
- In the navigation pane, choose Key Pairs.
- Under Actions. Choose Import Key Pair.
- For Key Pair Name, enter a name for the key pair.
- You can browse for your SSH key’s public key file (with .pub extension), or open it in a text editor and copy it into the text area below.
- Choose Import Key Pair.
Requirements for creating an EC2 instance:
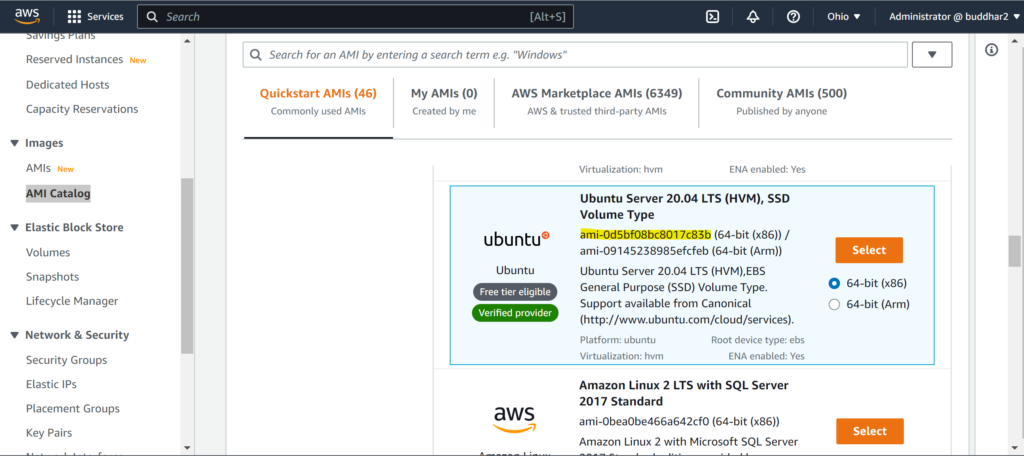
ImageId: An Amazon Machine Image (AMI) is required to launch an EC2 instance. You can either use one of the freely available AMIs provided by Amazon or create your own.
For this tutorial, we will use Ubuntu Server 20.04 LTS. To locate the ImageId
- Open the Amazon EC2 console at https://console.aws.amazon.com/ec2/.
- In the navigation pane, choose AMI Catalog.
- Choose any image from the catalog.
MinCount: This specifies the minimum number of EC2 instances you want to create
MaxCount: This specifies the maximum number of EC2 instances you want to create
InstanceType: The instance type for the EC2 instance. Information about all the instance types is available here.
KeyName: This will be the name of the keypair which we will use to access the created instance. If no KeyName is specified, we won’t be able to SSH into the EC2 instance.
Python program to create a new EC2 instance:
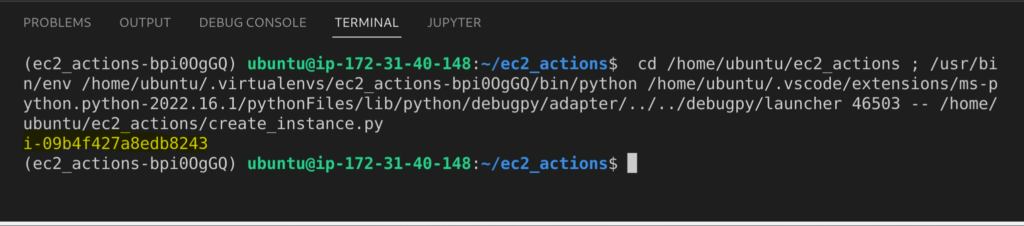
The below code creates an EC2 client and then uses it to create an instance using the specified image ID, minimum count, maximum count, and instance type. It also specifies the key name to use for the instance. Finally, it prints the instance ID of the created instance.
You can find the documentation here to know more about the boto3.
You can find the documentation here to know more about the run_instances.
import boto3
ec2_client = boto3.client("ec2", region_name="us-east-2")
instances = ec2_client.run_instances(
    ImageId="ami-0d5bf08bc8017c83b",
    MinCount=1,
    MaxCount=1,
    InstanceType="t2.micro",
    KeyName="<provide name of your imported SSH public key>"
)

print(instances["Instances"][0]["InstanceId"])
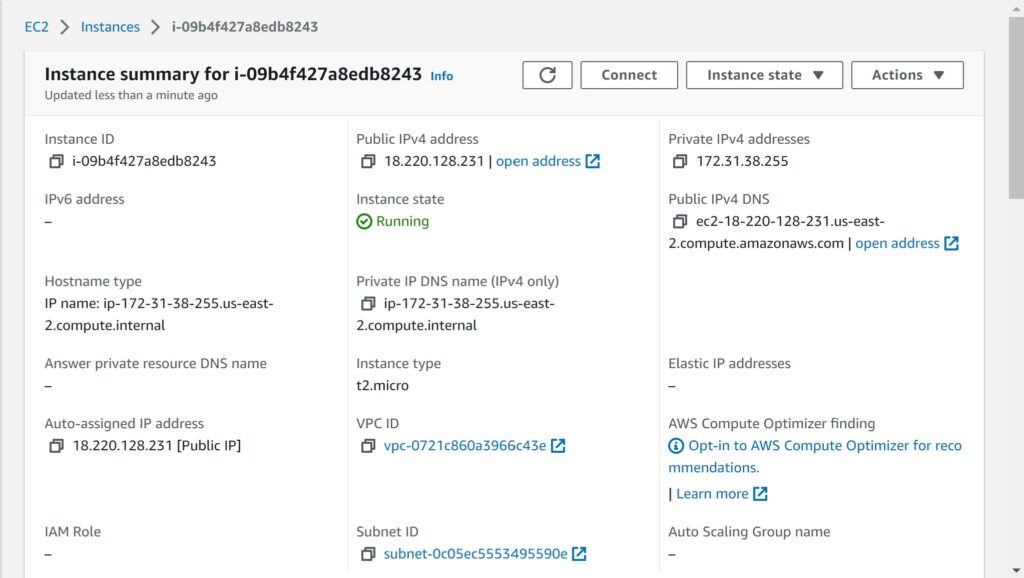
As you can see, the instance which we created through Python SDK can be seen from the AWS console.
List All running EC2 instances:
Python program to list all running EC2 instances:
The below code uses the describe_instances method on the ec2_client object, passing in a Filters parameter. This parameter only tells the API to return instances in a “running” state.
The API call returns a dictionary with a Reservations key. This key contains a list of dictionaries, one for each reservation.
For each reservation, the code loops through the list of instances in the reservation. For each instance, it prints out the instance ID, instance type, public IP address, and private IP address.
There is a lot of information returned from the describe_instances method. The information required to list the instance details from describe_instances includes the InstanceId, InstanceType, PublicIpAddress, PrivateIpAddress, and State.
You can find the documentation here to know more about the describe_instances.
import boto3
ec2_client = boto3.client("ec2", region_name="us-east-2")
reservations = ec2_client.describe_instances(Filters=[
    {
        "Name": "instance-state-name",
        "Values": ["running"],
    }
]).get("Reservations")

for reservation in reservations:
    for instance in reservation["Instances"]:
        instance_id = instance["InstanceId"]
        instance_type = instance["InstanceType"]
        public_ip = instance["PublicIpAddress"]
        private_ip = instance["PrivateIpAddress"]
        print(f"{instance_id}, {instance_type}, {public_ip}, {private_ip}")

Start/Stop/Terminate an EC2 Instance:
You only have to change the InstanceIds of your EC2 instance accordingly:
Python program to Start an Instance:
It calls the start_instances method on the client, passing in the instance’s ID to start.
You can find the documentation here to know more about the start_instances.
import boto3
ec2_client = boto3.client("ec2", region_name="us-east-2")
response = ec2_client.start_instances(InstanceIds=["i-09b4f427a8edb8243"])
print(response)
Python program to Stop an Instance:
It calls the stop_instances method on the client, passing in the instance’s ID to stop.
You can find the documentation here to know more about the stop_instances.
import boto3
ec2_client = boto3.client("ec2", region_name="us-east-2")
response = ec2_client.stop_instances(InstanceIds=["i-09b4f427a8edb8243"])
print(response)
Python program to Terminate an Instance:
It calls the terminate_instances method on the client, passing in the instance’s ID to terminate.
You can find the documentation here to know more about the terminate_instances.
import boto3
ec2_client = boto3.client("ec2", region_name="us-east-2")
response = ec2_client.terminate_instances(InstanceIds=["i-09b4f427a8edb8243"])
print(response)
Python is a great language for automating tasks, including managing of EC2 instances. Using the boto3 library, you can write scripts to provision and manage your EC2 instances. In this article, we’ve covered some of the basics of using boto3 to manage EC2 instances. With a little bit of Python knowledge, you can easily automate the management of your EC2 infrastructure.