Mobile push notifications are a useful tool for businesses to stay in touch with their customers and keep them informed about important updates, special offers, and other relevant information. Amazon Simple Notification Service (SNS) is a popular choice for sending push notifications to mobile devices, and Firebase can be used to easily integrate SNS with your mobile app. With the combination of Amazon SNS and Firebase, you can deliver timely, relevant notifications to your users, helping to keep them engaged with your app and improve their overall experience.
Overview
The purpose of this exercise is to create a simple application(Android one), integrate the firebase SDK and setup AWS SNS push notifications for that app. In this blog, we’re going to send push notifications to our mobile devices using Amazon SNS and firebase to our Android app.
Here are some reasons why it’s a good idea to do this:
Amazon SNS offers several benefits making it a versatile option for building and integrating loosely-coupled, distributed applications: Instantaneous, push-based delivery (no polling) Simple APIs and easy integration with applications. Flexible message delivery over multiple transport protocols.
- Retries: if the API call to FCM to send the push notification fails for some reason (networking issue, FCM having availability issues, etc.), then SNS will retry the deliveries for you, so as long as you successfully publish the message to SNS, it will be delivered eventually.
- Latency: publishing a message to SNS is asynchronous from its delivery and therefore is very fast, especially if you’re doing this from within AWS. This has the benefit that if you have a blocking process that tries to publish a message to multiple devices, this process may finish a lot faster.
- Throughput: if you wish to deliver a large number of messages quickly but do not have a lot of server capacity, letting SNS use its larger fleet to do the deliveries for you makes sense as it will result in more notifications getting delivered every second.
- Broadcasts: using SNS topics, you can make a single API call to fan out a notification to millions of devices. If you wanted to do this yourself, you’d have to make one call to FCM for each device.
- Device status: SNS will also keep track of which devices’ tokens are now invalid and invalidate the associated PlatformEndpoints for you. This removes some metadata that you might otherwise need to keep track of.
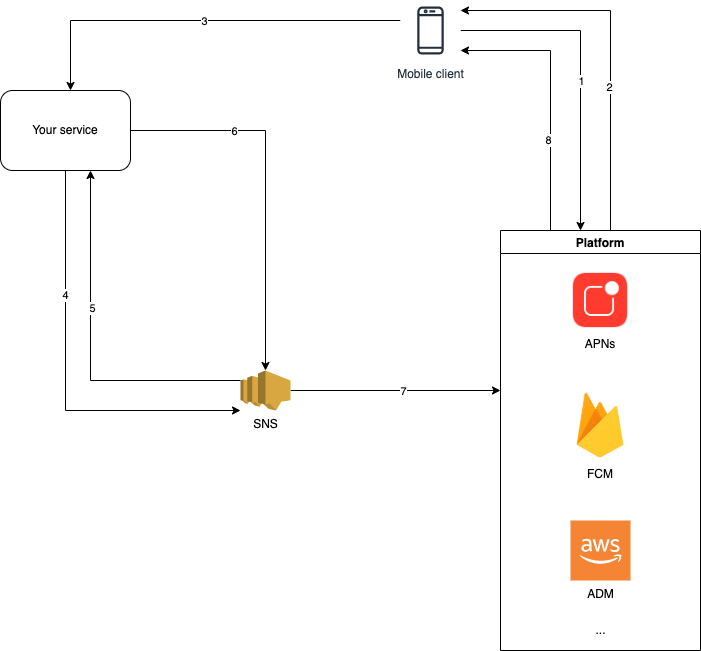
Overall architecture
Platform – These are services provided by mobile device builders (e.g. Apple, Google, Amazon) that transport the messages to the end devices. The Platforms offer device registration, app token creation and management, and the delivery channel for notifications to be delivered to devices. There are several different services that you can use to send push notifications to the users of your applications. The platform you use largely depends on which app store your customers use to obtain your app. The most common platforms are Apple Push Notification service (APNs), Firebase Cloud Messaging (FCM), Baidu Cloud Push, and Amazon Device Messaging (ADM).
Provider – The Provider allows app registration and messaging to be coordinated by your mobile apps backend system, to allow for event or schedule based interactions from your backend with your mobile app. They typically utilise underlining mobile platforms to communicate with your mobile app. Examples are AWS SNS, AWS Pinpoint, OneSignal, Expo Push API, etc.
Client – This is the mobile application running on a physical device or simulator.
The overall architecture looks like the following:
There are several activities to be completed. Here are the steps involved:
First, we need to build and setup android application but you don’t need to code it from the scratch; here’s the zip file. You can directly skip to creating a new project on firebase and then replacing google-services.json file that of your firebase project file on android app file(see step 5). Then you need to skip step 6, 7, 8 and jump directly to send a notification using firebase and complete the rest.
- Create a new project on Android Studio.
- Edit the MainActivity to get a device token.
- Create a new project on Firebase.
- Create a new app.
- Download the google-services.json.
- Edit the build.gradle files.
- Create a class to override the behavior when a notification is received, and the app is opened.
- Edit the Android Manifest file.
- Install the application on device or emulator.
- Send a notification using firebase.
- Create a Platform Application on AWS SNS.
- Create an endpoint using the device token.
- Publish the message to endpoint.
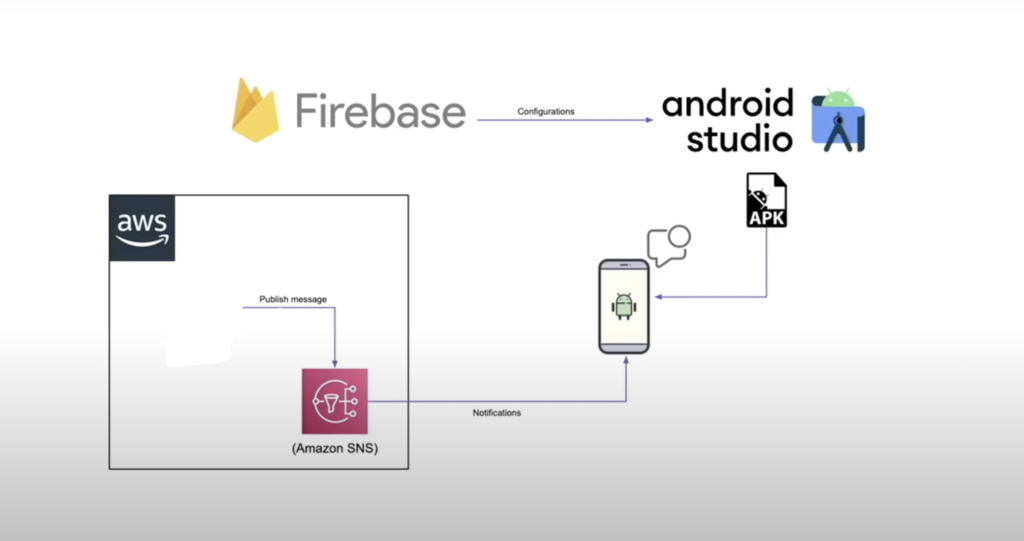
Now let’s take a visual look with a diagram with the components for what needs to achieve in this blog:
Create a new project on Android Studio.
Let’s start with creating a new Project on the Android Studio (I’m assuming we’re having Android Studio installed on our systems, if not you can install it from here) :
- Open the Android Studio -> Select New Project -> Select Basic Activity on the next tab -> Put your Application Name & copy the package name (we will use this firebase app setup) -> Click Finish.
Wait for sometime, Android Studio will create the project file then it will take you to MainActivity.kt file; which is just a main file for our simple application and we will be doing everything in this file and some minor changes in 2-3 different files.
- Now you can run the application by clicking the run app button just beside the emulator name (see the image below).

Edit the MainActivity to get a device token.
- When you run the application it will launch the application in the emulator defined in the left side of the run button as you can see in the above image.
- Then you will be navigated to MainActivity.kt file and it will have some basic template code for your app.
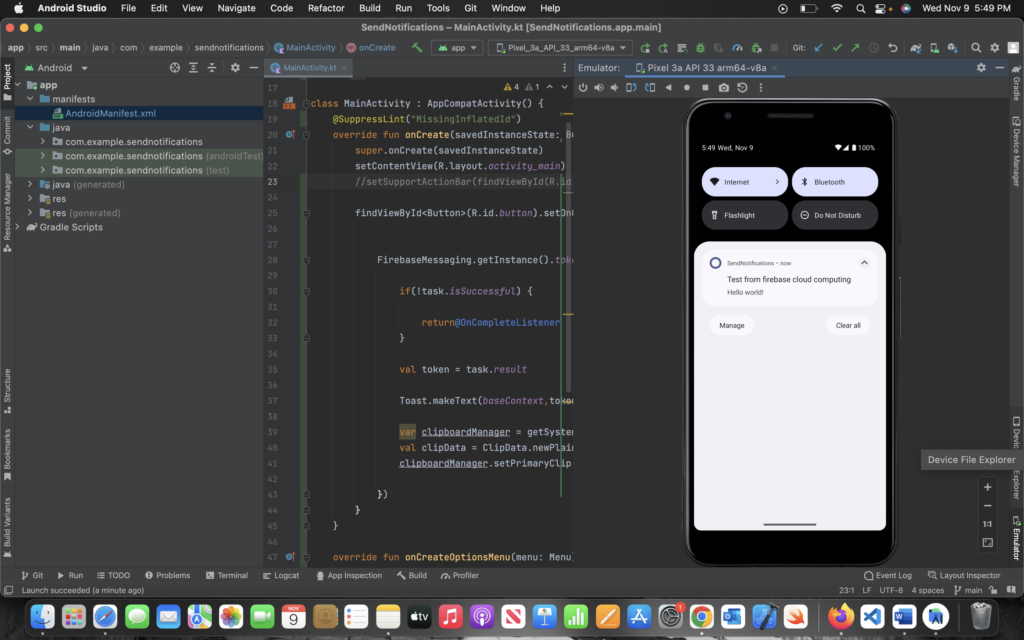
- Let’s start with writing a code block for generating a device and coping it to clip board, so, we can use that for firebase app and AWS SNS.
- Write this code inside the fab.setOnClickListener, so, that whenever the floating button get pressed it will call this firebase token method directly and worry about the Unresolved reference error for the FirebaseMessaging because we include dependency after this.
Kotlin:
FirebaseMessaging.getInstance().token.addOnCompleteListener(OnCompleteListener { task ->

    if(!task.isSuccessful) {
        return@OnCompleteListener
    }

    val token = task.result
    Toast.makeText(baseContext,token,Toast.LENGTH_LONG).show()

    var clipboardManager = getSystemService(Context.CLIPBOARD_SERVICE) as ClipboardManager
    val clipData = ClipData.newPlainText("text",token)
    clipboardManager.setPrimaryClip(clipData)

})
In the above code block, we’re just calling the token method of firebase and taking it result, coping it to clipboard.
Create a new project on Firebase.
Now let’s create a new app project on firebase and setup your device token. Let’s open firebase console and starting creating new project here. On the home, you will see add project button -> Click it -> Enter your project name(try to name after android application) -> Continue -> Enable Google Analytics(take the default) then Continue -> choose the default analytics account from drawdown then continue -> Give it a few moments, it will create your project then hit continue and you will redirect to your new project dashboard where you will see lot of options (but we will stick to cloud messaging & push notifications through android in this blog, feel free to explore if you want to) and on the front page you will see the adding firebase to your app title, under that you see the android, iOS, Web, Unity & Flutter icons.
Download and replace google-service.json config file
Now we will add our android app details here:
- Click on the Android icon -> Enter the Package name in the first field -> Enter your App nick name -> Click Register app.
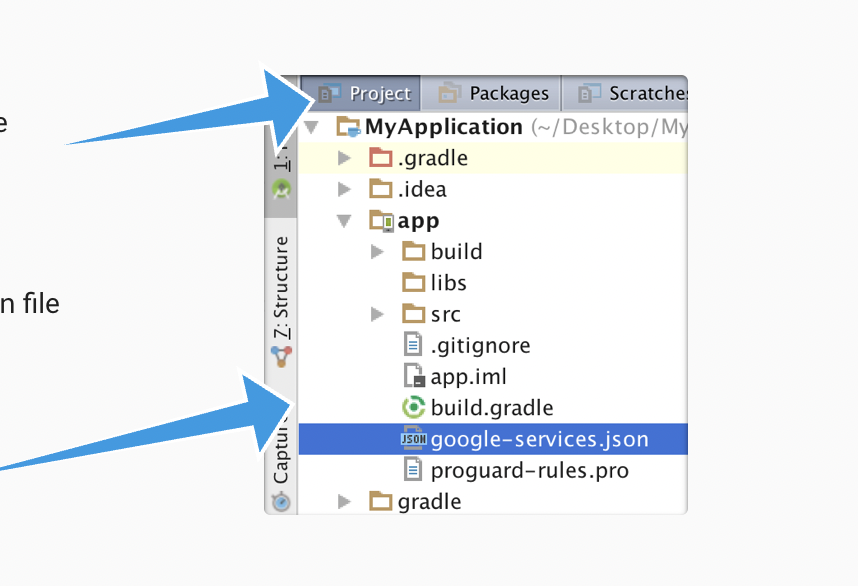
- Download the google-service.json config file (we need to add this in the android project in the app folder).
- To make the
google-services.jsonconfig values accessible to Firebase SDKs, you need the Google services Gradle plugin. - Add the plugin as a buildscript dependency to your project-level
build.gradlefile:
Root-level (project-level) Gradle file (<project>/build.gradle):
buildscript {
  repositories {
    // Make sure that you have the following two repositories
    google()  // Google's Maven repository

    mavenCentral()  // Maven Central repository

  }
  dependencies {
    ...
    // Add the dependency for the Google services Gradle plugin
    classpath 'com.google.gms:google-services:4.3.13'

  }
}

allprojects {
  ...
  repositories {
    // Make sure that you have the following two repositories
    google()  // Google's Maven repository

    mavenCentral()  // Maven Central repository

  }
}
Then, in your module (app-level) build.gradle file, add both the google-services plugin and any Firebase SDKs that you want to use in your app:
Module (app-level) Gradle file (<project>/<app-module>/build.gradle):
plugins {
  id 'com.android.application'

  // Add the Google services Gradle plugin
  id 'com.google.gms.google-services'

  ...
}

dependencies {
  // Import the Firebase BoM
  implementation platform('com.google.firebase:firebase-bom:31.0.3')


  // TODO: Add the dependencies for Firebase products you want to use
  // When using the BoM, don't specify versions in Firebase dependencies
  implementation 'com.google.firebase:firebase-analytics-ktx'


  // Add the dependencies for any other desired Firebase products
  // https://firebase.google.com/docs/android/setup#available-libraries
}
After writing these dependencies in grade build files, we will install these dependencies by running the build.
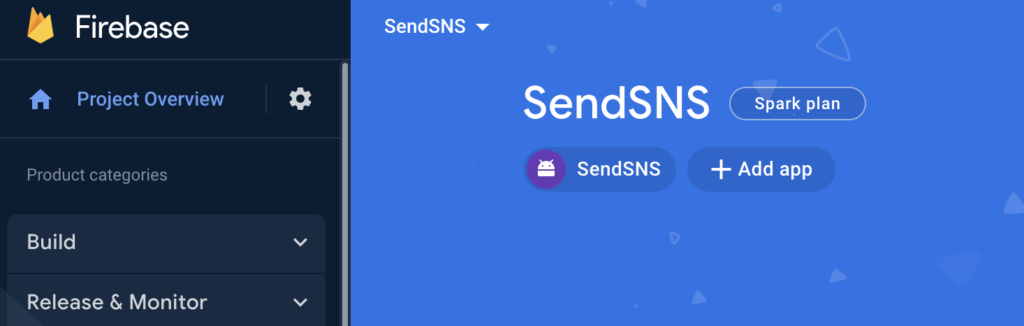
- Click next on the firebase webpage -> We’re done -> Continue to Console.
- Now, we can our on the dashboard on our firebase console (see below image for reference):
Create a class to override the behavior when a notification is received, and the app is opened.
For receiving the notification when the app is opened we will write a firebase class for overriding the behavior for our app.
We will create new file with the same class name called ‘MyFirebaseMessagingService’.
class MyFirebaseMessagingService: FirebaseMessagingService(){
    override fun onMessageReceived(remoteMessage: RemoteMessage) {
        Looper.prepare()
        Handler().post {
            Log.d("TAG", "onMessageReceived: ${remoteMessage.notification}")
            Toast.makeText(baseContext,remoteMessage.notification?.title, Toast.LENGTH_LONG).show()
        }

        Looper.loop()
    }

}
In the above code, we’re just inheriting FirebaseMessagingService() class and overriding onMessageReceived() method to show our notifications even when app is open.
We’re almost done with our app code activities, let’s just finish the last step for editing the Android Manifest file.
Edit the Android Manifest file.
- Open the AndroidManifest.xml file from the manifests folder in your project directory.
- We need information about the MyFirebaseMessagingService that we created above here. So, at run time it can access the code and use it for notification actions.
       <service
            android:name=".MyFirebaseMessagingService"
            android:exported="true">
            <intent-filter>
                <action android:name="com.google.firebase.MESSAGING_EVENT"/>
            </intent-filter>

        </service>
- Step 9 and 10 are optional in the activity list because we will use the emulator in the Android Studio to test our app but if you want to install the app on your android device just connect and select your android device to the android studio if it shows up there (otherwise we might have to do some more things and that’s out of scope for this blog).
Send a notification using firebase.
Finally, Let’s test the notifications from Firebase Cloud Messaging.
- Go to the dashboard -> Scroll down to cloud messaging tile and select it -> Create your first campaign -> select first option from the dialog popup which is Firebase Notification messages -> Create.
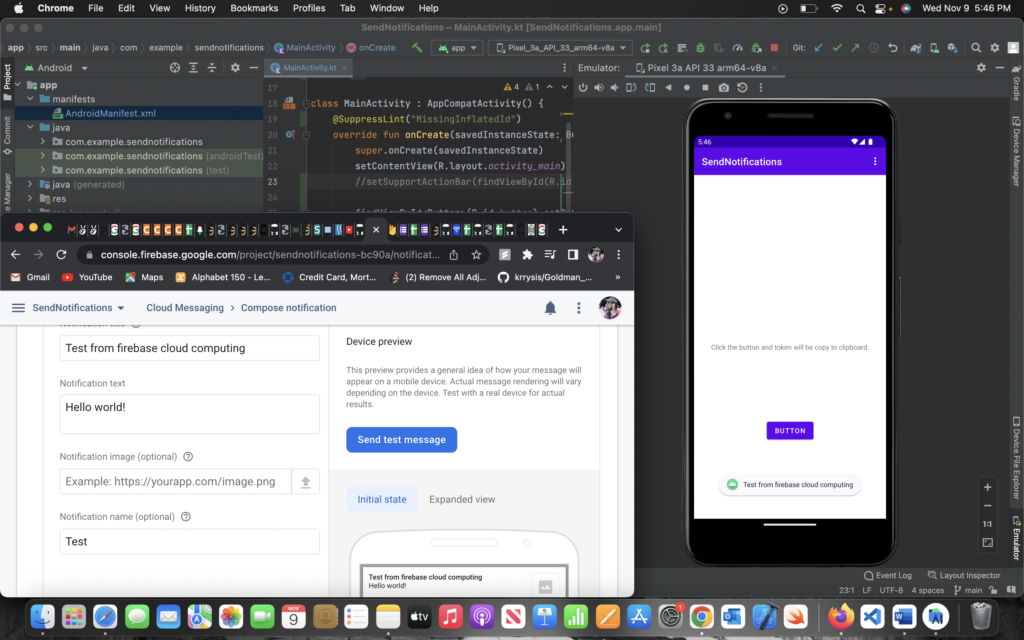
- Enter notification title (this is the title you will see in your notification) -> enter the notification text -> then click on the send message button on the right.
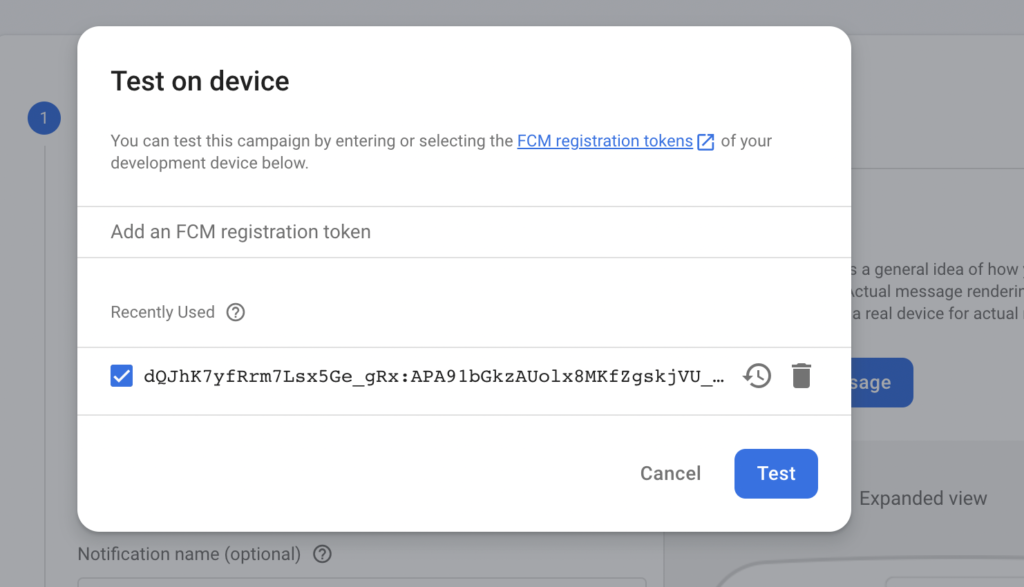
- After that a popup will appear for you to add your device token that we’re generating through app. Now, we need to copy that token from our device using android app and paste it into the add an FCM registration token & click on + sign then select added token -> Click on Test button.
After sending the test notification, we can check our app that is running in the emulator or device or we can check Notification Center on our mobile for notification from firebase.
Create a Platform Application on AWS SNS
- Navigate to Console Home –> SNS -> Select Push notifications from left menu drop down.
- Create platform application -> Application name for your app.
- For push notifications platform choose Firebase Cloud Messaging FCM
- Now we need to copy and paste firebase generated key from console.
- Navigate to Project settings on Firebase console -> Cloud Messaging tab -> Cloud Messaging API (Legacy)(Enabled if it’s disabled) -> Copy Server key -> Paste it into the API key field.
- For the rest we will take the default -> Create platform application.
Now you will be navigated to SNS dashboard where you can see your platform application with status enabled.
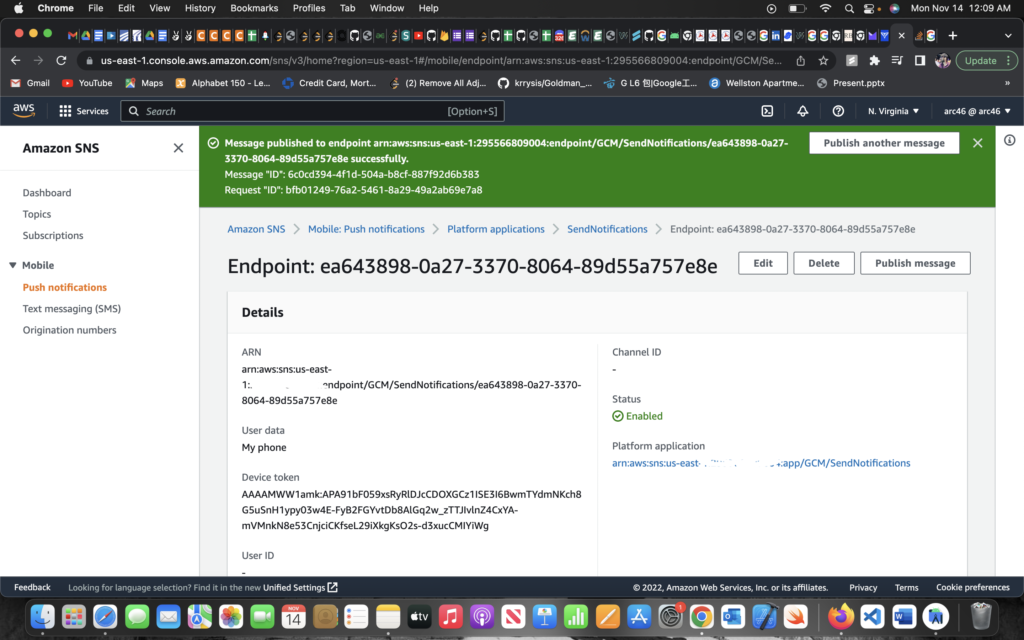
Create an application endpoint
- Copy your device token from your android app and keep it handy.
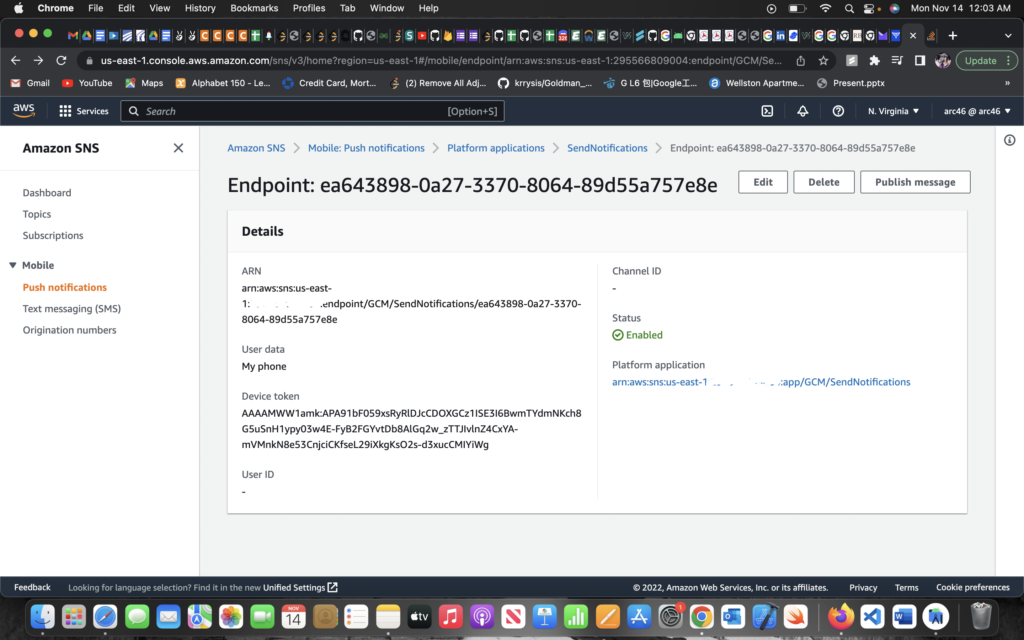
- Click Create application endpoint -> enter device token -> for user data just enter MyPhone -> Create application endpoint.
- Now you can see your target ARN with status enabled.
Let’s publish a message using AWS SNS to our app
- Click on public message -> In the message body section -> select custom payload option.
- Now we will paste the correct format for notifications in the JSON object field.
{
"GCM": "{\"notification\": { \"body\": \"Sample message for Android SNS AWS\", \"title\": \"Hello world from AWS SNS\" } }"
}
- And finally we’re going to publish message to our app.
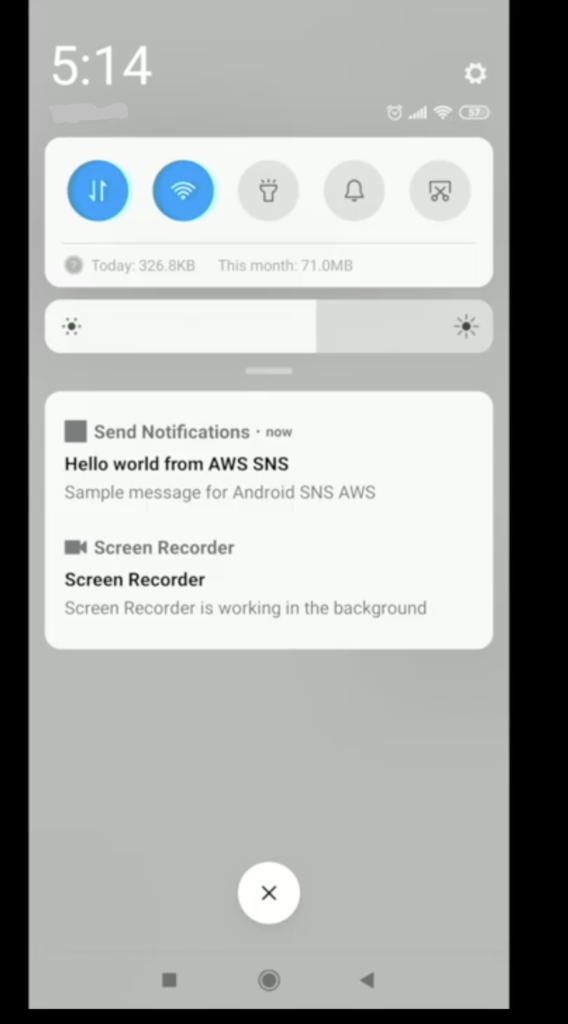
That’s it for now. If you enjoyed this article, share it with your friends and colleagues!
More About Mobile push notifications through AWS SNS
You can learn more about mobile push notification on AWS SNS through this link.
For more information about mobile push notifications on AWS SNS, here’s a good YouTube video to watch.
We will try to explore Push Notifications Using AWS Lambda for our future work.
Here’s the source code for android app.
Thank you!