This is step 1 of 6 of Hands-On Project 4 for Azure. In this step, you create a virtual network (VNet) that is suitable to connect your production PaaS resources.
Planning
In order to create a virtual network that will meet our requirements (and not require rework after creating it), it helps to do a bit of planning in advance. Following are a few considerations that we want to take into account before we create the virtual network:
- We want to be able to peer the new production VNet with the existing VNet that our cloud PC is connected to. To make this work smoothly, we want to choose an address range for the new VNet that does not overlap with the existing one.
- We want to connect our AppService web server to the production VNet. To make this connection, we need to do something called “delegating” a subnet within the VNet to the AppService. Essentially, this means that we will be dedicating a whole subnet to the AppService – no resources other than AppService resources can be connected to the delegated subnet.
- We want to connect our MySQL database server to the production VNet. Similar to the AppService, we need to delegate a full subnet to the database service.
Create a New Resource Group
To group the resources for this project, create a new resource group in the Azure portal, and create all the resources for this project within this new group. If you are using an Azure for Students account, you need to select a region for your resource group and resources that will allow you to create everything. As of this writing, the East US Region is allowing you to create the resources we use in this project.
Create the VNet and Subnets
- In the portal, navigate to the Virtual Networks service. View your existing virtual networks and note the IP address range for each of them.
- Click Create to create a new VNet. Name your new VNet and put it in your new resource group, then click on IP Addresses.
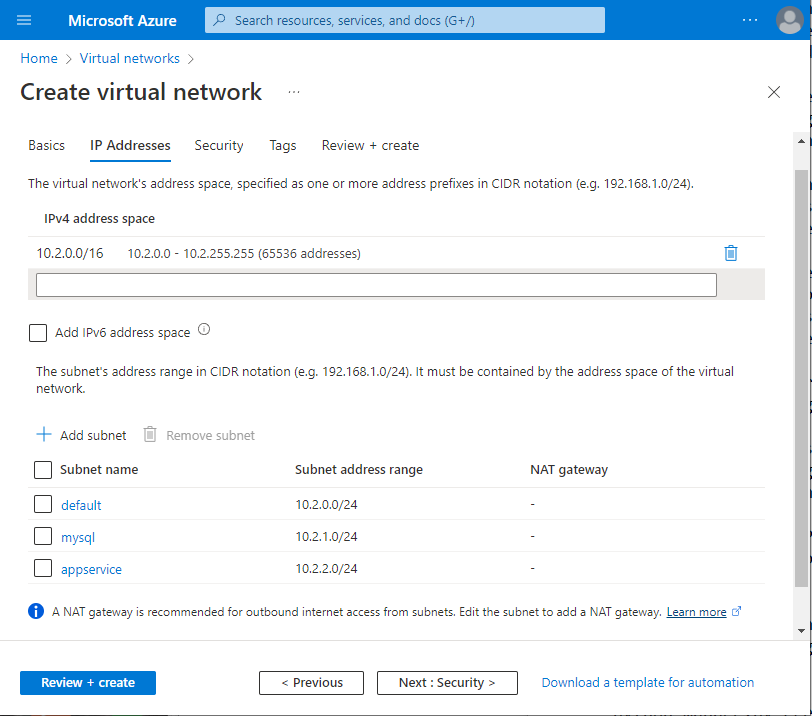
- On the IP Addresses tab, verify that the suggested address range does not overlap with one of your existing VNets. If it overlaps, choose a different address range. Azure usually suggests to use a /16 CIDR address. This is quite fine, since it provides a very large range of addresses.
- Also on the IP Addresses tab, create two subnets above and beyond the default subnet filled in by default. Give the subnets meaningful names. One suggestion is ‘mysql’ for the database subnet and ‘appservice’ for the web server subnet.
- When done, Review and Create the VNet.
Just prior to creating the virtual network, the setup will look similar to this:
Delegate the Subnets to PaaS Services
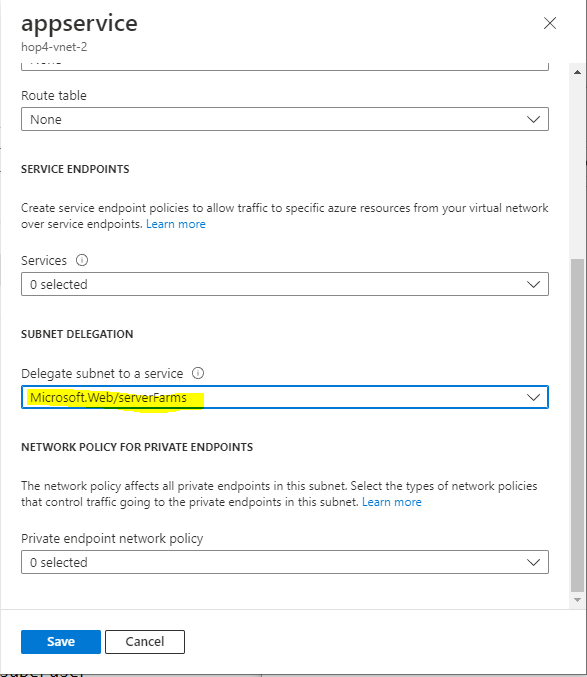
Once the subnets have been created, we need to delegate the subnets to specific platform services.
- In the portal, navigate to the Subnets page for your new VNet.
- Click on your database subnet (e.g. mysql). Scroll down to Subnet Delegation, and choose Microsoft.DBforMySQL/flexibleservers from the dropdown. Click Save.
- Click on your web server subnet (e.g. appservice). Scroll down to Subnet Delegation and choose Microsoft.Web/serverfarms from the dropdown. Click Save.
The following screenshots illustrate this process, and what the Subnets page looks like when it is done


Your Virtual Network is Ready
After completing the above steps, you are ready to proceed with the next step in the project.